Initiating software scans
During the software scans, the scanner collects information about files with particular extensions, package data, and software identification tags to evaluate whether particular software is installed on the computers in your infrastructure. It also gathers information about the running processes to measure software usage. By default, software scans are scheduled to run regularly but you can specify the exact days and times of the scans, or modify their start and end dates.
Before you begin
Backups of software directories that are stored on the endpoints might be reported as separate software instances. It might result in false discoveries and incorrect license consumption. To avoid this problem, either exclude the backups from scanning or compress them with a data compressor.
- Archived files such as ZIP or RAR files
- Paths that contain certain whitespace characters and other special characters. To avoid a situation in which software is not discovered, ensure that file paths in your infrastructure do not contain the unsupported characters. For more information, see: Limitations.
About this task
If you enabled the default scan configuration, software scans are initiated by default and this configuration is not required.
Software scan is resource-consuming, and its duration depends on the number of files in the file system. To minimize the impact of the scan, schedule the software scan for the period that is least critical for your environment, for example, at night or during the weekend. Software scan needs to be run with frequency that is adjusted to the dynamics of the environment, but typically few times per each reporting period. For information about default and minimal scan frequency, see: Frequency of scans and uploads of data.
Additionally, to minimize the impact of the scan, you can set up a CPU threshold for the scan, and optimize the cache configuration. For more information, see: Optimizing scanner cache configuration.
Procedure
- Log in to the BigFix console.
- In the navigation tree, click .
-
Select Initiate Software Scan.
If the task is not applicable, see: Scan problems.
-
To ensure complete software discovery, select all types of scans under the Software
Discovery section.
Different types of scans search for different types of information to determine whether the software is installed or to measure its usage. Generally, all types of scans should be run regularly. However, you can choose to run different types of scans at different times or distribute the scan schedule over the computers in your environment to improve the performance of the import. For more information, see: Types of software scans.
 To discover software that is installed on Mac OS X, run the package data scan on Mac
computers. To measure application usage, activate the Application Usage Statistics analysis and run
the application usage statistics scan. Other types of software scan are not necessary and are
ignored on Mac OS X.
To discover software that is installed on Mac OS X, run the package data scan on Mac
computers. To measure application usage, activate the Application Usage Statistics analysis and run
the application usage statistics scan. Other types of software scan are not necessary and are
ignored on Mac OS X. -
To see license metric utilization on BigFix Inventory
reports, select the relevant options under the Additional Scan Capabilities
section.
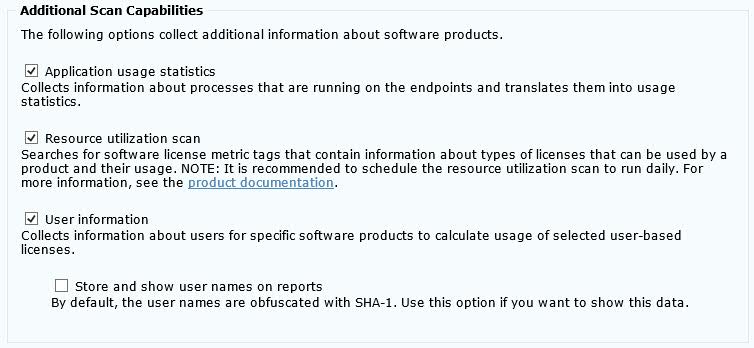
Note: The resource utilization scan collects information contained in .slmtag files. The license metric quantity for these products is based on the .slmtag data and is reported on All Metrics and All IBM Metrics panels . To ensure that the reported data is accurate and current, it is recommended to schedule the resource utilization scan to run daily. If you prefer to run the remaining scans at different times, run the Initiate Software Scan fixlet for resource utilization scan separately. - Optional: To enable scanning of shared disks in basic mode, select Scan remote shared disks. The basic mode is advised for environments where a single shared disk is mounted on a single computer or a few computers. However, this mode is only one of the available solutions. Before selecting this option, see: Discovering software on shared disks.
- Optional: To limit the amount of processor
resources that the scanner consumes, select Initiate the
software scan with CPU threshold. Specify the consumption
limit that is in the range 5 - 100.The higher value you specify, the higher is the consumption limit. For example, if you specify 75, scanner processes use the average of 75% of the processing power of the target computer.Important: Setting the threshold does not guarantee that the CPU consumption is always below the specified value. It fluctuates around that value, sometimes exceeding it and sometimes dropping below it. Temporary peaks are expected. The setting does not apply to Mac OS X because the scanner is not installed on these
computers.

- To start the scan, click Take Action.
-
Select the computers on which you want to initiate the scans.
Only local drives are scanned on the selected computers. For information about scanning shared disks, see: Discovering software on shared disks.Tip: To ensure that the action is applied on all computers that are added in the future, select Dynamically target by property.
- Optional:
By default, the scans are scheduled to run weekly. If you want to specify the dates and
frequency of the scans, open the Execution tab. Specify the details, and
click OK.
For information about default and minimal scan frequency, see: Frequency of scans and uploads of data.