Installing the scanner
The scanner collects hardware information as well as information about files and packages that exist on the computers in your infrastructure. Install the scanner on every computer on which you want to detect software. If you enabled the default scan configuration, the scanner is installed automatically and this configuration is not required.
Before you begin
- Ensure that the BigFix client is installed and running on the computers on which you want to detect software and that the computers are subscribed to the IBM BigFix Inventory v9 site.
- To install the scanner on a WPAR, you must install it on the LPAR first.

 Ensure that on AIX the
 xlC.rtelibrary version 13.1.0.0 or higher is installed on the target computer. Ensure that on Red Hat Enterprise Linux 8.0 the
 libnsl.so.1library is installed on the target computer. The last version of the scanner for 32-bit Linux x86 with thelibstdc++.so.5library is 2.8.0.3000. Ensure that the
 libstdc++.so.6library is installed on the target computer. Software discovery on Mac OS X does not require installing the scanner nor scheduling
regular uploads of scan results. To enable the discovery, it is enough to run the package data
scan.
Software discovery on Mac OS X does not require installing the scanner nor scheduling
regular uploads of scan results. To enable the discovery, it is enough to run the package data
scan.
About this task
The scanner can be used by multiple IBM applications. By default, the scanner that is delivered with BigFix Inventory is installed in the single user mode. It means that if it is used by other applications, it must be run by root (UNIX) or SYSTEM (Windows). If any of the applications requires that the scanner is run by a different user, install it in the regular mode. For more information, see: Using CIT deployed by LMT/BFI 9 by other IBM products.
Procedure
- Log in to the BigFix console.
- In the navigation bar, click .
- In the upper right pane, select Install or Upgrade Scanner.
-
 Select the installation directory. You can choose the default directory, or an alternative
one. In the latter case, the scanner is installed in the same path as the BigFix client.
Note: The setting applies only to new installations, you cannot change the path if you are upgrading the existing scanner.
Select the installation directory. You can choose the default directory, or an alternative
one. In the latter case, the scanner is installed in the same path as the BigFix client.
Note: The setting applies only to new installations, you cannot change the path if you are upgrading the existing scanner.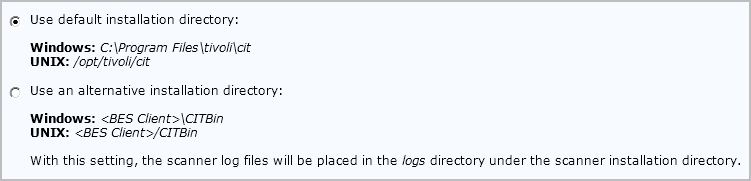
- Click Take Action.
- Select the computers on which you want to install the scanner, and click
OK.Note: To install the scanner on a WPAR, install it on the LPAR first.

Tip: To ensure that the action is applied on all computers that are added in the future, select Dynamically target by property.