Troubleshooting No VM Manager data
Troubleshoot, and understand why the VM Manager data cannot be retrieved by BigFix Inventory. Apply the listed solutions for the
VM Manager connections with  No VM Manager data.
Background
The basic virtual environment is configured with one central VM Manager Tool that is installed on the same computer as the BigFix server. However, you can use a more complex environment, with many VM Manager Tools. Each tool must be connected with every hypervisor that is configured for this VM Manager, and the results from every such hypervisor must reach BigFix Inventory.
Before you start troubleshooting the issue, collect the following information:
- The number of VM Manager Tools that are installed in your environment.
- The number of hypervisors to be connected.
- Valid credentials with sufficient rights to log in to hypervisors.
![]() Starting from application update 9.2.12, you do not need to go to the computer where
VM Manager Tool is installed, to get the data that are needed
for troubleshooting purposes. When cannot retrieve VM manager data from a computer, go to the Computer
Support Data panel and download the logs from the related computer to investigate the
issue. For more information about how to download the log package, see: Collecting logs for troubleshooting purposes.
Starting from application update 9.2.12, you do not need to go to the computer where
VM Manager Tool is installed, to get the data that are needed
for troubleshooting purposes. When cannot retrieve VM manager data from a computer, go to the Computer
Support Data panel and download the logs from the related computer to investigate the
issue. For more information about how to download the log package, see: Collecting logs for troubleshooting purposes.
Reasons behind the data retrieval failure
- The hypervisor connection is not defined.
- VM Manager Tool cannot connect to the hypervisor to collect the data.
- VM Manager Tool does not generate results, or does not properly communicate them to BigFix Inventory.
- VM Manager Tool collects invalid or incomplete results.
Troubleshooting
- Check whether all VM Managers are added to BigFix Inventory.
-
- Log in to BigFix Inventory.
- Go to , and check whether all the VM Manager connections are defined. If not, see: Adding VM
Managers in central mode or Adding VM Managers in distributed mode.Note: Make sure that the VM Manager URL is in the correct format. The format differs between technologies, and versions.
- Check whether all VM Manager connections are in the
 OK status.
 - If any of the VM Manager connections is in status other than OK, refer to: VM manager statuses.
- Check whether VM Manager Tool is properly configured.
-
- Check whether the VM Manager Tool is properly installed and configured.
The VM Manager Tool is installed in the BESClient/LMT/VMMAN directory.
- To ensure that the tool was installed successfully, log in to the BigFix console.
- Click Actions in the navigation tree, and select Install VM Manager Tool.
- Switch to the Computers tab, and check whether the status is set to Completed.
- If the installation failed, check which line of the action script caused the failure.
Double-click the listed computer, and analyze the View Action Info to find
the relevant line.
If you cannot find the Install VM Manager Tool action, see: Troubleshooting: Enabling the VM Managers panel.
- Run the following command and check whether the VM Manager Tool is working.
 BESClient/LMT/VMMAN/vmman.sh -run
 BESClient\LMT\VMMAN\vmman.bat -run
 - Test the connection to VM Managers by running the following command.
BESClient/LMT/VMMAN/vmman.sh -testconnection
BESClient\LMT\VMMAN\vmman.bat -testconnection
- Check the statuses of the VM Managers by running the following command.
BESClient/LMT/VMMAN/vmman.sh -status
BESClient\LMT\VMMAN\vmman.bat -status
- Check whether the VM Manager Tool is properly installed and configured.
- Check whether VM Manager Tool results are generated and properly communicated to the License Metric Tool server.
-
- Check whether the scan results files are packed for upload.
- Go to Computer Support Data panel and collect the logs from the computer that you need to investigate. For more information about how to download the log package, see: Collecting logs for troubleshooting purposes.
- Go to the following directory.
-
\sha1_files\logcollector_0_computer_id_logCollectorAgent.tar\computer_id_logCollectorAgent\var\opt\BESClient\LMT\VMMAN\computer_id
-
\sha1_files\logcollector_0_computer_id_logCollectorAgent\Program Files
(x86)\BigFix Enterprise\BES
Client\LMT\VMMAN\computer_id_vmman.zip
- If the result files are not packed for upload, check whether the upload is scheduled.
- Log in to the BigFix console.
- Click Actions in the navigation tree, and select Schedule VM Manager Tool Scan Results Upload.
- Check the details and make sure that the state is marked as Open. If not, see: Uploading collected data.
- If the action failed, check which line of the action script caused failure. Go to the Computer tab, double-click the listed computer, and analyze the View Action Info to find the relevant line. You can also try forcing the upload of collected data.
- Check whether the results exist in the BES server
sha1directory in the log package that you downloaded from the affected computer.-
/sha1/vmman_scan_*_computer_id_*_vmman.tar.gz
-
\sha1\vmman_scan_*_computer_id_*_vmman.zip
sha1directory check the Index.txt file. If the file contains the following errorMaxArchiveSize: Exceeded, see: Configuring VM manager for subcapacity reporting.Note: Starting from application update 9.2.14, you can check whether the value of
_BESClient_ArchiveManager_MaxArchiveSize parameter is exceeded on the
Computer Support Data panel. For more information, see: Checking whether the maximum archive size is exceeded.
Starting from application update 9.2.14, you can check whether the value of
_BESClient_ArchiveManager_MaxArchiveSize parameter is exceeded on the
Computer Support Data panel. For more information, see: Checking whether the maximum archive size is exceeded. - To check whether the result file is available in the BigFix database, go to the log package that was downloaded
from Computer Support Data panel and check whether the BIGFIX_Uploads and
check whether the BIGFIX_Uploads and
BIGFIX_uploads_availability files contain the data. If you cannot find the
results, restart the FillDB service on the BigFix server.
- Run the following command: /etc/init.d/besfilldb restart.
- Find the FillDB service on the list of services, and restart
it.
- If the issue occurs more than once, upgrade the BigFix server. For more information, see: Software/Hardware data may not appear in the LMT/BFI UI after successful ETL import because of the BigFix FillDB APAR IV83671.
- Check whether you can find the result data in DatasourceFile in the log
package that was collected from this computer.
- If the result file exists in the BigFix database, but it is not found in DatasourceFile file, contact HCLsupport.
- Check whether you can find the results in adm.last_imported_scan file in
the log package from this
computer.
- If the results data exists in all databases (listed in point 5 and 6), but cannot be found in
adm.last_imported_scan file, investigate why the file import fails.
- Check the BigFix Inventory import logs, which are located in the
following
directory.
Installation_directory/wlp/usr/servers/server1/logs/imports
You can find also the last import log attached to the log package from this computer.
- Check the BigFix Inventory import logs, which are located in the
following
directory.
- If the results data exists in all databases (listed in point 5 and 6), but cannot be found in
adm.last_imported_scan file, investigate why the file import fails.
- Check whether the scan results files are packed for upload.
- Check whether the VM Manager Tool collects valid and complete results.
- Continue with this solution if the result file was imported without errors, and at least one of
your VM Manager connections has the No VM Manager data flag.
- Check whether the results are complete.
- Collect UUIDs of at least a few endpoints that cannot connect due to no VM Manager data.
- Log in to BigFix Inventory, and view the IBM Capacity Data
Completeness widget. It shows the number of endpoints with the No VM Manager Data status.
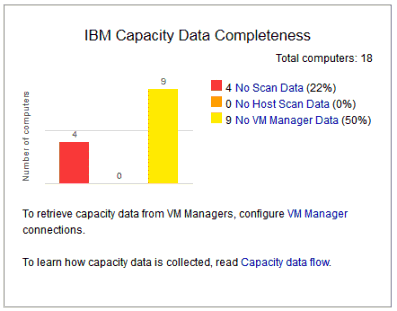
- Click the No VM Manager Data to see the list of computers with no VM
Manager data on the Hardware Inventory report.

- Export the report to CSV file to view the information about the server ID.
- Get the result file. The result file is located in the
sha1directory on the BigFix server.sha1directory is also attached to the log package that is collected from the affected computer and downloaded from Computer Support Data panel. - If the result file is not in that directory, go to log package and check the
debugData.zipfile. ThedebugData.zipfile contains the result files and additional information that you might need to troubleshoot the problem. - Choose a server ID, also referred to as UUID, from the list of customer endpoints, and check the
result files against this ID. The UUID does not include the
TLM_VM_phrase. See the example of the result file for a virtual machine.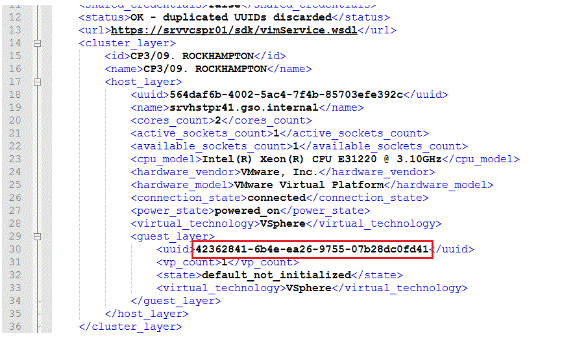
- What to do, when you cannot find the UUID in the result files.
Repeat the actions from step one to ensure the UUID is not in the result files. Use only the final parts of the UUID in search.
The UUID returned by the hardware scan can differ from the UUID returned by the VM Manager Tool. Both values consist of 32 identical characters. However, the first 16 characters are arranged in different order. The final 16 characters are the same. For example, the Hardware Inventory server ID isTLM_VM_e2bc2742-2329-caeb-2b5c-d1a004b2758a. However, the result file shows the following value.
This issue was fixed in version 9.2.3. For permanent resolution upgrade BigFix Inventory. After the upgrade, upload the new capacity data to produce new scan results. To do that, run a single capacity scan and force upload of results. For more information, see: Initiating the capacity scan on all computers.The capacity data is updated in up to two days, when the capacity scans and the VM Manager data are imported.
- If the UUID is not in the result files, check the possible causes.
- The UUID is duplicated.
- To verify whether the UUID is duplicated, check all the
trace.logfiles that are located in the log package in the following directory.
\sha1_files\logcollector_0_computer_id_logCollectorAgent.tar\computer_id_logCollectorAgent\var\opt\BESClient\LMT\VMMAN\logs
\sha1_files\logcollector_0_computer_id_logCollectorAgent\Program Files
(x86)\BigFix Enterprise\BES Client\LMT\VMMAN\logs - Search for the following extract, and remove the duplicated
UUID.
2016-05-30 15:42:40 : (pool-1-thread-1)
com.ibm.license.mgmt.datacollector.tasks.VMCollectorTask::
updateManagerSuccess():: (vmmconf_4.properties):
Duplicates of UUIDs are found on VM Manager,
URL: https://srvvcspr01/sdk/vimService.wsdl.
Discarded UUIDs for guests: 4227e866-7121-d731-235a-343077d7ee93.
- To verify whether the UUID is duplicated, check all the
- The user who is connecting with the VM Manager on VMware has no permission to collect the data
about the virtual machine.
Check the VM Manager settings, and permissions. For more information, see: Verifying permissions for VMware communication.
- The VM Manager is not valid for the virtual machine.
- The UUID is duplicated.
- What to do when the UUID is found in the result files, and the VM Manager connection is still
flagged as No VM Manager data in BigFix Inventory.
- To find the reason behind the connection status, check whether the debug data is collected. Open
the log package and go to the debug directory.
\sha1_files\logcollector_0_computer_id_logCollectorAgent.tar\computer_id_logCollectorAgent\var\opt\BESClient\LMT\VMMAN\debug\sha1_files\logcollector_0_computer_id_logCollectorAgent\Program
Files (x86)\BigFix Enterprise\BES Client\LMT\VMMAN\debug
- Open the
login.xmlfile.
- Check whether the
login.xmlfile is correct, and error-free.Thelogin.xmlfile can contain the authentication error.
If the file contains the authentication error, and the VM Manager connection test was successful, the user login, or password probably contains<faultcode>ServerFaultCode</faultcode> <faultstring>Cannot complete login due to an incorrect user name or password.</faultstring> <detail> <InvaildLoginFault xmlns="urn:vim25" xsi:type="InvalidLogin"/>$, or\sign. Upgrade the VM Manager Tool to the latest version to resolve the problem. For more information, see: Checking the VM Manager Tool version and Updating VM Manager Tool.Note: After you upgrade the VM Manager Tool, download the fresh log package and check the debug data. - Open the
retrieveProperties.xmlfile from the debug directory. The file contains information about all virtual machines, including the duplicate UUIDs, and the<HostCpuPackage>data. If the<HostCpuPackage>tag is not in the file, the user that connects to the VM Manager is underprivileged. Ensure that the user can collect the endpoints and the host data. Check user's permissions. For more information, see: Verifying permissions for VMware communication and How to set the correct permissions for LMT - VMware communication.
- To find the reason behind the connection status, check whether the debug data is collected. Open
the log package and go to the debug directory.
- Check whether the results are complete.