After creating a package, add the necessary files to install
the software product that you want to deploy to your endpoints and
then create the distribution tasks.
Adding the installation files
To add a file
to the package, click Add Files located under
the Manage Files tab.
Figure 1: Managing files
This action opens the Add Files to Package window
where you can add files and folders. For information about the types
of files you can add, see Supported package types.
Note: The
dashboard can only download files that do not require any authentication,
such as files that do not need username or password.
There
are different ways to add a file or a bundle to a package. You can
use any of the following options:
Add File
Specify a single file, which is uploaded from the system. You
can manually type the name of the file, or click Browse to
locate a file stored in your system.
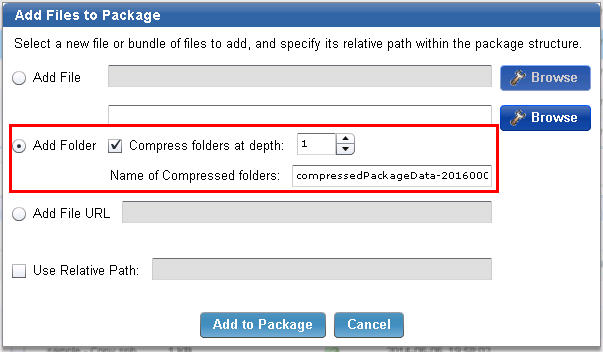
Add Folder
Specify an entire folder of content of your package, which is
uploaded from the system. As in the previous example, type the name
of the folder or browse to locate a folder in your system.Figure 2: Adding files from a folder
The Compression Depth feature, located within the Add Folder field, is
used to compress files together at a specified folder depth. Use a
depth of '0' to bundle all files together into one compression
file.
Note: To
maintain optimum performance, use the compression feature if pushing
more than 50 files to an endpoint. Distributing many small files costs
more network bandwidth, while distributing fewer large files costs
more endpoint processor. Use the Compress Folders at depth option
to tune this performance control for your environment.
Note: If
you choose to compress nested folders when adding the installation
files of a software product, you can rename the folders that are uploaded
to a package. Rename the folders for easier identification, especially
if multiple folders are uploaded. The folder name uses the following
naming convention: compressedPackageData-<YYYMMDDHHMM>
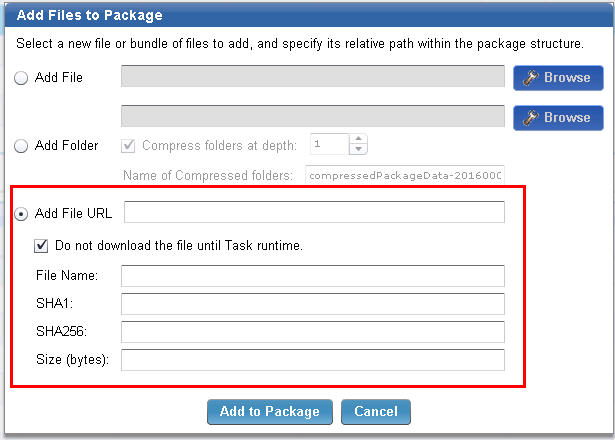
Add File URL
Specify the URL of the file. You can either choose to download
the file immediately or only during Fixlet runtime.
Note: The ability
to download the file immediately and upload it to the BigFix server
is available only for IBM BigFix v9.1 or later.
Figure 3: Adding files from a URL
If you want to associate the file to a Fixlet and download it
only when the Fixlet is deployed, click Do not download
the file until Task runtime. Then, provide the following
information, which are validated only during Fixlet runtime:
File name
SHA1 value
SHA256 value
Size information (in bytes)
Verify that you enter the correct values, otherwise the console
will prompt an error message when the Fixlet is deployed.
Click Use Relative
Path if you want to add the files into a specific folder
of the package, and then enter the folder directory. For example,
you must enter InstallPackage/Languages if
you want to add another language file to your package with the following
structure:
After selecting
an option, click Add to Package at the bottom
of the window. This action processes all the information for your
package, analyzes the relevant files, and uploads them to the server.
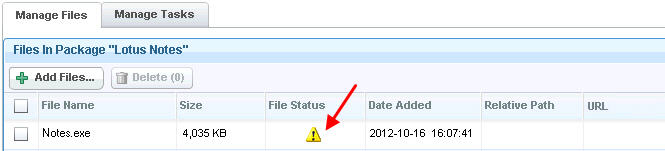
While
files are being uploaded to the server, check the File
Status field in the dashboard. An exclamation mark indicates
that files are not yet uploaded to the IBM BigFix.
Figure 4: File status
You might need to click Refresh to
view changes in file status before the dashboard auto-refreshes. The
upload is complete when the file status changes to a check mark.
Note: If
a file fails to upload, check the logs in <Windows
temp>\SoftwareDistributionLogs\Uploadmanager.
Creating distribution tasks
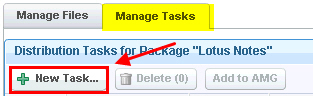
To
create a distribution task for the package, click the Manage
Tasks tab.
Figure 5: Adding a
Fixlet to a package
Note: Add tasks only after you add files.
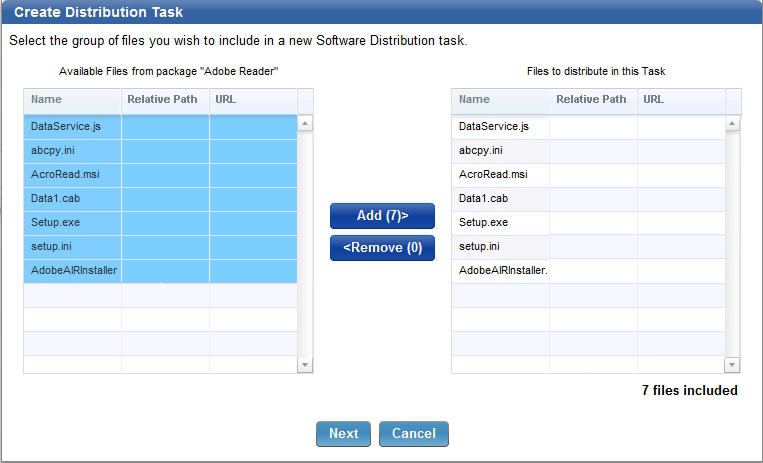
Click New
Task to open the Create Distribution Task window,
which displays all available files associated with your package that
can be included in a distribution task.
Note: The Policy Action type
of Mac PKG tasks is not supported in the Software Distribution task
deployment process.
Select each file that you want to
deploy to your endpoints, and click Add.
Figure 6: Creating a distribution task
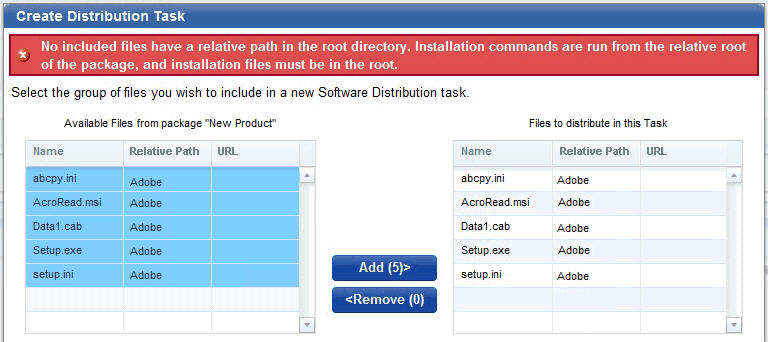
You cannot create a task where all of the files are in a
relative path. Software Distribution tasks require that the installation
commands exist in the root of the package. If you attempt to add files
to a package that has no files in its root folder, the task displays
the following warning:
Figure 7: Warning message
when files which are not in the root folder, are added to a package
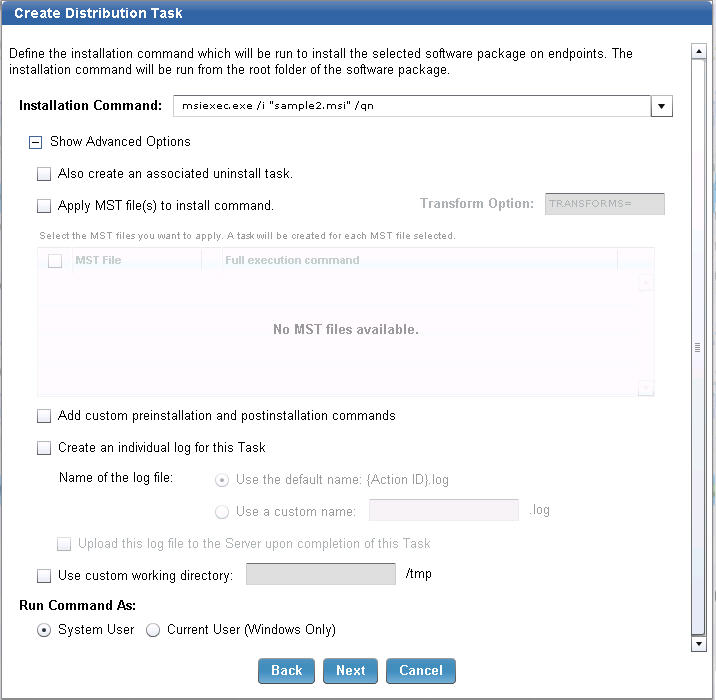
Click Next. In this window, you define
an installation command to be used when sending the software package
to your endpoints, and customize a command-line message specific to
your distribution task.
Figure 8: Defining
installation command
Note: If you added a PKG file, select whether
it is a Mac or Solaris file.
You can also configure the
following advanced options for the distribution task:
Force installation
This option is only applicable to SPB files.
You can specify the values for the SPB built-in variables,
such as the installation path, folder name, file separator, either
during the creation of the task or at deployment time.
To modify variables at deployment time, you must select
them during task creation. The selected variables can then be edited
in the Fixlet description page.
Create an associated uninstall task
Select this option to create a task to uninstall the selected
software package.
Apply MST files to the installation command
If your installation command is an MSI, then select Apply
MST file to install command. A list of all the MSTs that
can be applied to the MSI is displayed.
Add custom preinstallation and postinstallation commands
You can include any additional commands during the creation of
the installation task through the dashboard rather than editing the
task after its creation. For more information, see Adding preinstallation and postinstallation commands.
Create an individual log
Configure the task to generate an individual log file upon the
completion of the action. For more information, see Generating logs for individual tasks.
Use a custom directory
Specify a full path location, including the drive, to download
and run the installation files. For example, C:/SWD.
Files are downloaded and extracted to this custom directory instead
of the default __Download/ directory. Tasks run
from the specified location instead of the default ../__BESData/actionsite directory.
A folder called tmp is created in the specified
path, and is cleared before running any new tasks.
You can configure to remove the files from the client in the tmp folder
when the action completes.
You can run the command either as a system user
or as a current user. The default is to run the task as a system user,
but certain packages require the current user to install the software
package successfully. Click Next.
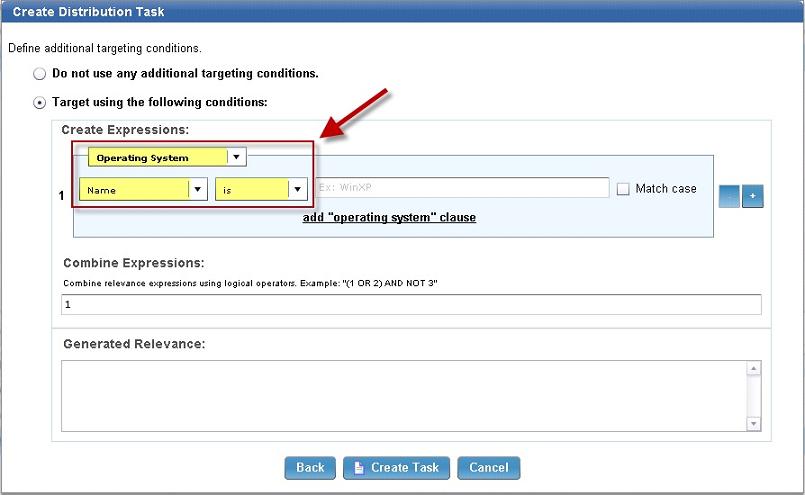
Use
the three drop-down lists to specify operating system, name, and syntax
parameters for targeting using additional conditions. You can combine
relevance expressions in the box indicated, or add generated relevance.
Click Create Task when you complete these
steps.
Figure 9: Defining additional target
conditions
In the next window, click the link in the Actions box to
deploy the action, and set parameters in the Take Action dialog.
Note: Ensure that you test a Fixlet before deploying it in a
production environment.
To verify if the task has completed
successfully, check whether the software was installed on the endpoints.
For more information, see Package type verification.
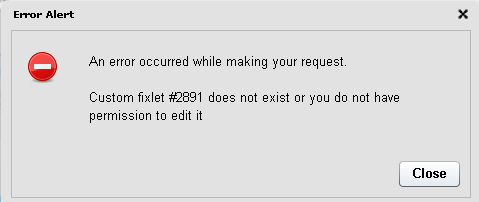
You can edit a task only if you have the appropriate console
permissions to view and edit the task, regardless of the permissions
set through the Manage Software Distribution dashboard. If you do
not have console permission to edit a task and you attempt to do so,
an error message displays. Figure 10: Permission
restriction warning
A similar error message displays when you attempt to
delete a Software Distribution package through the Manage Software
Distribution dashboard without having the appropriate permission.