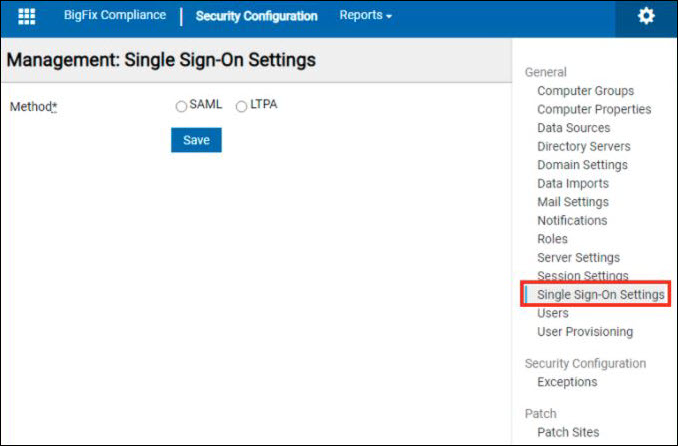
Single Sign-On (SSO) settings
This section provides information on the different Single sign-on (SSO) settings.
Authenticating users with SSO
- Security Assertion Markup Language (SAML)
- Lightweight Third-Party Authentication (LTPA)
To open the SSO settings page, navigate to the settings gear icon and click Single Sign-On Settings from the list.
Configuring SAML Single Sign-On (SSO)
Follow the below steps to set up the SAML SSO for your system with Active Directory Federation Services (ADFS).
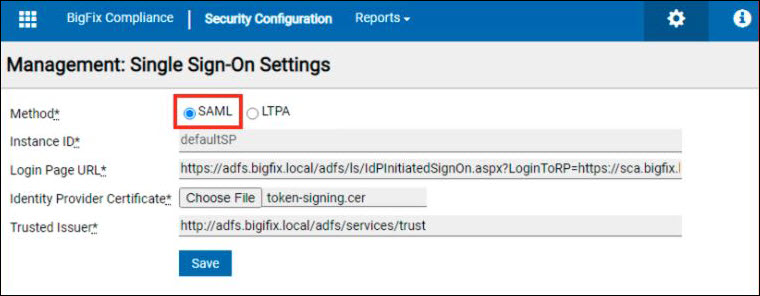
- Login URL
- Token-Signing Certificate
- Trusted Issuer
- Back up on the following .xml files:
- <Install Dir>\wlp\usr\servers\server1\server.xml
- <Install Dir>\wlp\usr\servers\server1\app\tema.war\web.xml
- When enabling the SSO in server settings, you must have at least one SSO
user created. Before enabling SSO, perform the following steps:
- Create a SSO user from . The operator must create at least one user with administrators role and SSO as an authentication method.
- Consider changing the authentication method of existing users to the SSO.
- Create user provisioning rules as necessary.
- Login to BigFix Compliance as an administrator (with FQDN URL).
- Create a SSO user with administrator rights in the BigFix Compliance
server.
- Go to . Click Create User.
- Enter the username. The format of the username is related to
the Name ID format of the claim rules on relaying party
trust on ADFS. Ensure that the username format follows the
LDAP attribute
format.User-Principal-Name
The username format is
<user>@<domain name>.Example:
SAM-Account-Nameuser01@bigfix.localThe username format is <user> without domain part.
Example: user01
E-Mail AddressThe username is the email address in the profile of the user.
Example: user01@bigfix.local
- Check administrators role.
Note: At least one SSO user must have the administrators role.
- Specify Computer Groups as necessary (not applicable for the administrator).
- Select Single Sign-On as the authentication method.
- Enter the email address and contact information.
- Click Create.
- Follow these steps to use user provisioning:
- Add your directory server by creating an entry in . Refer to Directory Servers.
- Configure the user provisioning rule in . When the SSO is enabled, the authentication method of all the provisioned users is SSO. Refer to User Provisioning.
- Click New.
- Select SAML as the SSO method.
- Enter the values for the following field(s).
- Login Page URL: Enter the login page
URL.
- ADFS:https://<ADFS_hostname>/adfs/ls/IdPInitiatedSignOn.aspx?LoginToRP=https://<SCA_hostname>:9081/ibm/saml20/defaultSP
- ENTRA ID: https://launcher.myapps.microsoft.com/api/signin/<APPICATION ID / GUID>?tenantId=<TENANT ID / GUID>
- Identity Provider Certificate: Browse to select the identity provider certificate. This certificate refers to the Token-Signing certificate exported from ADFS in DER/Base64 encoded X.509.
- Trusted Issuer: Enter the trusted
issuer.
- ADFS: http://<ADFS_hostname>/adfs/services/trust
- ENTRA ID: https://sts.windows.net/<TENANT ID / GUID>/
- Login Page URL: Enter the login page
URL.
- Click Save.
- Restart BigFix Compliance service.
Using SCA HTTPS Certificate for SAML
By default, the SCA is creates a dedicated and self signed certificate in separate keystore defined in the sever.xml as "SPKeyStore". It is possible to use the certificate stored in the "defaultKeyStore". To adjust the setup for this purpose, follow these steps:
- Navigate to the path \SCA\wlp\usr\servers\server1\server.xml.
- Remove
keyAlias="samlspandkeyStoreRef="SPKeyStorefrom server.xml. - Open BigFix Compliance in
web browser.
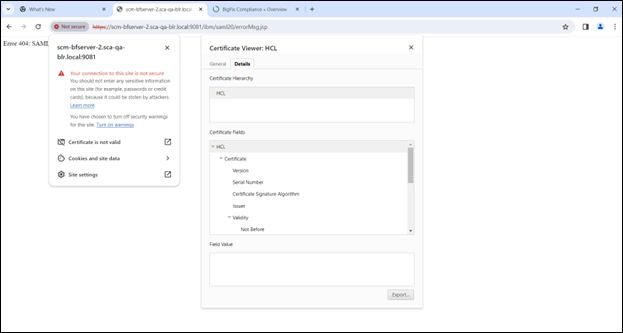
- Get the information about the certificate.
- Click on the Not secure label on the URL to display the window.
- Select the Certificate is not valid option above.
- Click on the Details tab.
- Export the certificate in (base64 encoded) format.
- Add the exported certificate to the Active Directory Federation Certificate (ADFS).
- Navigate to ADFS management.
- Proceed to .
- Right click on the available relying party and select Properties.
- Navigate to the encryption option.
- Remove the existing certificate.
- Click on Browse, and in the dropdown menu, select All Files.
- Upload the downloaded certificate.
- Restart the BigFix Compliance server.
Configuring SAML SSO - Microsoft Active Directory Services (ADFS)
- Download the metadata of the service provider and configure the service provider
details on the identity provider. Download the service provider metadata file,
spMetadata.xml from the link.
- Log in to BigFix Compliance and go to .
- Click the Download SP Metadata link to download the service
provider metadata file, spMetadata.xml.
Note: When the SAML SSO entry is created, only the Delete button and the Download SP Metadata link are enabled. If the download link is not enabled, try the following:
- Open the C:\Program Files\IBM\SCA\wlp\usr\servers\server1\apps\tema.war\WEB-INF\config\ folder or the BigFix Compliance installation path.
- Copy the options.cfg.sample file and save it as options.cfg into the folder.
- Open the options.cfg file and locate the line: #platform.sso.saml.metadata.link.ssl.verify=false.
- Remove # from the code and save the file.
- Restart the BigFix Compliance service.
- Log in again and check if the download link is enabled.
- Configure Relying Party Trusts in ADFS Management with the metadata file.
- In ADFS Management, navigate to Relying Party Trusts, click Add Relying Party Trust.
- Click Start and select Import data about the relying party from a file.
- Click Browse and specify the spMetadata.xml file and click Next.
- Specify a display name (for example Compliance) and click Next.
- Click Next all the way and Close.
- In the Edit Claim Rules window, click Add Rule and click Next.
- Enter a claim rule name such as Name ID.
- Select Active Directory as attribute store.
- Select User-Principal-Name as LDAP Attribute and Name ID as Outgoing Claim Type.
- Click Finish.
- Once ADFS is configured, continue to enable SSO in BigFix Compliance, on page:
- Click Enable.
- Restart BigFix Compliance service.
Configuring SAML SSO - Microsoft Entra ID
To configure BigFix Compliance with Microsoft Entra ID, consider that only the Identity Provider Initiated (IdP-initiated) scenario is supported. Microsoft Entra ID does not support SAML HTTP Post redirect binding, which is necessary for IBM WebSphere Liberty used by BigFix Compliance.
- Follow Microsoft guide Security Assertion Markup Language (SAML)
single sign-on (SSO) for on-premises apps with Microsoft Entra
application proxy - Microsoft Entra ID | Microsoft Learn and use
following information:
- Identifier (Entity ID): https://<bigfix sca server>:9081/ibm/saml20/defaultSP
- Reply URL (Assertion Consumer Service URL): https:// <bigfix sca server>:9081/ibm/saml20/defaultSP/acs
- Sign on URL: keep empty
- Relay State: keep empty
- Once the Entra ID is configured, continue to enable SSO in BigFix Compliance, on page:
- Click Enable.
- Restart BigFix Compliance service.
- Possible issues
-
- An endless redirection loop is made. Proceed with manual setup and avoid the use of metadata from BigFix Compliance. Make sure that neither the Sign-On URL nor the Relay State is configured. If these settings are configured, recreate the application definition in Entra ID from beginning.
- When the correct page is provided in SCA Login Page for Service Provider Initiated (SP-initiated) flow, you may get error AADSTS750054. This error is caused by the lack of compatibility between Entra and WebSphere HTTP binding methods (Redirect only vs. POST only). For more detailed information about the error, refer to Microsoft Learn - Troubleshoot AADSTS750054 error.
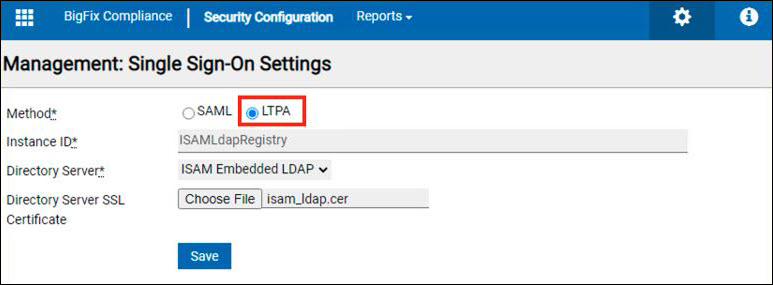
Configuring LTPA Single Sign-On for your system
Follow these steps to set up the Lightweight Third-Party Authentication (LTPA) SSO for your system with IBM Security Access Manager for Web (ISAM).
Before you begin
- Identify the ISAM server, Directory Server, and the Compliance Server.
- Back up the following .xml files:
- <Install Dir>/wlp/usr/servers/server1/server.xml
- <Install Dir>/wlp/usr/servers/server1/app/tema.war/web.xml
- Create SSO users from . The operator must create at least one single sign-on user with administrators role.
- Create User Provisioning rules.
Perform the following steps:
- Login to BigFix Compliance and go to .
- Create a Directory Server entry for single sign-on authentication. (See Directory Servers section for how to add a Directory Server).
- Go to to create an SSO user.
- Go to . Click Create User.
- Enter a username that is registered in the directory server.
- Check Administrators role (at least one single sign-on user needs to have Administrators role).
- Specify Computer Groups, as necessary. (not applicable for administrator).
- Select Single Sign-On as the authentication method.
- Enter the email address and contact information.
- Click Create.
- Create an LTPA configuration entry.
- Go to .
- Select LTPA as the SSO method.
- Select the directory server that was created in Step 2.
- If the directory server is configured with SSL option, click Browse and upload the directory server’s certificate.
- Click Save.
- Restart the BigFix Compliance service.
- Download LTPA Keys from BigFix Compliance.
- Login back to the SSO settings page.
- Click Download LPTA Keys link and save ltpa.keys.
- Configure reverse proxy / virtual junction on ISAM with BigFix Compliance server certificate and LTPA keys For more information, refer to https://help.hcltechsw.com/bigfix/11.0/inventory/Inventory/security/t_configuring_sso_isam.html.
- Enable SSO in BigFix Compliance.
- Login back to the SSO settings page.
- Click Enable.
- Restart BigFix Compliance service.
- Access BigFix Compliance by ISAM’s virtual host/url such as, https://<virtual_host>/sca.