Testing with Jenkins
You can use the HCL OneTest™ Performance Jenkins plugin for performance testing to run tests on a Jenkins server by using a Jenkins build step.
Introduction
To automate testing with Jenkins, you must configure two computers: A Jenkins master and a Jenkins slave. This master-slave configuration allows a single Jenkins installation on the master computer to host multiple slave environments for building and running tests. You must install the latest version of the HCL OneTest™ Performance Jenkins plugin on the master computer, and install the products themselves on the slave computer, where you create the tests. For detailed information about the Jenkins master-slave relationship, see the Distributed Builds section on the Jenkins site.
For more information about specific versions of plugin, see Integration plugin compatibility matrix.
You can then install the plugin on the Jenkins server. After you create the tests in HCL OneTest™ Performance, you can run the tests on the Jenkins server by using this plugin. If you have earlier version of the HCL OneTest™ Performance Jenkins plugin, you must uninstall it before installing the latest version of the plugin on the Jenkins server.
Before you begin
- Installed Installation Manager, which is required for installing the products.
- Installed HCL OneTest™ Performance.
- Verified that you have a Jenkins master computer where Jenkins and the HCL OneTest™ Performance Jenkins plugin is installed.
- Verified that you have a Jenkins slave computer where the products are installed.
- Verified that you have a test residing within an Eclipse workspace on the Jenkins slave where the products are installed.
To run performance on Mac OS, you must add an environment variable that points to the
installation directory of the product, for example, export TEST_WORKBENCH_HOME=/opt/HCL/HCLOneTest. For Windows™, this environment variable is
already defined.
If you installed HCL OneTest™ Performance on Windows by using the stand-alone installer, then you must specify the environment variable that points to the installation directory of the product.
Installing the HCL OneTest™ Performance Jenkins plugin on the Jenkins master computer
- Download the HCL OneTest™ Performance Jenkins plugin 6.0 from the HCL® License & Delivery portal.
- From the Jenkins dashboard, perform the following tasks:
- Click .
- Click Advanced.
- From the Upload Plugin section, click Choose File to locate and Open the HCL OneTest™ Performance Jenkins plugin.
- Click Upload.
The HCL OneTest™ Performance Jenkins plugin is displayed in the Installed tab.
-
To allow Random TCP Ports for Java™ Network Launch Protocol (JNLP) agents, perform the following steps:
- Click .
- In the Agents section, Select Random.
- Click Save to save and apply the changes.
Job Configuration
- Create a new Jenkins free-style software project. For more information to create a free-style Jenkins project, see Building a software project in Jenkins.
- Optionally, set an environment variable in from the Jenkins dashboard.
Select the Environment variables check box if it is not selected. Add the variable and save the details.
- From the Jenkins dashboard, perform the following tasks:
- Open the Jenkins free-style software project, and then click Configure.
- Click .
- Click Run HCL OneTest Performance test.
- Provide the details about the test run as shown. The following table explains each field.
Field Description Name Required. The name of the test. Workspace Required. The complete path to the Eclipse workspace. Project Required. The path, including the file name of the project relative to the workspace. Test Suite Name Required. The path, including the file name of the test to run related to the project. IMShared Location Optional. The complete path to HCLIMShared location,if it is not the default location. Var File Optional. The complete path to the XML file that contains the variable name and value pairs. Config File Optional. The complete path to a file that contains the parameters for a test or schedule run. Results File Optional. The name of the results file. The default result file is the test or schedule name with a time stamp appended. The results file is stored in the Results directory. If you are running multiple tests, do not provide a name for the results file. Overwrite Results File Optional. Determines whether a results file with the same name is overwritten. The default value is true, which means the results file can be overwritten. Quiet Optional. Turns off any message output from the launcher and returns to the command shell when the run or the attempt is complete. Number of Virtual Users Optional. For a schedule, the default value is the number of users specified in the schedule editor. For a test, the default value is one user. Overrides the default number of users, if required. VM Args Optional. Java™ virtual machine arguments to pass in. Dataset Override Optional. For a test or schedule, the default value is the dataset specified in the test editor or schedule editor. Overrides the default dataset value to run if required. Note:You must use the Dataset Override option to replace the dataset values during a test or schedule run. You must ensure that both original and new datasets are in the same workspace and have the same column names. You must also include the path to the dataset.
For example,
/project_name/ds_path/ds_filename.csv:/project_name/ds_path/new_ds_filename.csv.You can swap multiple datasets that are saved in a different project by adding multiple paths to the dataset separated by a semicolon (;).
For example,
/project_name1/ds_path/ds_filename.csv:/project_name1/ds_path/new_ds_filename.csv;/project_name2/ds_path/ds_filename.csv:/project_name2/ds_path/new_ds_filename.csvExported Statistical Report Data File Optional. The complete path to a directory to store exported statistical report data. Custom Report Format Files Optional. A comma-separated list of absolute paths to custom report format files (.view files) to use when exporting statistical report data with the Export Statistical Report Data File option. Exported Statistical Report in html Optional. The complete path to a directory to export web analytic results. Analyze the results on a web browser without using the test workbench. If you run multiple tests, do not provide a value in this field. The web analytic results will be exported to Jenkins workspace. User Comments Optional. Add text within the double quotation mark to display it in the User Comments row of the report. If you do not supply a value for Exported Statistical Report Data File, these logs will be saved in Jenkins workspace/temp directory.
- Click Save.
- Optionally, to run multiple tests under the same job, click Add build step again, and provide details for the next test.
Environment variable configuration
- Use the dollar sign ($) followed by the variable name.
For example,
$workspace - Use the dollar sign ($) followed by the variable name between braces.
For example,
${workspace}
You can then run the Jenkins build by using environment variables in the Run HCL OneTest Performance test step. The environment variable that you added to your test is substituted with the actual value associated with the variable that you set in for the job. The HCL OneTest™ Performance Jenkins plugin uses the actual value while running the job.
For example,
If you set the environment variable named workspace with the value
C:\Users\HCL\workspace1 in , then you can use $workspace or
${workspace} as input to the corresponding text field of your
choice for the Run HCL OneTest Performance
test step in the Jenkins build step. When you run the build,
$workspace or ${workspace} is substituted with
its corresponding value C:\Users\HCL\workspace1.
Master/Slave Configuration
Master and slave configurations are supported by HCL OneTest™ Performance Jenkins plugin . Refer to Distributed builds for more information.
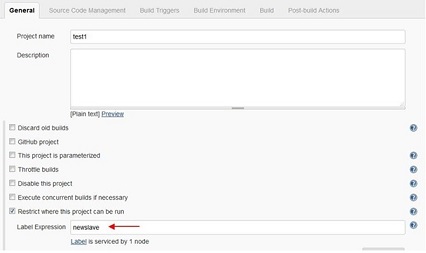
While creating the job configuration, in addition to the preceding steps, you must select the Restrict where this project can be run check box and provide the name of the slave node in the Label Expression field. This is the location where the products are installed and where tests can be run.
Running tests
After you save the project, you must open the project, and then click Build Now. This action starts the test run on the slave computer. You must specify the relative path from the project to the test including the file name of the test. To run multiple tests from different projects, you must add new build step for each project.
Building result and logs
- After the build completes, click the build number and open the console for the project. Locate
the
Test Resultto check the test execution status.Note: If you add multiple build steps to run multiple tests, multipleTest Resultinstances are displayed. - For product logs, log in to the slave computer and search in the Jenkins slave workspace/temp directory.