Adding a user group to VU Schedule
By defining user groups, you can group related tests and run the tests in parallel. Tests belonging to different user groups run in parallel.
Procedure
- In the Test Navigator, double-click the VU Schedule.
- Right-click the name of VU Schedule, and then click .
- In Group name, type a descriptive name for the user group.
-
Under Group size, select Absolute or Percentage,
and type the number of users or a percentage of users in the group.
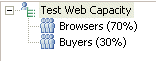
Option Description Absolute Specifies a static number of virtual users. Type the maximum number of virtual users that you want to be able to run. For example, if you type 50, you can run up to 50 virtual users each time you run a schedule. Typically, you create an Absolute user group only if the group does not add a workload. For example, if one test prepared a website for use and another test restored the site to its initial state, each test would be in an Absolute user group that contains one user. Percentage Specifies a dynamic number of users. Type the percentage of the workload that the user group represents. Typically, you assign user groups a percentage, rather than an absolute number. For example, perhaps 70.0% of your users browse your website, and 30.0% order an item from your website. Set up two user groups in this proportion. Then, at the schedule level, type the initial number of users to run. You can also add users during the run. The schedule distributes the users among the dynamic user groups according to the percentages you specify. Tip: You can specify fractional percentages. -
Under Locations, select Run
this group on the local computer or Run this
group on the following locations.
Option Description Run this group on the local computer The user group runs on your computer. Use this option if the workload is small or if you are testing the VU Schedule. Run this group on the following locations Typically, you run user groups on remote computers. When user groups run on remote computers, the workbench activity on the local computer does not affect the ability to apply load. Run user groups at remote locations in these cases: - When a large number of virtual users are running and the local computer does not have enough processor or memory resources to support this load. You can conserve resources by running the users on different locations, so that fewer users run on each computer.
- When a test requires specific client libraries or software. The user group that contains this test must run on a computer that has the libraries or software installed.
-
To declare a remote location:
-
To add an already declared location:
- Click .
- In the Select Location window, select the computer on which the user group will run, and then click OK.
Example