Controlling loops
This example demonstrates extending test execution by using custom code to control loops. It provides sample code that shows how you can manipulate the behavior of loops within a test to better analyze and verify test results.
The Javadoc for the test execution services interfaces and classes can be accessed from the product by clicking .
This example uses a recording of a stock purchase transaction using the Trade application. The concepts shown here can be used in tests of other applications.
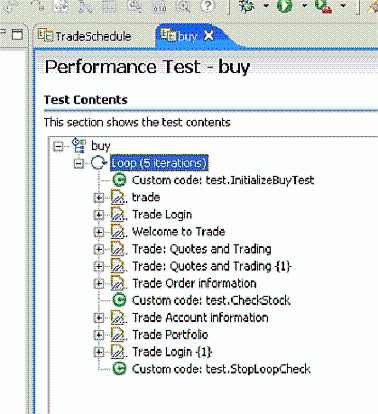
The test begins with a recording of a stock purchase transaction, using dataset substitution for the login IDs. The pages are wrapped in a five-iteration loop, as shown in the following figure:

Notice that among the various pages of the test, three items of custom code exist (indicated by the green circles with "C"s in them). This example explores these items of custom code.
The Javadoc for the test execution services interfaces and classes can be accessed from the product by clicking .
The first piece of custom code, InitializeBuyTest,
is mentioned here:
package customcode;

import java.util.Random;

import com.ibm.rational.test.lt.kernel.IDataArea;
import com.ibm.rational.test.lt.kernel.services.ITestExecutionServices;
import com.ibm.rational.test.lt.kernel.services.IVirtualUserInfo;

/**
 * @author unknown
 */
public class InitializeBuyTest implements
		com.ibm.rational.test.lt.kernel.custom.ICustomCode2 {

	/**
	 * Instances of this will be created using the no-arg constructor.
	 */
	public InitializeBuyTest() {
	}

	/**
	 * For description of ICustomCode2 and ITestExecutionServices interfaces,
	 * see the Javadoc.. */
	public String exec(ITestExecutionServices tes, String[] args) {
		// Get the test's data area and set a flag indicating that nothing
		// has failed yet. This flag will be used later to break out
		// of the schedule loop as soon as a failure is encountered.
		IDataArea dataArea = tes.findDataArea(IDataArea.TEST);
		dataArea.put("failedYet", "false");

		// Get the virtual users's data area
		IDataArea vda = tes.findDataArea(IDataArea.VIRTUALUSER);

		// Randomly select a stock to purchase from the set of s:0 to s:499.
	    IVirtualUserInfo vuInfo = (IVirtualUserInfo) vda.get(IVirtualUserInfo.KEY);
	    Random rand = vuInfo.getRandom();
		String stock = "s:" + Integer.toString(rand.nextInt(499));

		// Persist the name of the stock in the virtual user's data area.
		vda.put("myStock", stock);

		return stock;
	}
This custom code is located in the method exec().
First, the data area for the test is acquired to store a flag value, in this case a string of text, to be used later to stop the test loop when an error is discovered. Data stored in this way can be persisted across tests.
Then a randomly generated stock string is created. The value is stored as the variable stock, and is passed back as the return value for the method. This return value is used as a substitute in a request later, as shown in the following figure:

The highlighted item uses a substitution (s%3A716),
which is the value returned by the InitializeBuyTest custom
code item. We are using custom code to drive the direction of our
test.
The next lines of code in InitializeBuyTest use
the Virtual User data area to store the name of the stock for later
reference. Again, data stored in this way can persist across tests.
The second piece of custom code is called CheckStock.
Its contents are as follows (listing only the exec() method
this time):
public String exec(ITestExecutionServices tes, String[] args) {

		// Get the actual and requested stock purchased.
		String actualStock = args[0].replaceAll("<B>", "");
 		actualStock = actualStock.substring(0, actualStock.indexOf("<"));
		String requestedStock = args[1];

  		// Set the log level to ALL.
 		IDataArea dataArea = tes.findDataArea(IDataArea.TEST);
 		ITestInfo testInfo = (ITestInfo)dataArea.get(ITestInfo.KEY);
 		testInfo.setTestLogLevel(ITestLogManager.ALL);

 		// If the log level is set to ALL, report the actual and requested stock
		// purchased.
 		ITestLogManager testLogManager = tes.getTestLogManager();
		if (testLogManager.wouldReport(ITestLogManager.ALL)) {
 			testLogManager.reportMessage("Actual stock purchased: "
 					+ actualStock + ". Requested stock: " + requestedStock
					+ ".");
 		}

		// If the actual and requested stock don't match, submit a FAIL verdict.
 		if (testLogManager.wouldReport(ITestLogManager.ALL)) {
			if (!actualStock.equalsIgnoreCase(requestedStock)) {
 				testLogManager.reportVerdict(
						"Actual and requested purchase stock do not match.",
 						VerdictEvent.VERDICT_FAIL);

 				// Use the test's data area to record the fact that an error has
				// occurred.
 				dataArea.put("failedYet", "true");
 			}
		}
  		return null;
	}
This code begins by extracting two arguments that have been passed to the code. A part of the response in the original recording is highlighted and used as a reference, as shown in the following figure.

Some string manipulation is needed to acquire the text of interest;
in this case, the name of the stock that was actually purchased. This
newly created reference is then passed into CheckStock as
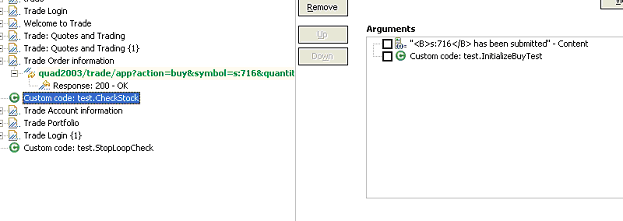
an argument, as shown in the following figure:

Note that the return value of InitializeBuyTest is
passed in as an argument as well.
The CheckStock custom code item uses these values
to verify that the randomly chosen stock generated by InitializeBuyTest is
actually purchased during the execution of the test.
CheckStock then sets the test log level, reports
the actual and requested stock purchase, and raises a FAIL verdict
if they do not match. CheckStock also stores a true value
associated with the tag failedYet in the test's data
area.
The third piece of custom code (exec() method
only) is mentioned here:
public String exec(ITestExecutionServices tes, String[] args) {

		// Get the test log manager.
		ITestLogManager testLogManager = tes.getTestLogManager();

		// Get the test's data area and get a flag indicating to
		// see if anything has failed yet. If so, stop the loop.
		IDataArea dataArea = tes.findDataArea(IDataArea.TEST);
		String failedYet = (String) dataArea.get("failedYet");

		// Break out of the loop if an error has been encountered.
		if (failedYet.equalsIgnoreCase("true")) {
			tes.getLoopControl().breakLoop();

			if (testLogManager.wouldReport(ITestLogManager.ALL)) {
				testLogManager.reportMessage("Loop stopped.");
			}
		}

		return null;
	}
This code uses the test's data area to determine the user-defined
value associated with the tag failedYet. If failedYet is true, StopLoopCheck breaks
out of the test loop.