When you generate from the Unload Job window, ipload creates
a format, a map, a job, and, if needed, a device array. You can generate
an unload job that uses a query to select from one or more tables
or that unloads an entire table.
Choose Job > Unload from the HPL main window to display the Unload
Job Select window.
Click Create in the Selection
Type group.
Select a name for the unload job and
type it in the Job Name text box.
Click OK to display the Unload
Job window.
Click Generate.
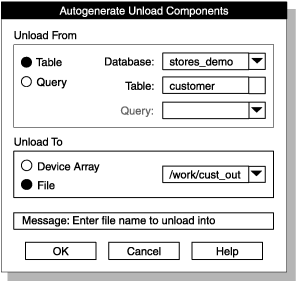
The Autogenerate
Unload Components window appears, as the following figure
shows.
Figure 1: The Autogenerate
Unload Components window
Click Query in the Unload
From group.
Enter the name of the query.
You can use the
down arrow to see selection lists. When you unload from a table, you
do not enter a query.
Click Device Array or File in
the Unload To group.
If you click Device Array, you can
use the down arrow to see a list of the available device arrays.
If you click File, ipload creates
a device array of the same name as the unload job and inserts the
specified file into that device array.
Important: If you are executing onpload from
the command line during an unload job, you must first create the file.
Click OK to generate the components
of the unload job.
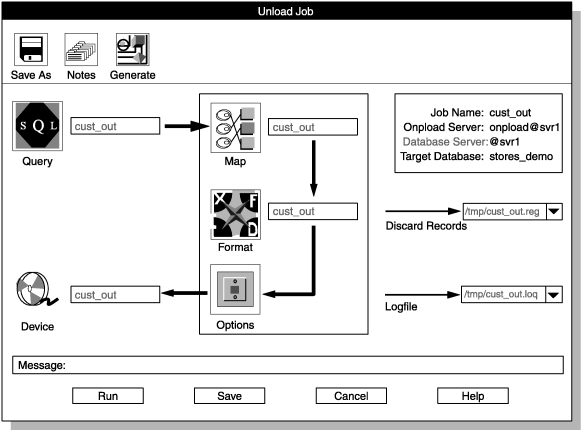
The display returns to the Unload
Job window. The ipload utility completes
the Unload Job window. If you chose cust_out for
the unload job name (step 4),
the Unload Job window appears as the following
figure shows.Figure 2: The
Unload Job window
Click Save to save this Unload Job.
You can click Run to run the job, or
click Cancel to exit and run the job later.
To run the job, click Run to display
the Active Job window.
When the Active Job window displays Job
Completed, click Cancel to return to
the main HPL window.