Creating a load map

You can create a load map from the Load Job window or from the Components menu of the main window.

Before you begin

Before you can create a load map, you must create a format that describes the data file that you plan to load. For information about how to create a format, see Define formats.

About this task

Important: The HPL does not support conversion from extended type data and smart-large-object data (Ext Type data types) to non-Ext Type data types. A field that is defined as an Ext Type data type can be mapped only to an Ext Type column. For more information about Ext Type data types, see Data types allowed in a fixed format or Data types allowed in a delimited format

To create a load map:

Procedure

  1. Choose Components > Maps > Load Map from the HPL main window.
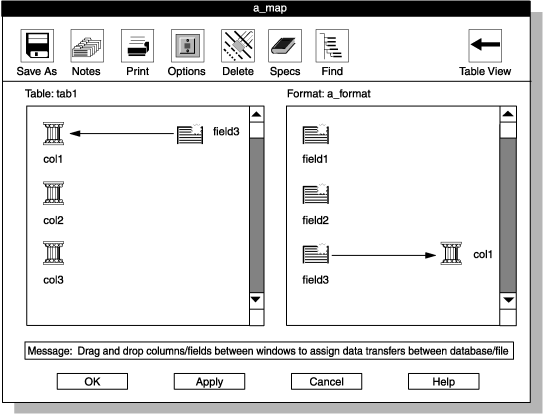
    The Record Maps window appears, as the following figure shows.
    Figure 1: The Load Record Maps window

    begin figure description - This figure is described in the surrounding text. - end figure description
  2. Click Create in the Selection Type group.
  3. Choose a name for the map and type it in the Map Name text box.
  4. Type the names of the database and table where the data will be loaded in their corresponding text boxes.

    You can also click the down arrow to choose the names from a selection list. The Tables selection list includes synonyms that are valid for the local database server.

  5. Type the format that describes the data file in the Format text box.

    You can also click the down arrow to choose the format from a selection list.

  6. Click OK to open the Map-Definition window.

    A Map-Definition window similar to Map-Definition window, one association completed appears.

  7. Click a column icon in the left column in the Table pane and hold the mouse button down.
    A box appears around the icon and its name.
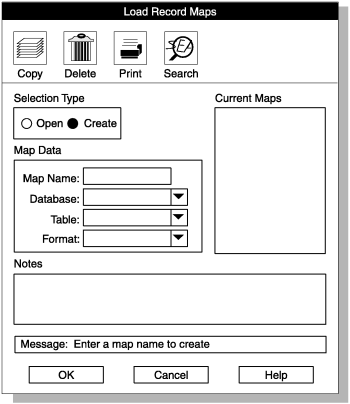
  8. Drag the box to a field icon in the Format pane.

    When you connect columns to fields, it does not matter whether you drag a column to a field or drag a field to a column, but you must always connect items from the left column of each pane.

    The following figure shows a Map-Definition window with this step completed.
    Figure 2: Map-Definition window, one association completed

    begin figure description - This figure is described in the surrounding text. - end figure description

  9. Repeat steps 7 and 8 for each field that you want to transfer into the database.
  10. Add the options that you want, if any.
    For instructions, see Defining the mapping options.
  11. Click OK to return to the Load Record Maps window.