Creating a fixed format

You can create and define formats for fixed-length records from the Record Formats and the Fixed Format Definition windows.

About this task

To create a format for fixed-length records:

Procedure

  1. Choose Components > Formats from the HPL main window.
    The Record Formats window appears, as the following figure shows.
    Figure 1: The Record Formats window
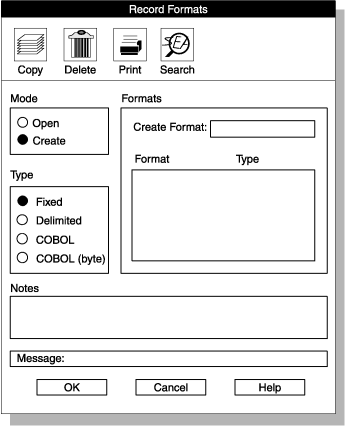
    begin figure description - This figure is described in the surrounding text. - end figure description
  2. Click Create in the Mode group.
  3. Click Fixed in the Type group.
  4. Choose a name for the format and type it in the Create Format text box.
  5. Click OK.
    The Fixed Format definition window appears. The title bar includes the name that you chose for the format. The following figure shows the Fixed Format Definition window as it might appear after you prepare the format for the file that Sample file with fixed-length records shows.
    Figure 2: A completed Fixed-Format Definition window with an open selection list

    begin figure description - This figure is described in the surrounding text. - end figure description

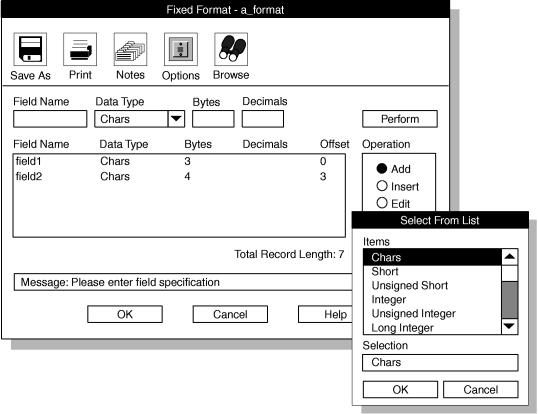
    Table 1. The Fixed-Format Definition window options
    Display option Description
    Bytes The Bytes text box specifies the number of characters that the field occupies in the record. In the Bytes text box, you must set the number of bytes for your data types. Although ipload uses default information to calculate an offset if you create a format that has a new length, it does not readjust the lengths for existing formats. To change the default information, see The Machines window. The ipload utility automatically calculates the total length of the data file as you add each field description.
    Decimals The Decimals text box specifies the number of decimal places that are displayed when you convert floating-point types to ASCII. You can set the number of decimals only for the Float and Double data types.
  6. Click Add in the Operation group.
  7. Choose a name for the field and type the name in the Field Name text box.
  8. Type the data type in the Data Type text box.
    For columns that contain user-defined types (UDTs) columns, you must choose an Ext Type format. For information about user-defined types, see Informix® Guide to SQL: Reference.

    The down arrow next to the Data Type text box displays the selection list that appears at the right in A completed Fixed-Format Definition window with an open selection list. Data types allowed in a fixed format describes the data types that appear in the selection list.

  9. Type the appropriate value in the Bytes text box (or in the Decimals text box, if appropriate).
    If you chose the Ext Type String in the Data Type box, you must specify a size, or you get an error. Field size depends on the type of data and its representation in the data file.
  10. Click Perform.

    After you click Perform, ipload calculates the proper offset for this field in the record and displays the value under the Offset heading, as A completed Fixed-Format Definition window with an open selection list shows.

  11. Repeat steps 7 through 10 for each field in your data file.
  12. Click OK to save the format and return to the Record Formats window.
  13. Click Cancel to return to the HPL main window.

Results

Tip: Use the field name to map the data file to the database. You can type any name that you choose. You might find it easier to remember the names if you use the same name as the corresponding column of the database.