Component-Definition windows
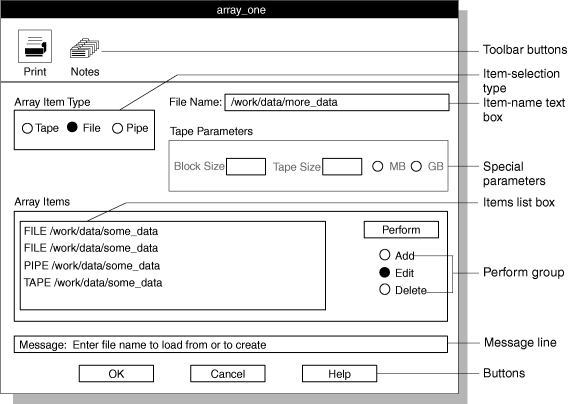
After you select a component to create or modify and click OK in the Component-Selection window, you typically see the Component-Definition window. From the Component-Definition window, you can enter, edit, or delete values or items that describe the component.

| Display option | Description |
|---|---|
| Toolbar buttons | The buttons across the top of the display represent actions that you can take after you select a component from the component list box. For example, in The Device-Array Definition window (the Device-Array Definition window), the toolbar buttons indicate that you can print or make a note about an item. The HPL ipload utility buttons explains how to use these buttons. |
| Item-selection group | The item-selection group lets you specify the type of item that you want to edit or the type of action that you want to take. After you specify a choice in the item-selection group, other options become active. In the Device-Array Definition window, the item-selection group is labeled Array Item Type. After you select Tape, File, or Pipe (only on UNIX™), other options become active. |
| Item-name text box | The item-name text box lets you specify the
name or description of one of the items that makes up the component.
For example, in the Device-Array Definition window,
you type the full path name of a device in the item-name text box.
In the Device-Array Definition window, the item-name text box is labeled Tape Name, File Name, or Pipe Name (only on UNIX), depending on the type of component that you select from the Array Item Type group. |
| Special-parameters group | When a Component-Definition window
first appears, some of the choices are inactive (shown in gray letters).
In general, the inactive choices are not meaningful until you specify
some other characteristic of the component that you are editing. The special-parameters group in the Device-Array Definition window is the Tape Parameters group. The items in the special-parameters group are meaningful only for tapes. The choices in the Tape Parameters group become active only if you select Tape from the Array Item Type group. The choices in The Device-Array Definition window are gray because File is selected in the Array Item Type group. |
| Item list box | The item list box shows items that you already created to define the component. In the Device-Array Definition window, this list is labeled Array Items and shows the tapes, files, and pipes (UNIX only) that are already part of the current device array. |
| Perform group | The Perform group lets
you specify the action that you want to take. After you select an
item and an action, you must click Perform to
complete the action. For example, to add a new device in the Device-Array
Definition window, you must specify the name or description
of the device and then click Perform to add
it to the Array List. Important: Remember
to click Perform to complete the action that
you designated in the Perform group. |
| Message line | The message line primarily gives instructions for the next logical action. The message line also returns an error message when an action fails or a completion message when a process is finished. |
| Buttons | The buttons across the bottom of the display let you indicate your next action. For a more complete discussion, see The HPL ipload utility buttons. |