Creating an Event from Scratch
To better understand the steps for creating an event, let us create a basic one with the following objective: to encourage Credit Card customers to make ecommerce transactions.
Overview
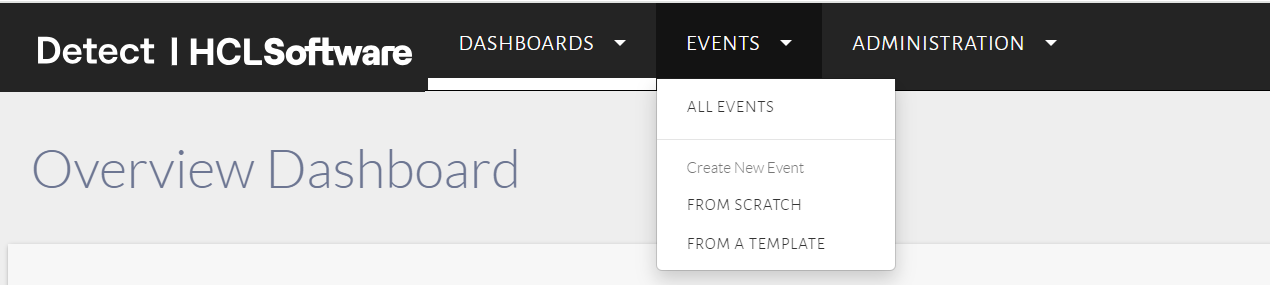
Step 1: New Event
Click 'Events' in the top navigation bar and select From scratch, as seen on the right in the image below.
Step 2: Event Name & Description
Fill in the details of the event as seen in the image below. Click 'Create New Event' to proceed.
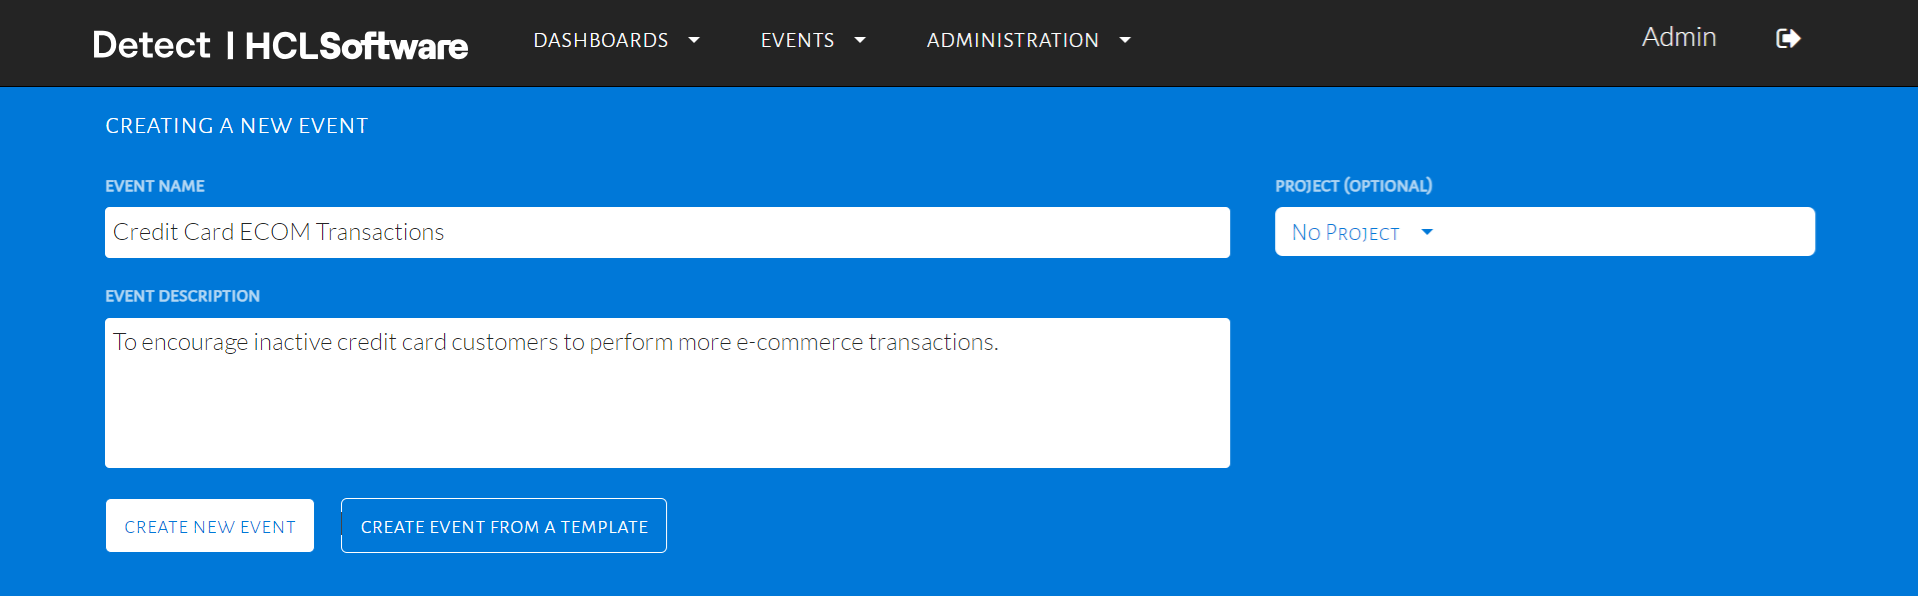
Type in details for new event
Step 3: Event Audience
Set the audience conditions, as seen in the image below. These conditions determine the customers to target during the event. We will target customers who have been inactive for more than 30 days on Purchase Transactions. This is a preset audience condition and can be found under "Inactivity from SAP Profile Based Conditions".
Audience Stats, appearing below the Audience Criteria, estimates the number and percentage of customers being targeted by the audience condition configurations.
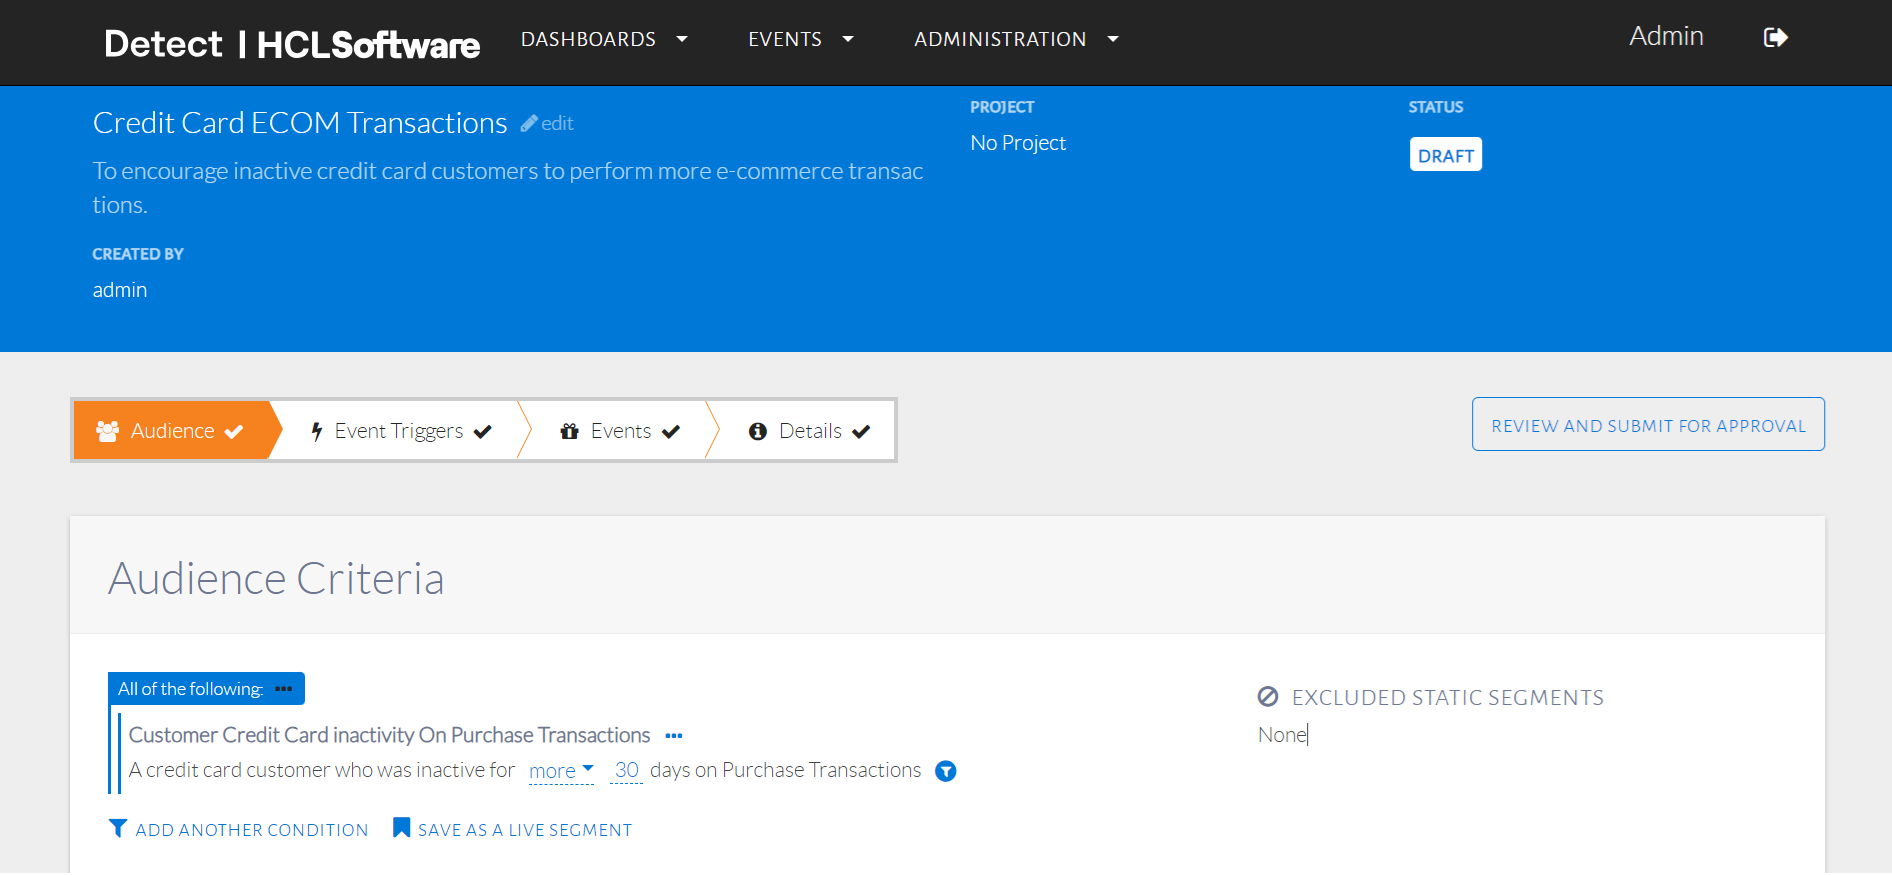
Target inactive customers
Step 4: Triggers
Set the trigger conditions, as seen in the image below. These conditions determine which customers have performed a transaction to trigger the event. The customers who satisfy both the audience conditions and the trigger conditions will qualify for the event. We will configure a simple trigger to target customers who spend at least NT $200 via an ecommerce transaction. Once the simple transaction conditions are selected, combinations of filters can be selected via the filter icon in orange (shown below after the transaction amount condition).
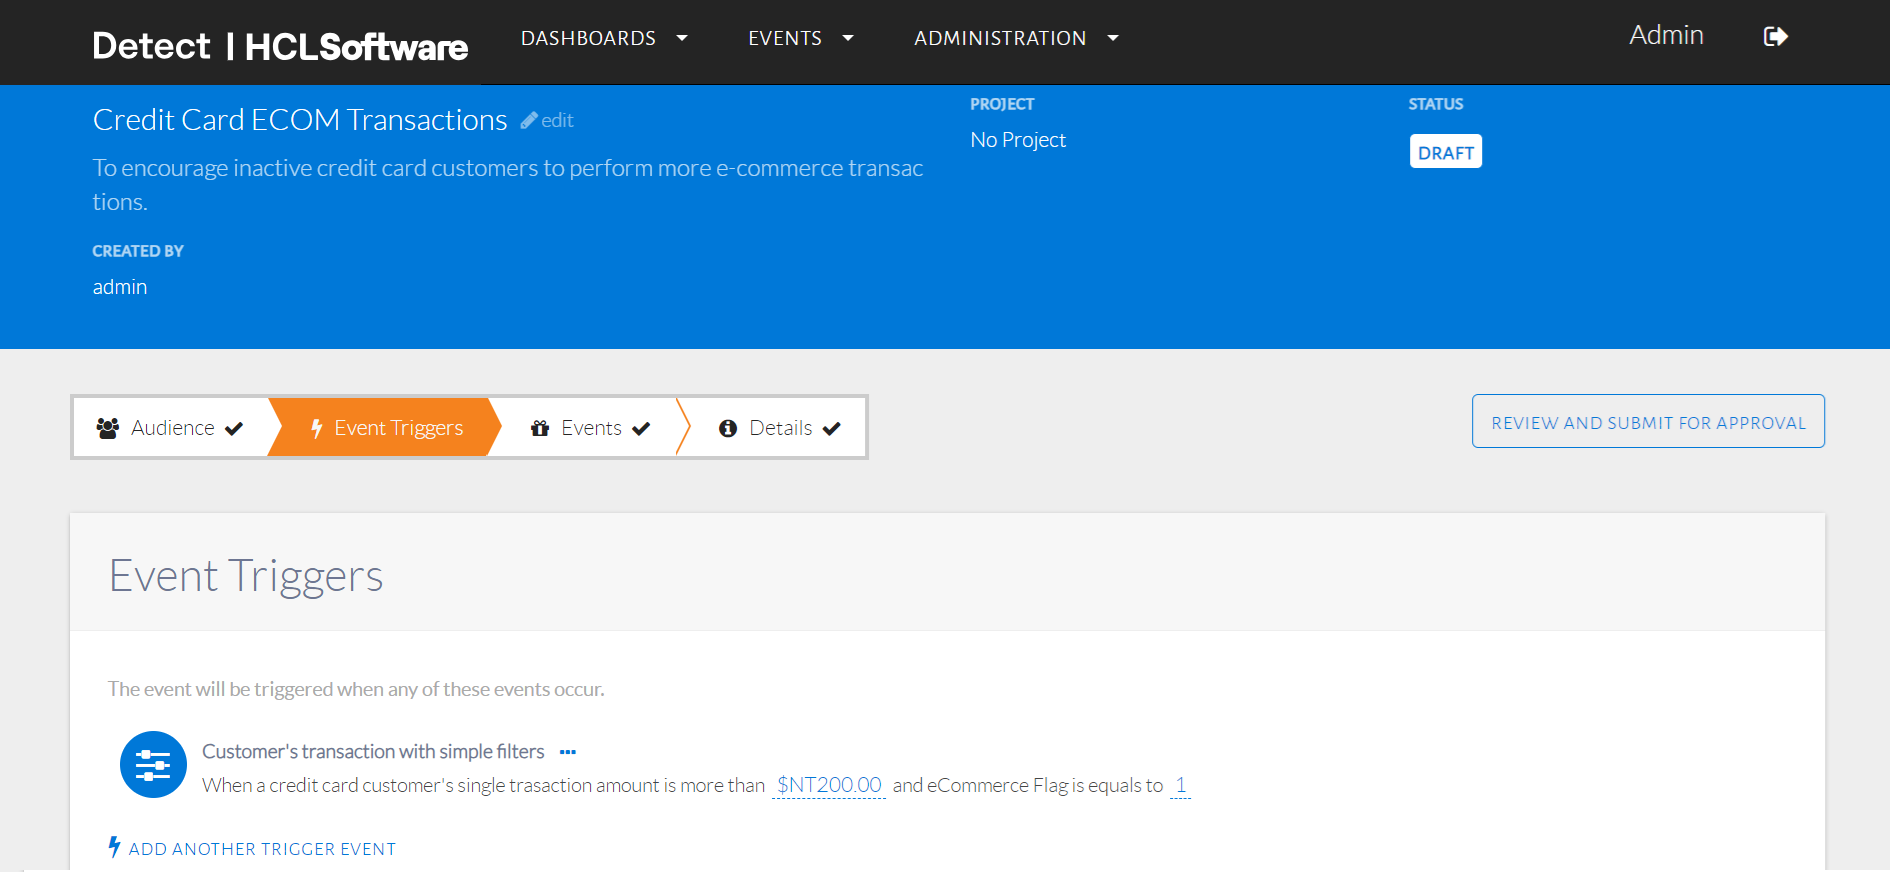
Trigger an event on e-commerce transactions
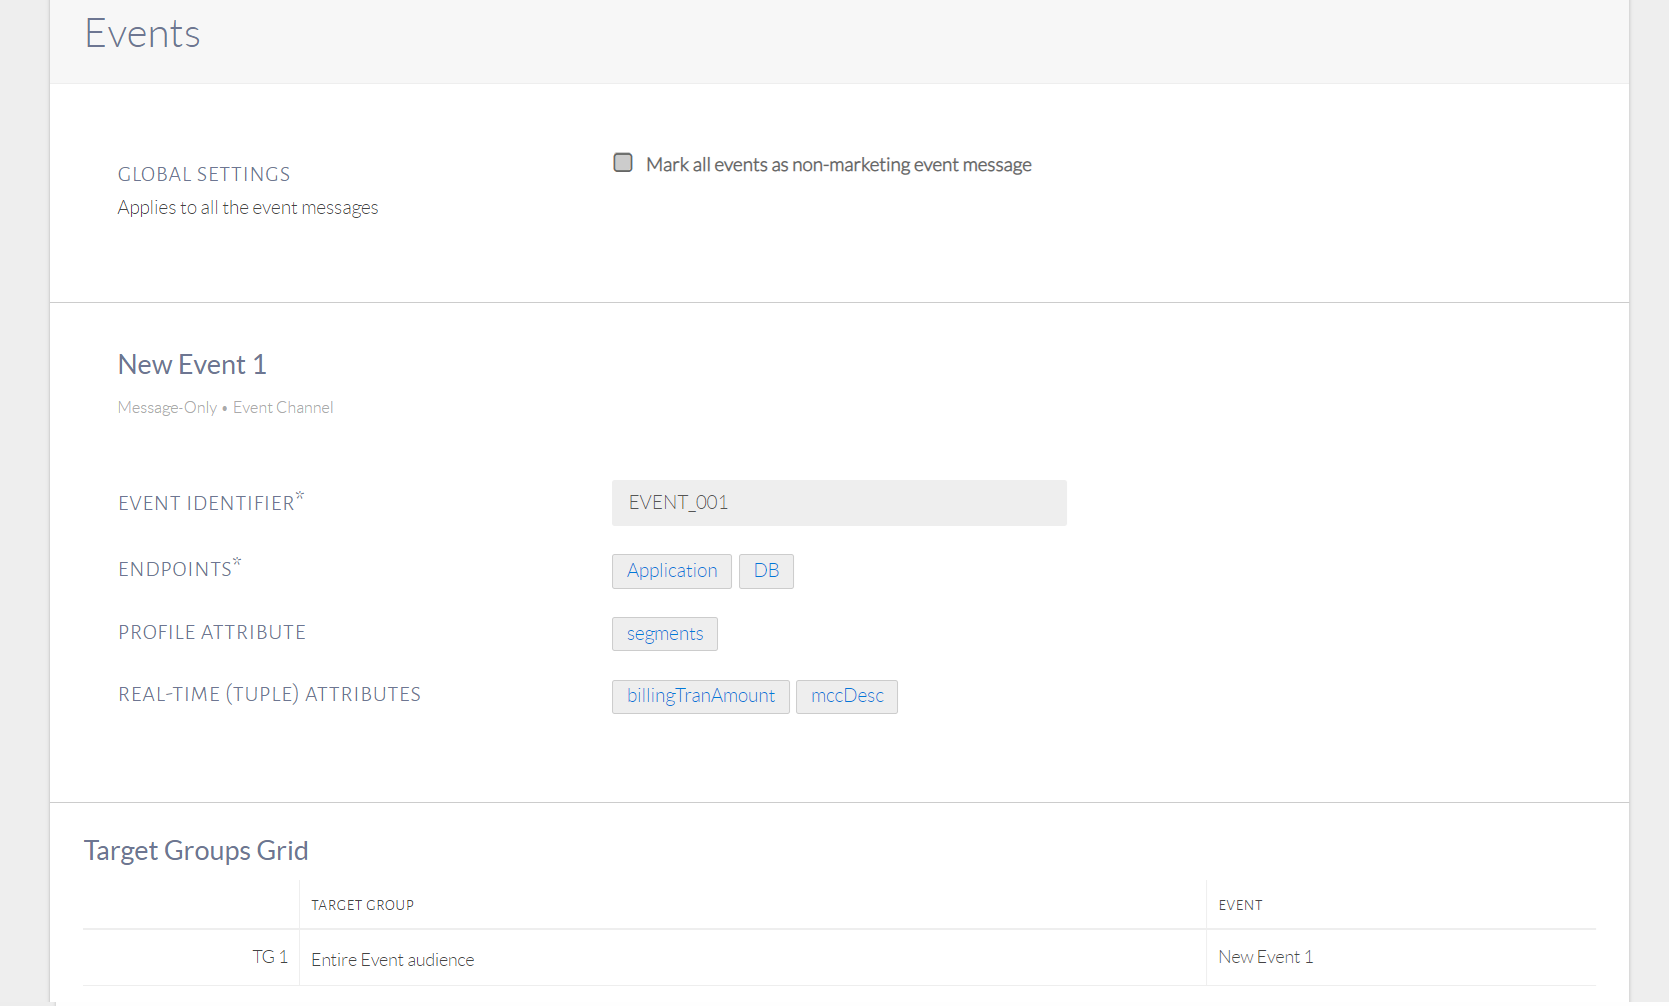
Step 5: Events
Set an event to be given to the qualified customers, as seen in the image below. Fill up the Event ID to correspond with events configured in the downstream system. Downstream systems can be selected as Application (for real-time events) or DB (for batch events). Lastly, profile & real-time attributes can be selected based on the event & offer.
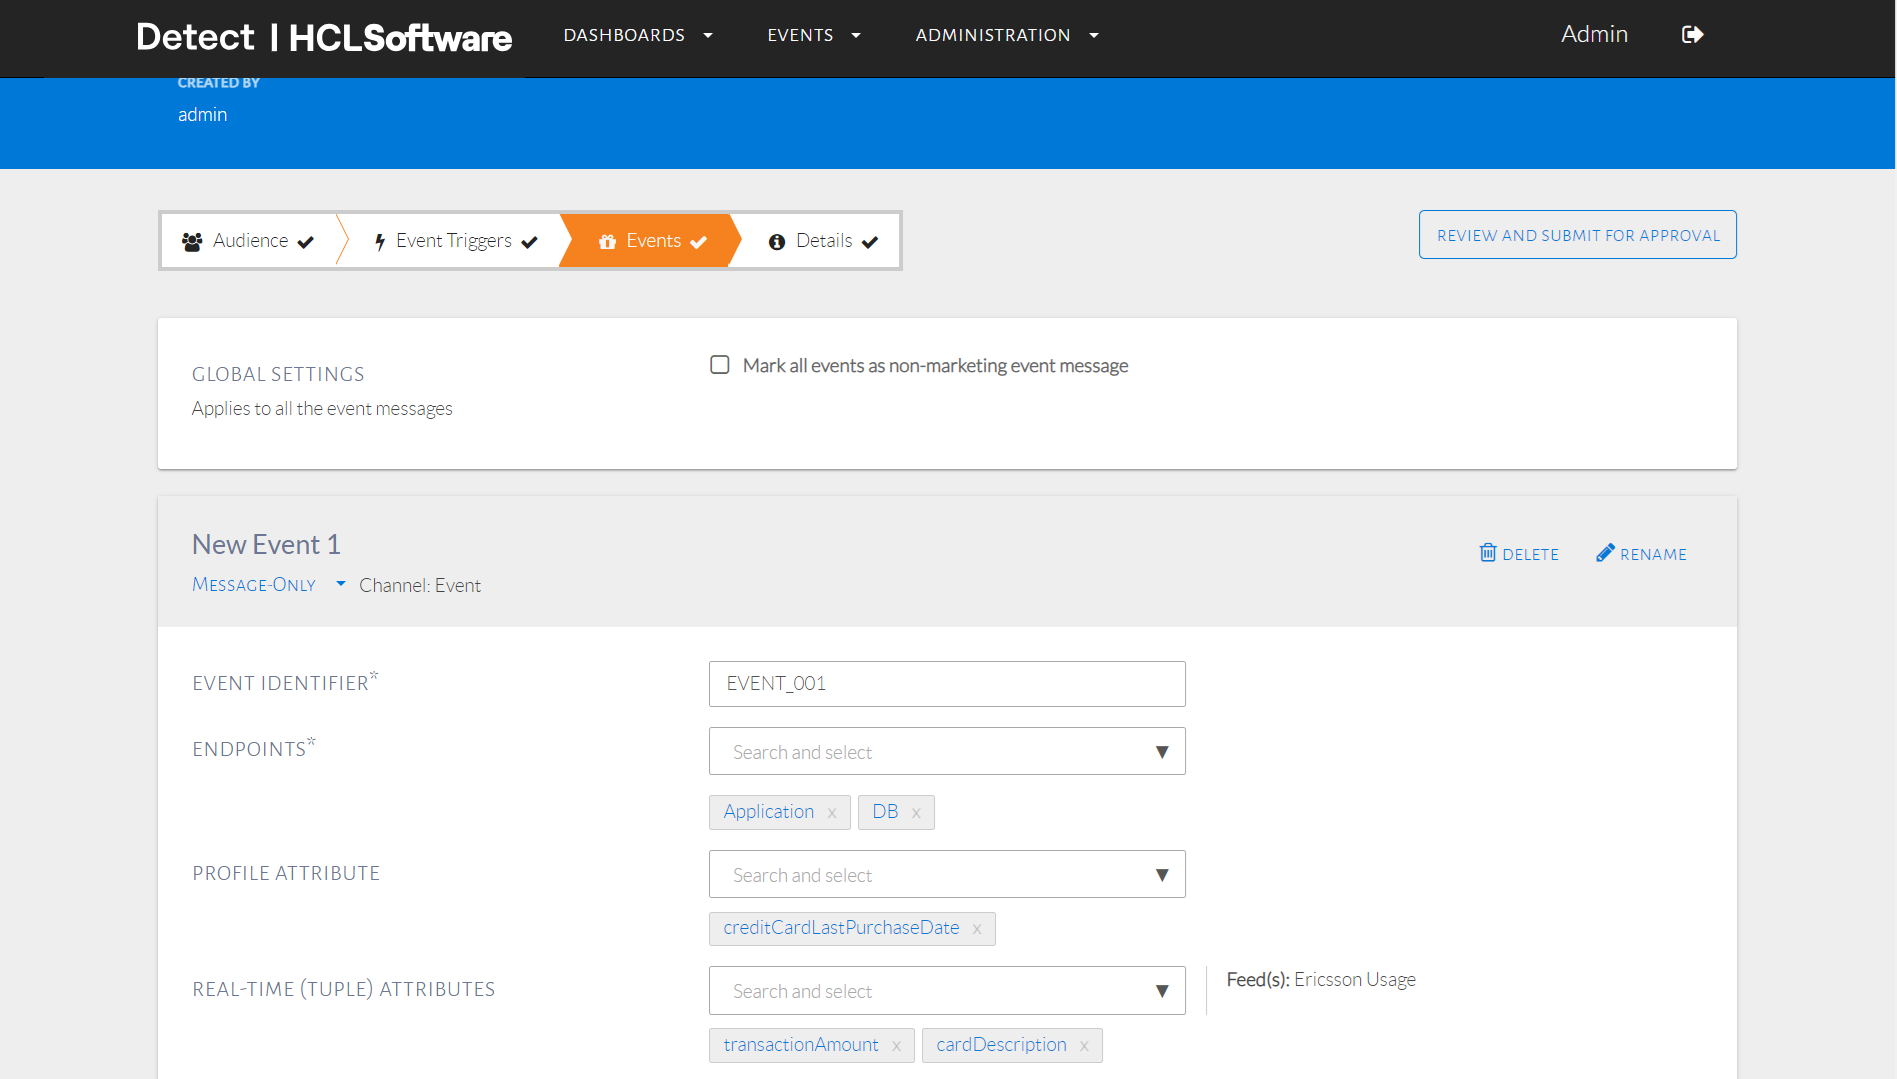
Message-only event fields
Additionally, varying target groups can be selected but for this event, we will go with the default target group including the entire audience.
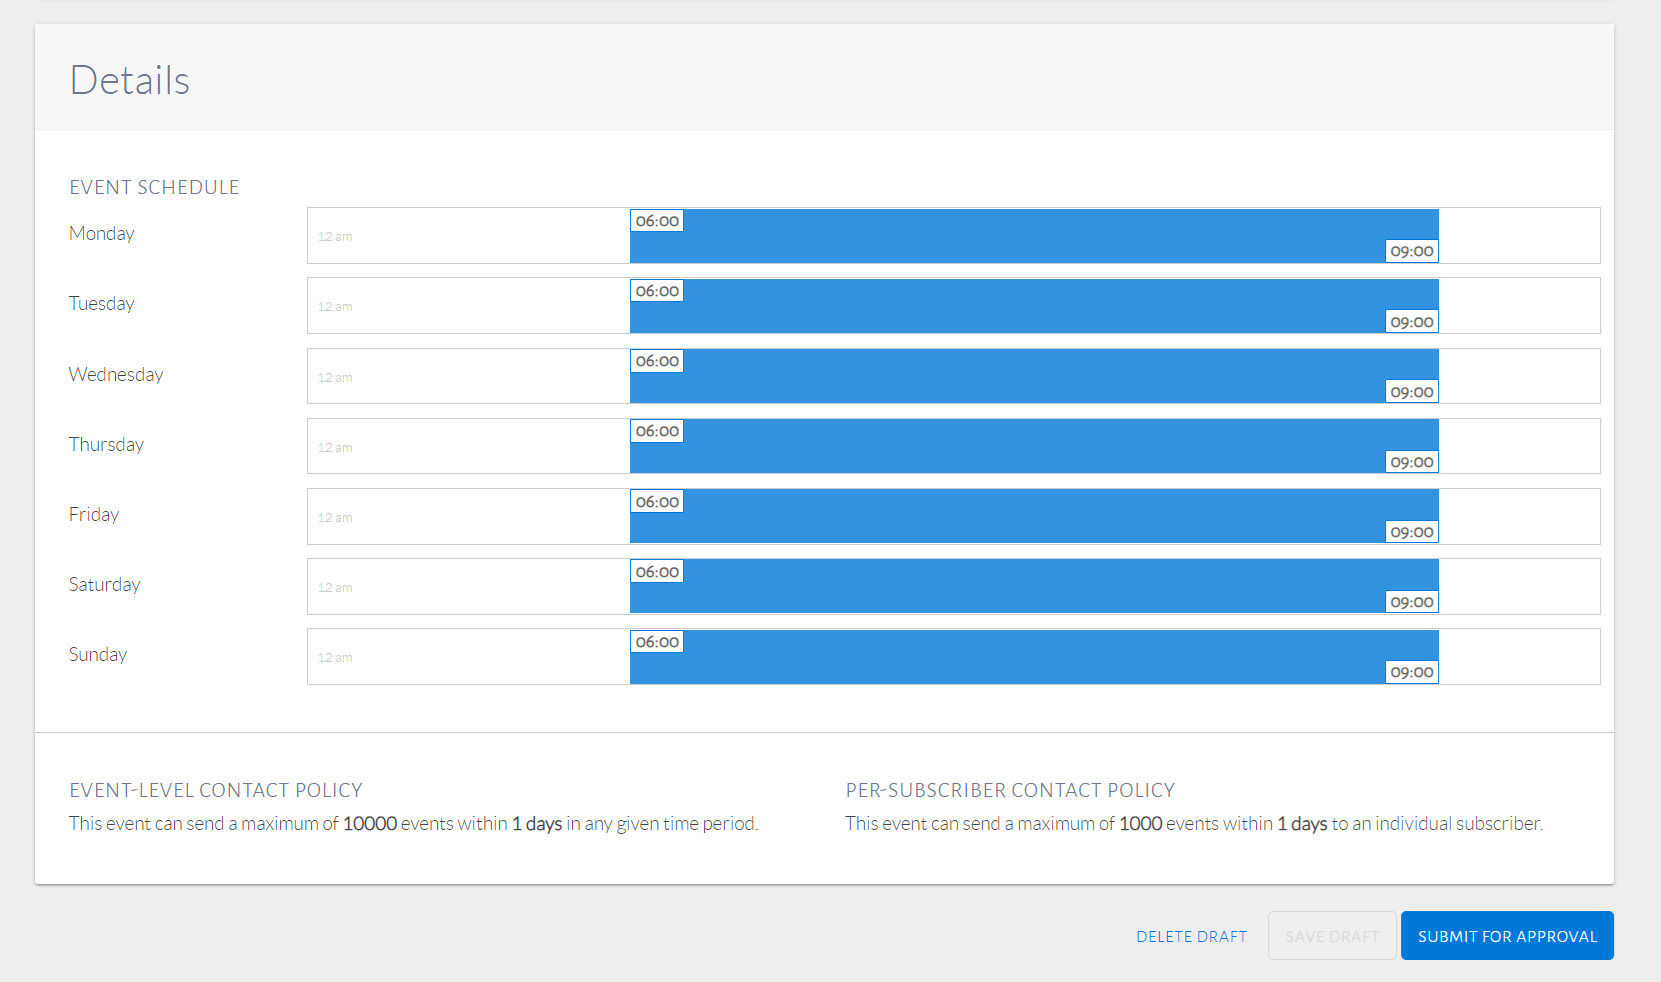
Step 6: Details
Set the details of the event, as seen in the image below. This event can be scheduled to detect triggers on all days, with a time (or times) for each day specified. Maximum events for a specific customer within a time frame and total customers within a time frame can be selected here as well. Click Save and Continue to Review to proceed.
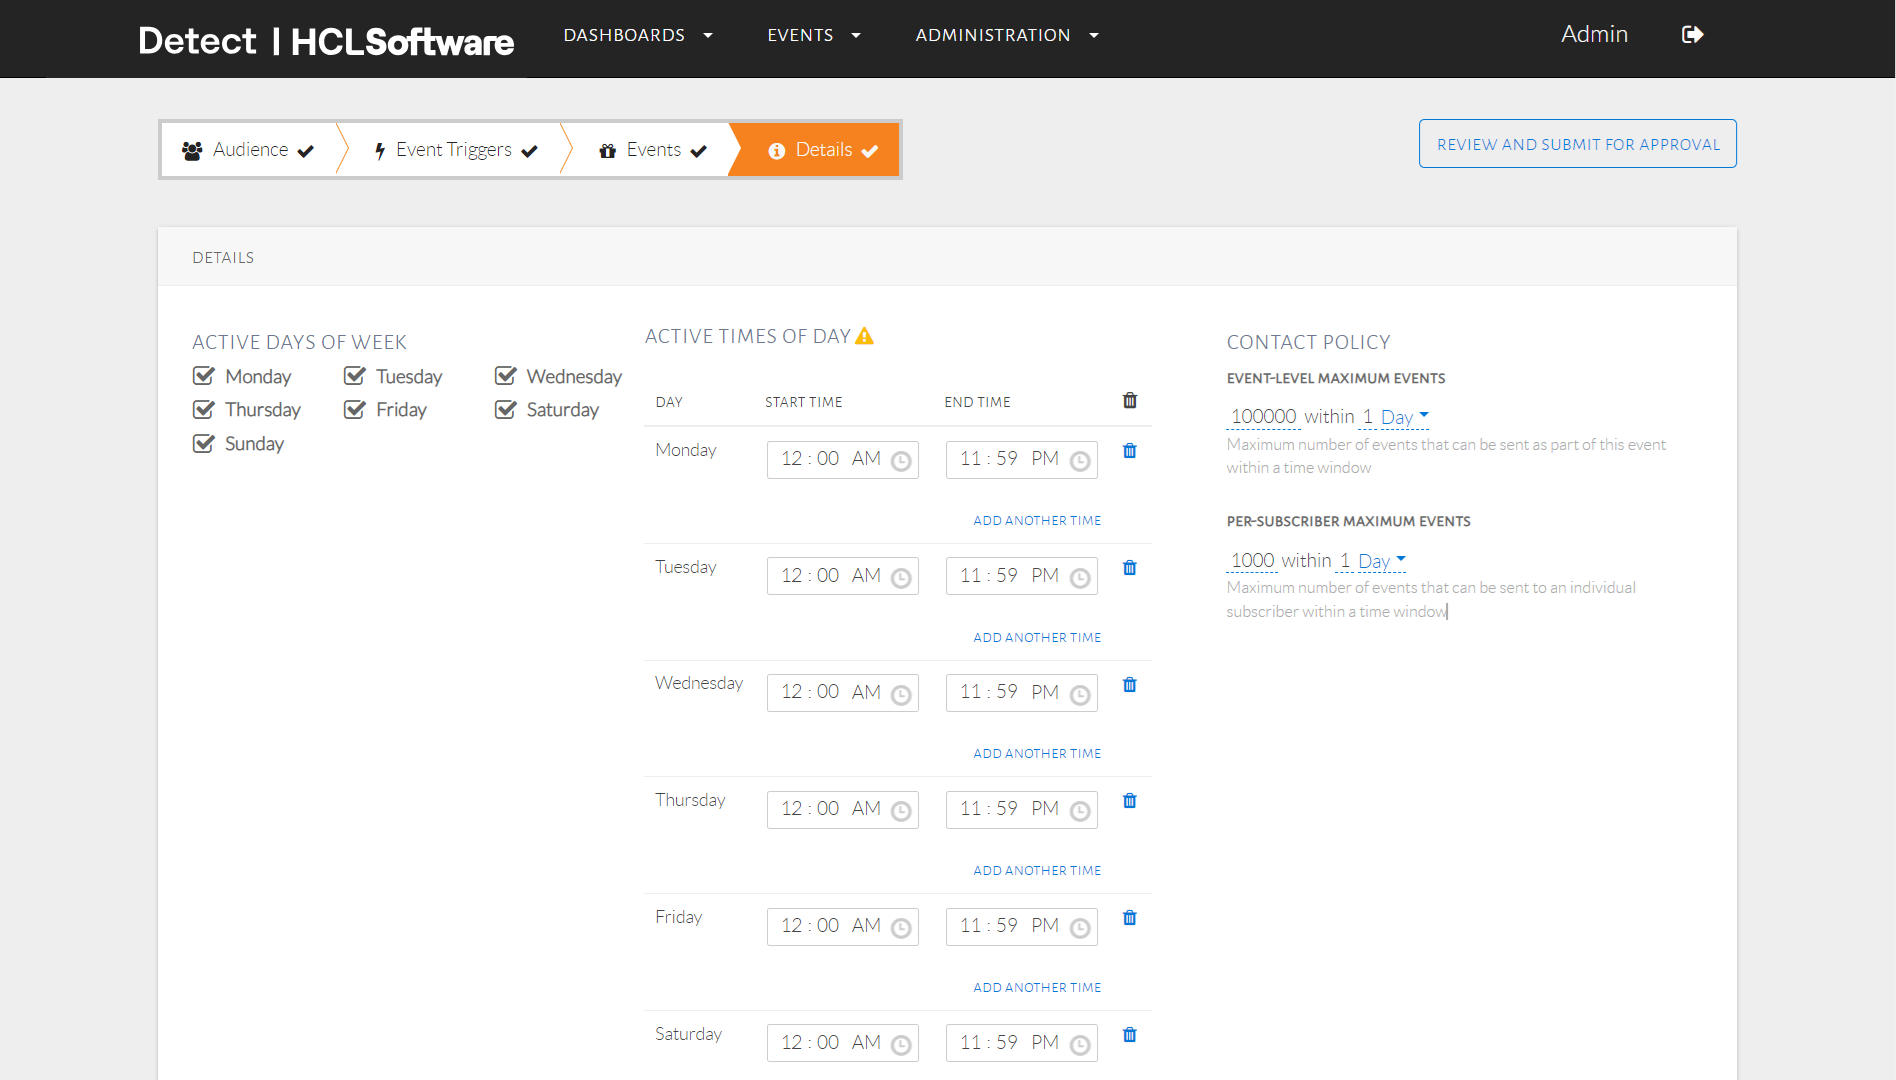
Set event schedule and contact policy
Step 7: Review Event
Review the details of the event and specify the dates the event will run. Click Submit for Approval. Once a Checker (or Admin) has reviewed and approved the event, they can select a time period for the duration of the event and deploy it as shown in the image below.
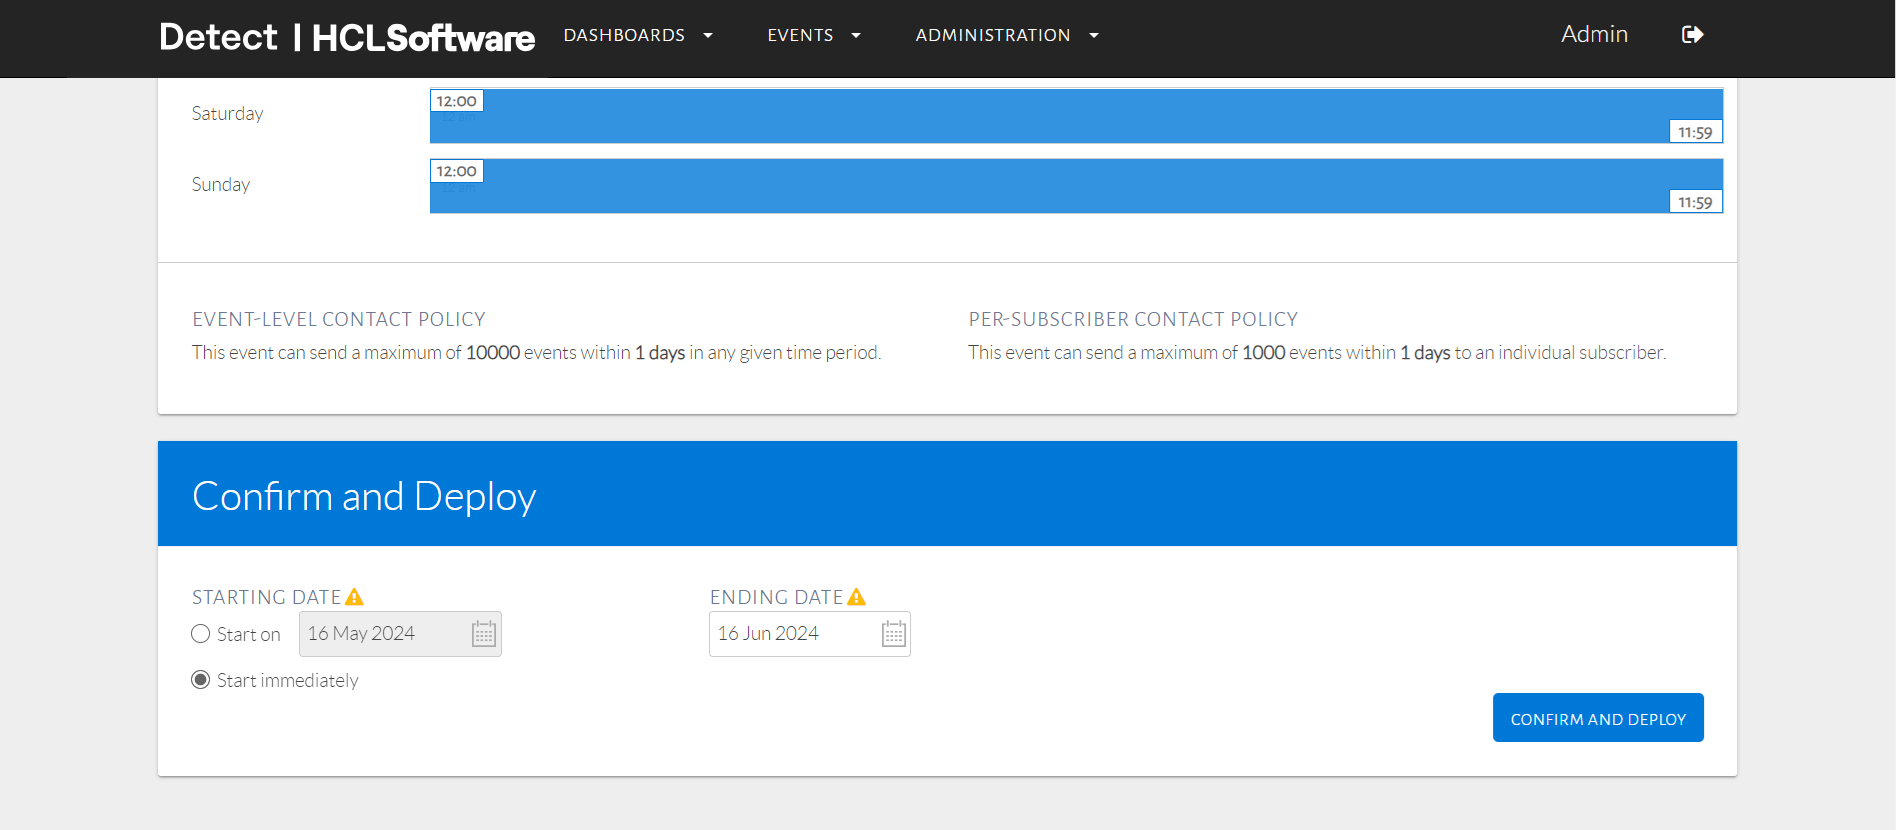
Confirm and deploy
Detailed Steps
Event Name & Description
On this page, type in the Event Name and Event Description as seen in the image below. These details are required to proceed. For this event, the objective is to encourage Credit Card customers to make ecommerce transactions.
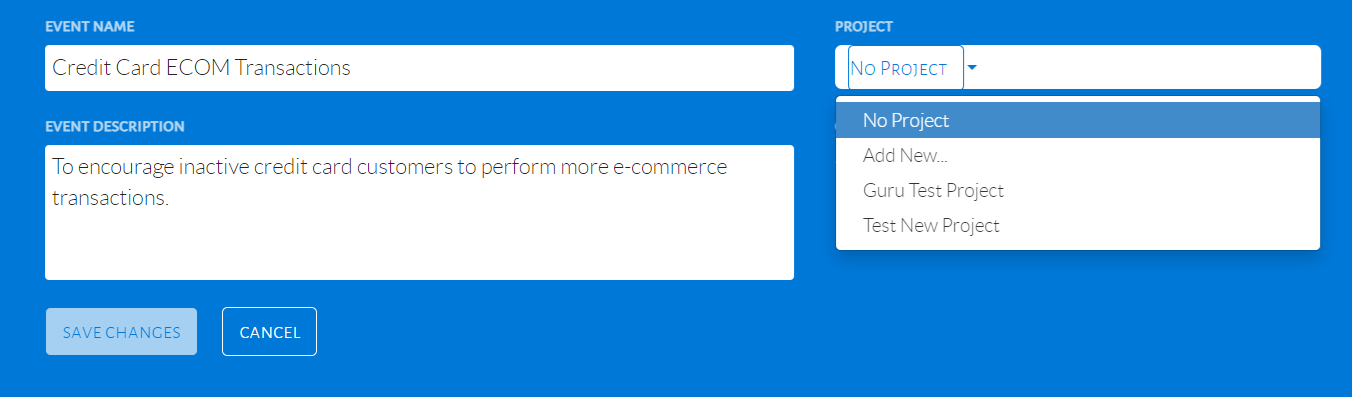
Details for new event
The event can also be classified under a project, which is optional. Select a project name from the drop-down menu under Project. We will classify this event under Test, which can be created by choosing Add New.
Audience
The audience of an event are customers with specific characteristics that are being targeted. For this event, the audience are customers who have Credit Cards and who have been inactive in the last 30 days for Purchase Transactions.
After proceeding from Event Description, a page will be displayed as seen in the image below. Click Audience Conditions to begin selecting conditions.
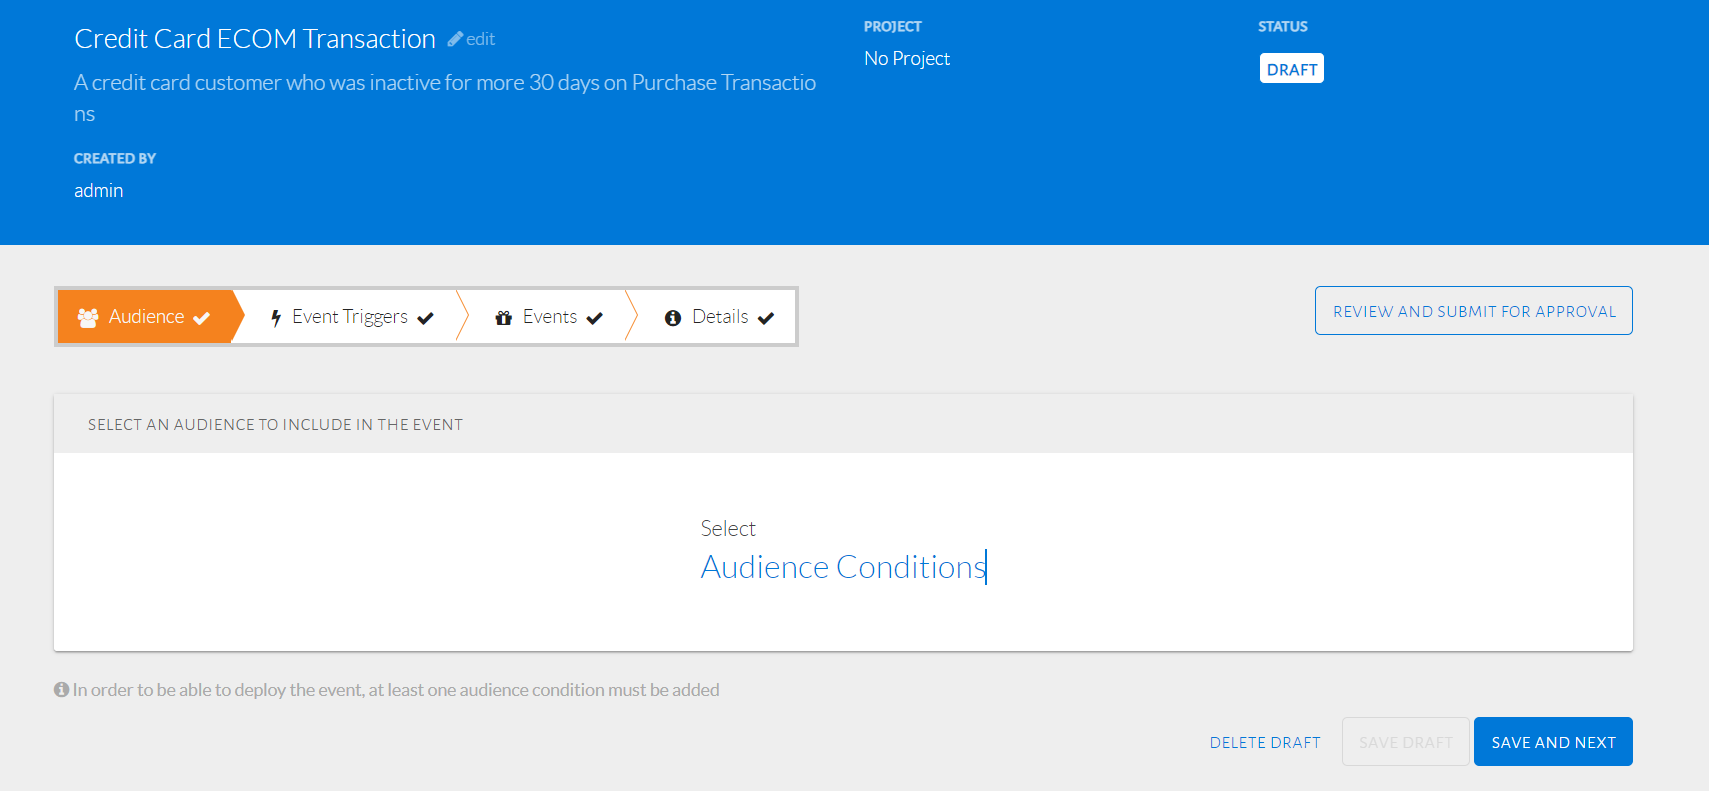
Select audience, triggers, events and details
A pop-up will be displayed as seen in the image below where the user can choose from different conditions. The Subscriber Profile tab shows 3 general categories.
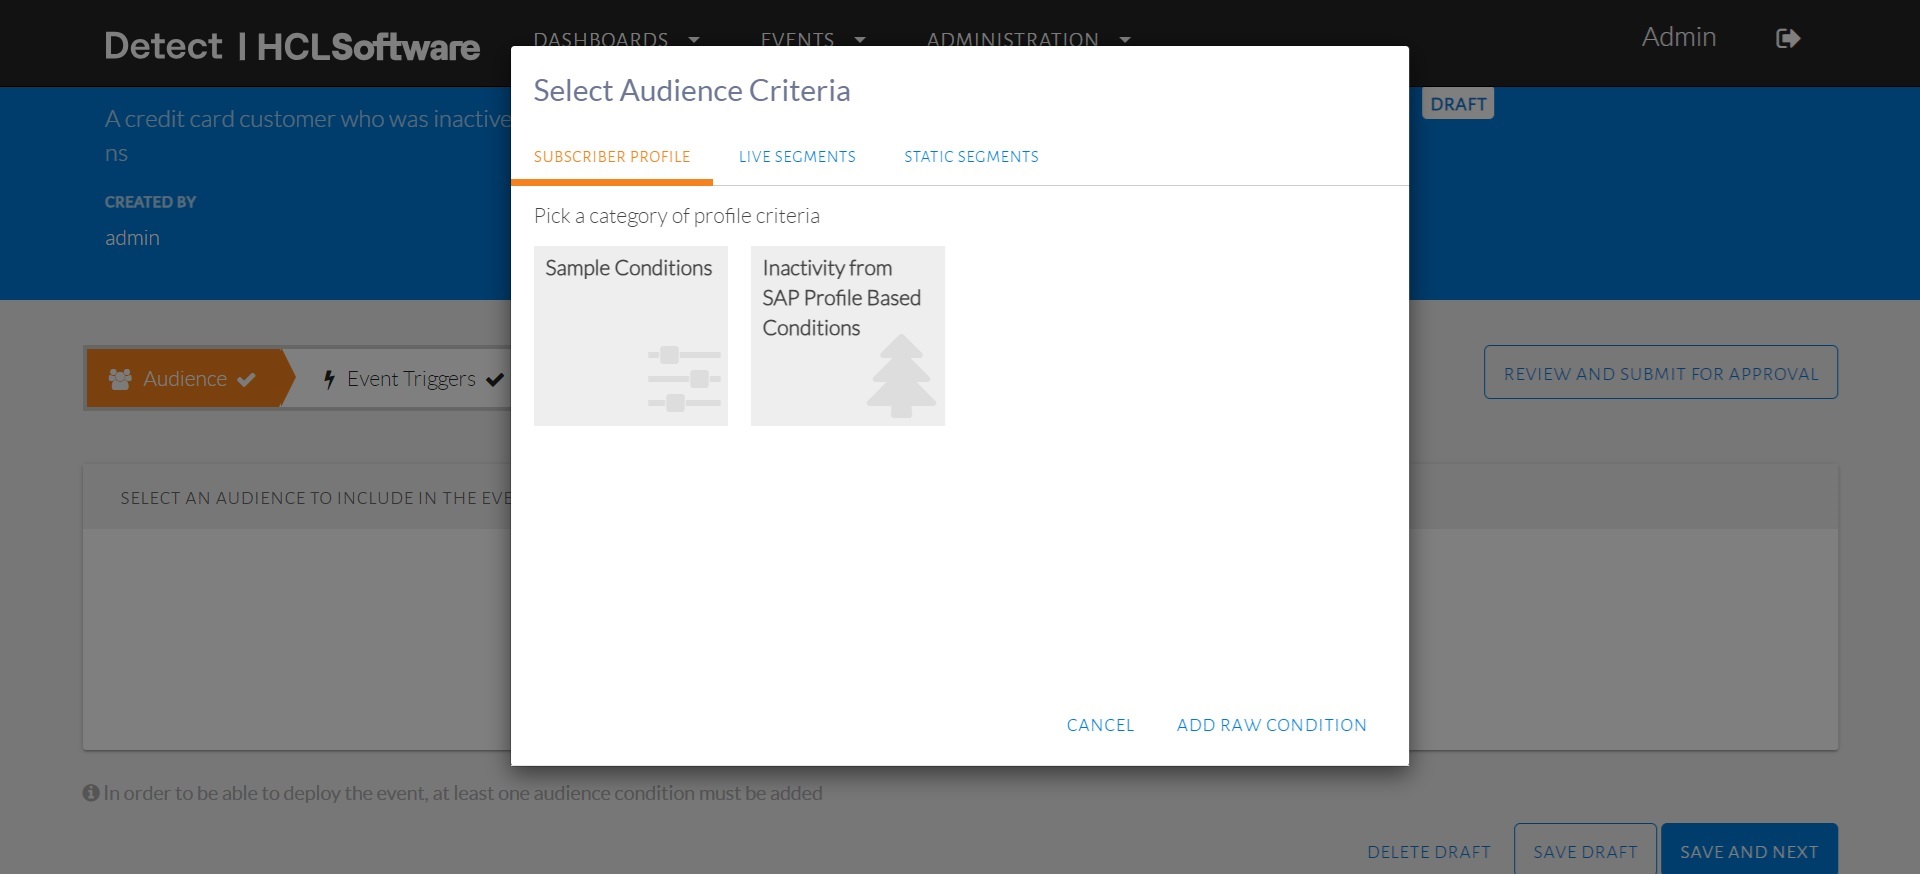
Select audience conditions
Profile-Based Conditions filter customers by their profile attributes such as age, gender or nationality. Real-Time Usage Based Conditions filter customers based on their real-time transactions. Inactivity based Conditions filter customers based on the last activity recorded on their card as seen in the image below. Hovering the mouse over a condition will show the condition, where the underlined words represent values that can be altered for that filter.
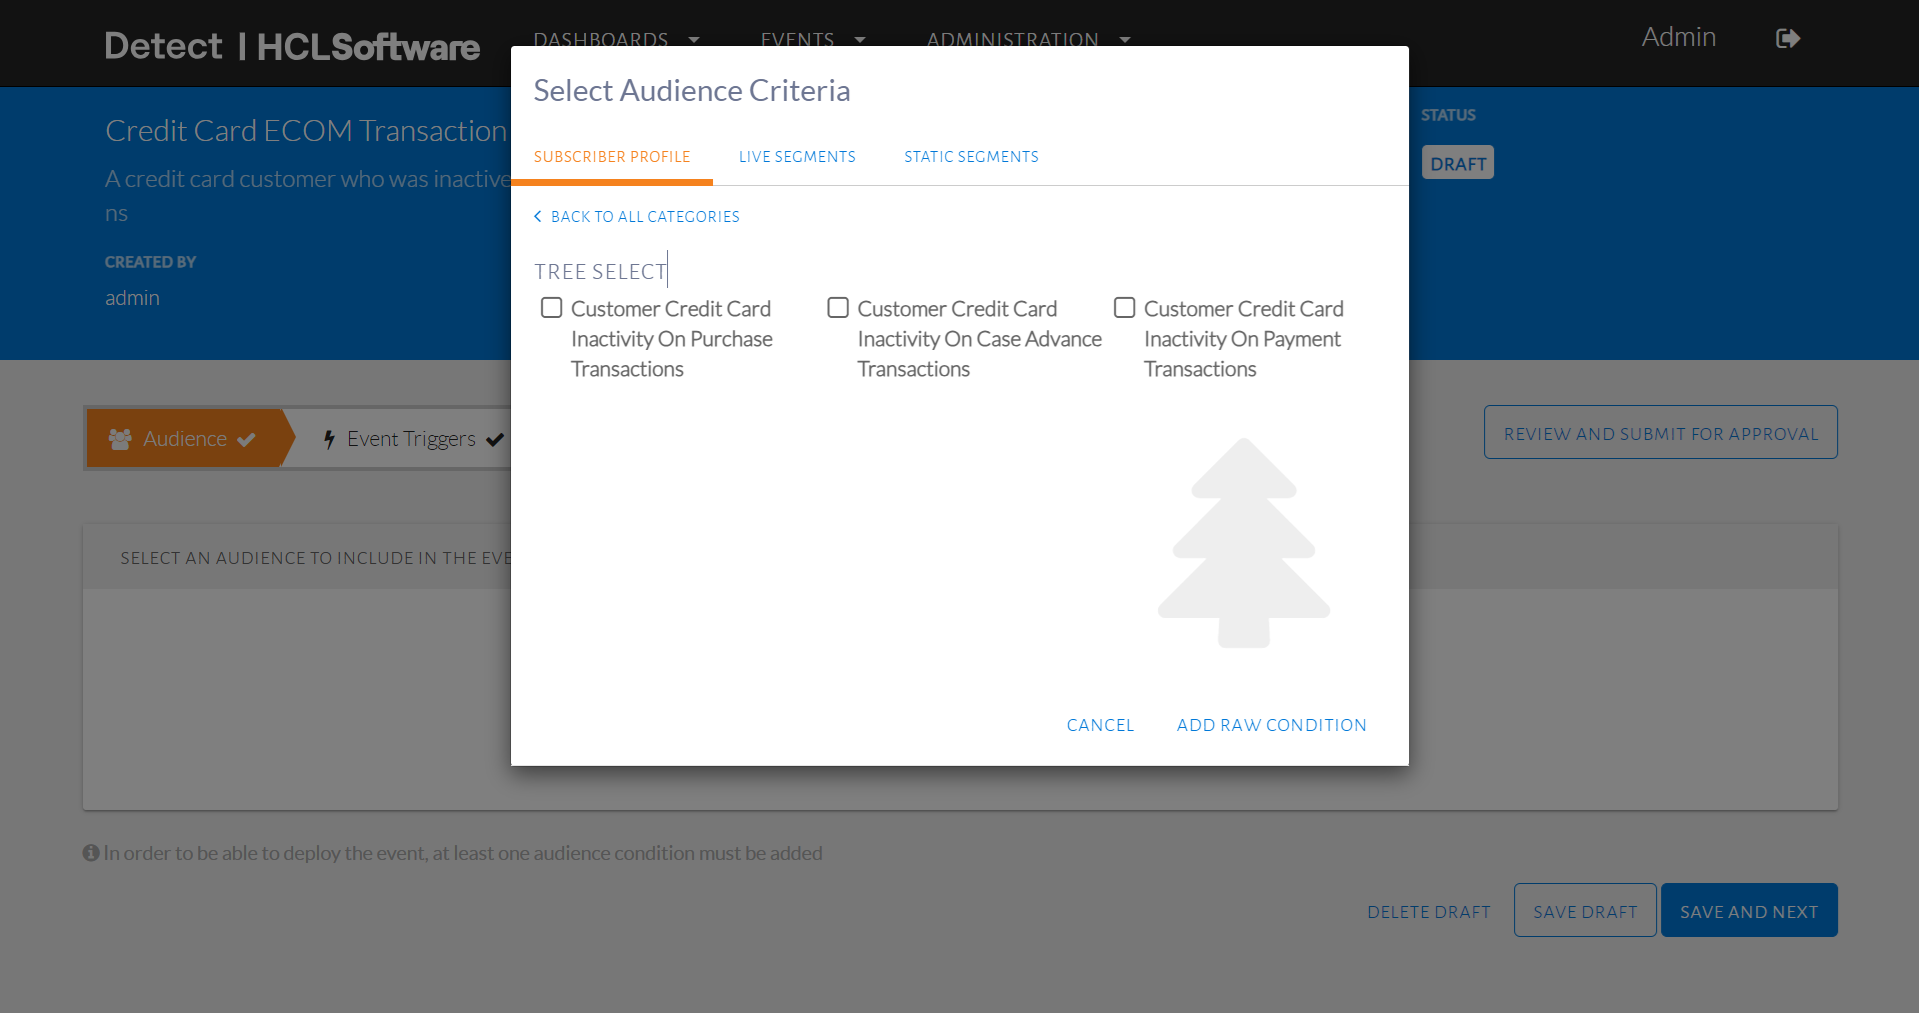
Inactivity based audience conditions
The selected condition must allow us to filter the count of transactions in the last 1 month. Therefore, the selected condition is Inactivity on Purchase transaction count for credit card transactions.
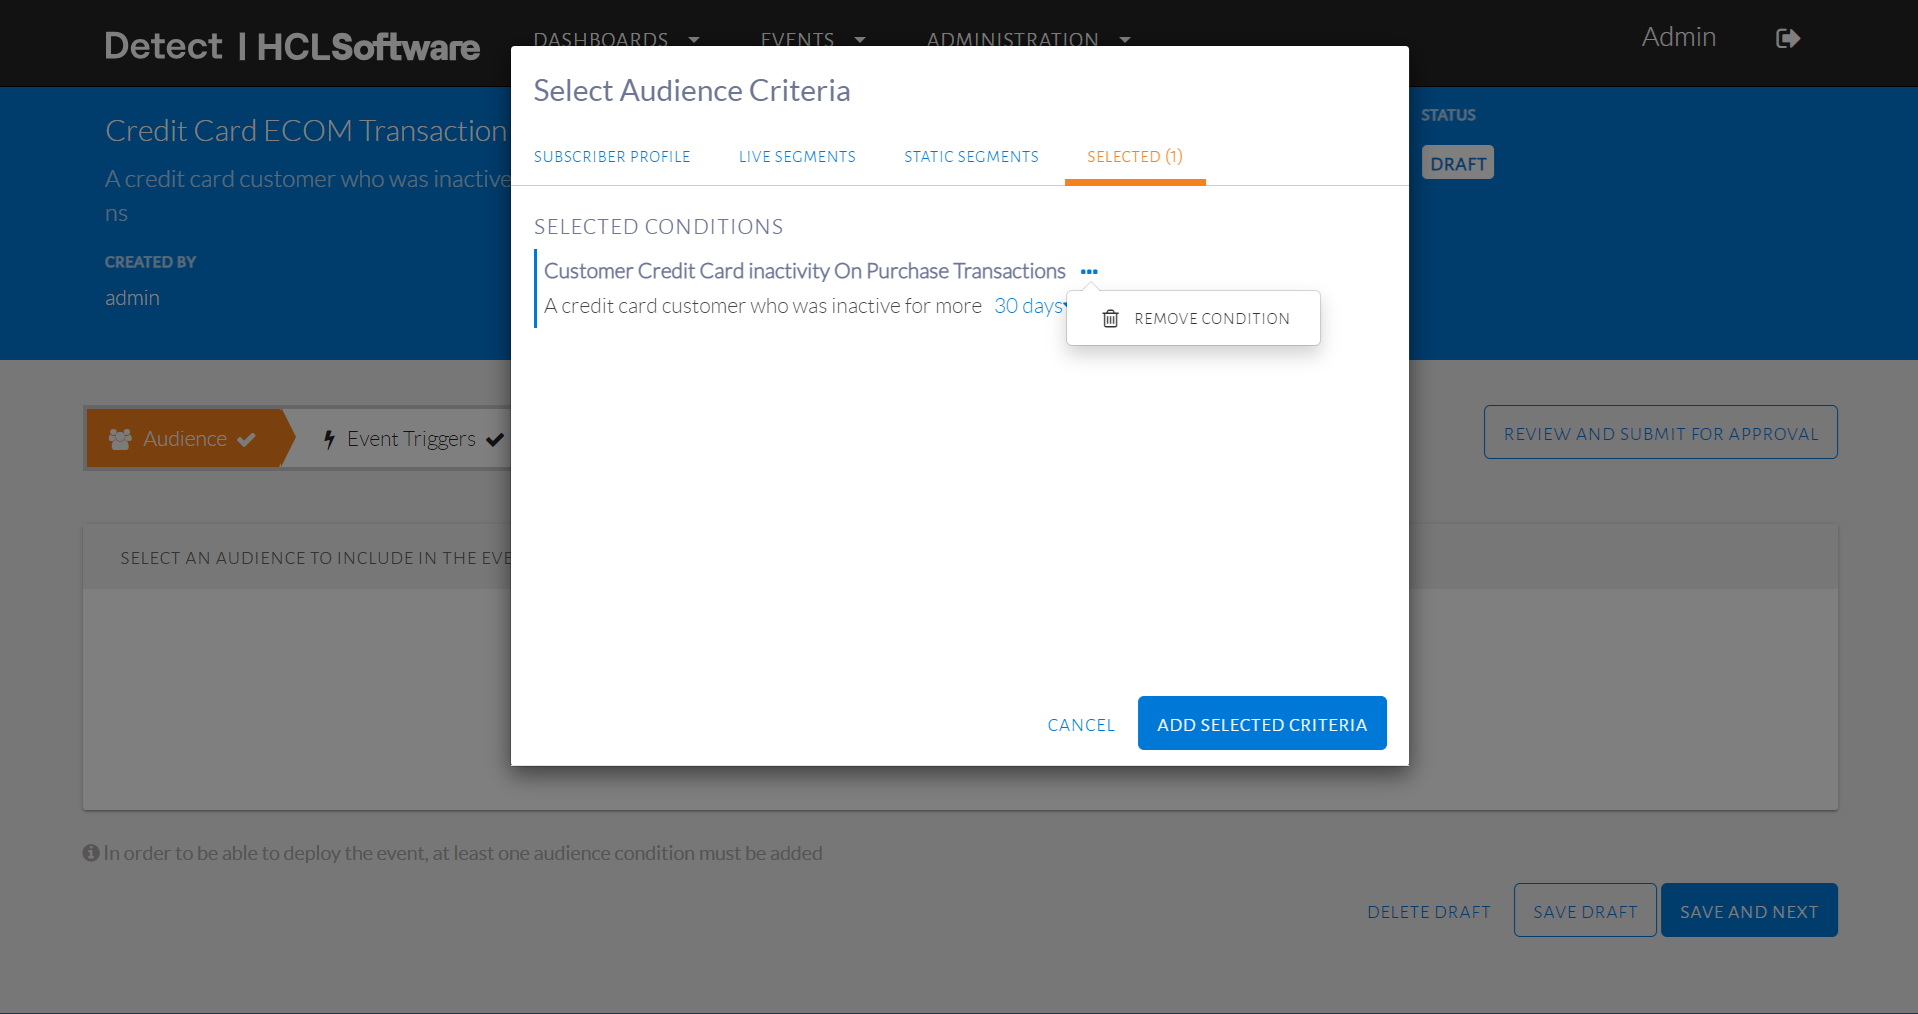
The user can choose many different kinds of conditions and view all on the Selected tab. A condition can be removed, as seen in the image below.
Remove a condition
A condition can also be edited on this tab, as seen in the image below. The values in orange represent the different filters that can be altered. In the figure below, Customer Status has valid options that can be selected. Another example is in the inactivity condition, where more or less can be selected and the time period can be changed. Once editing is complete, click Add Selected Criteria to proceed.
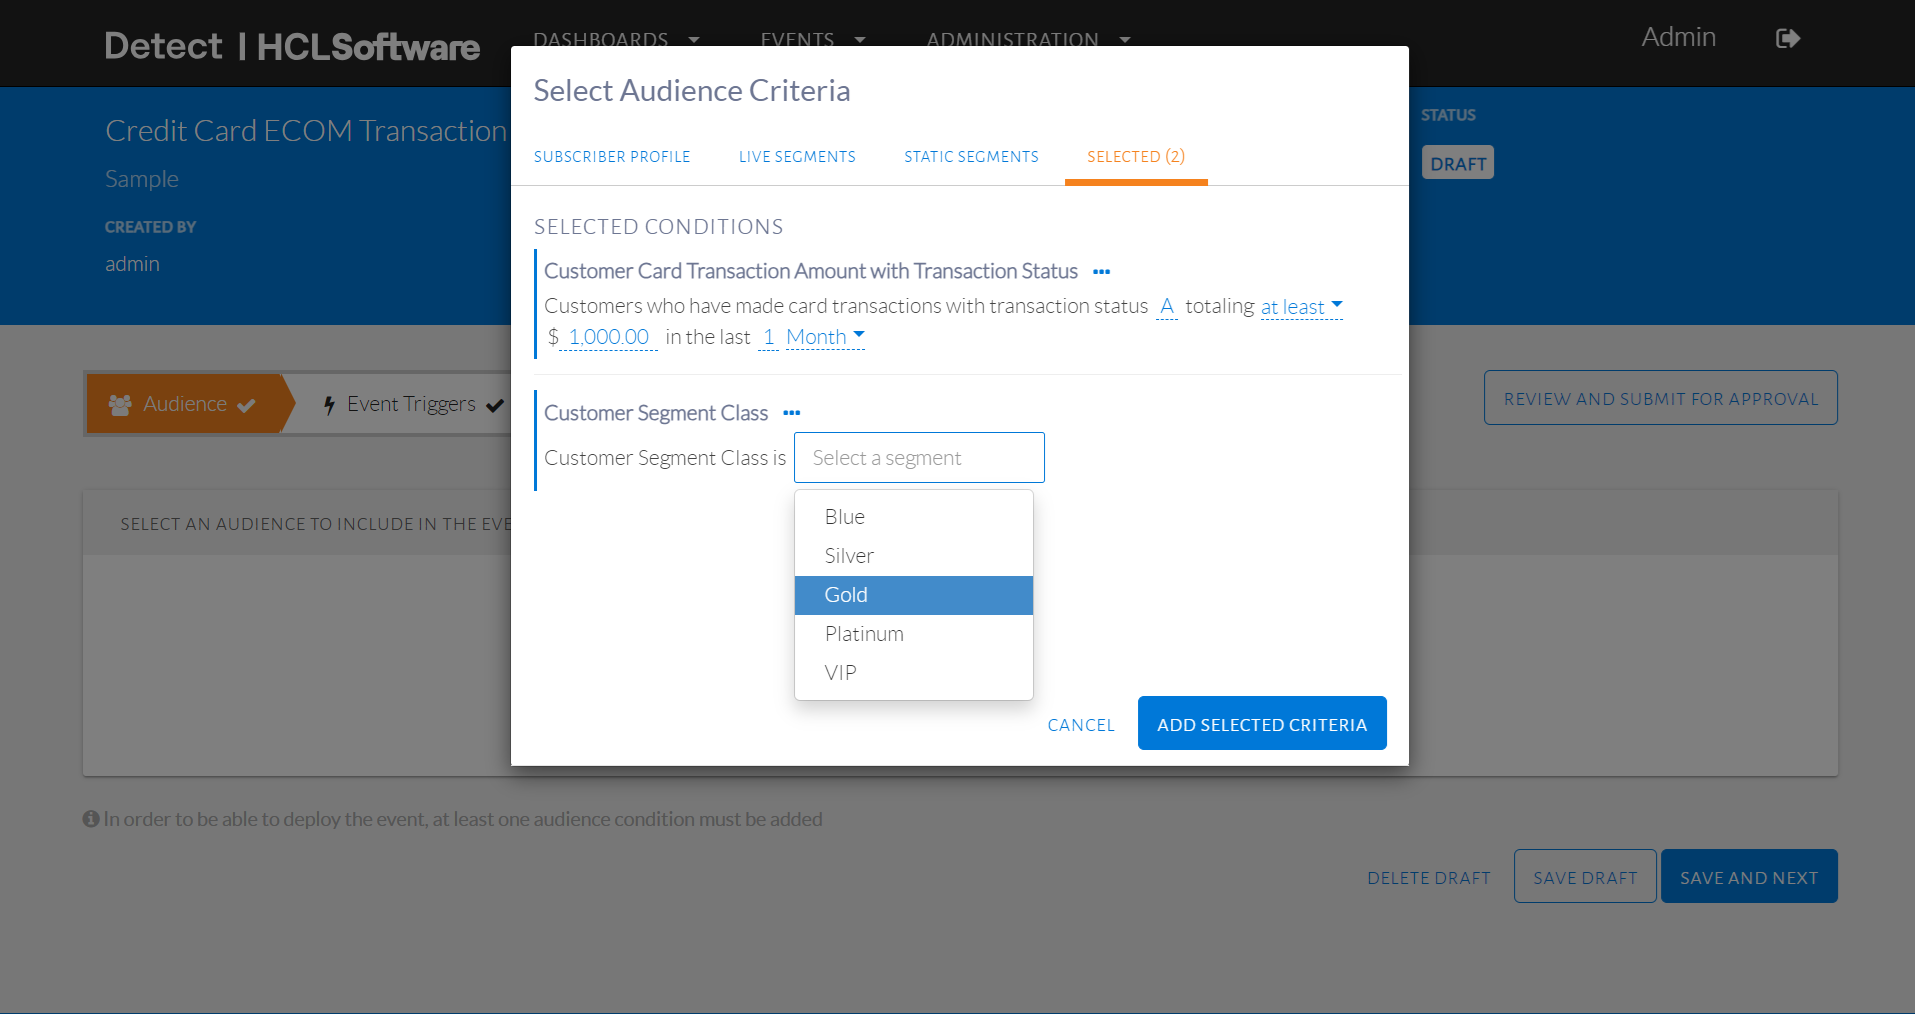
Set the values for the different filters within a condition
The audience conditions will then be displayed as in the image below. The values in orange can also be edited on this page, just as on the Selected tab.
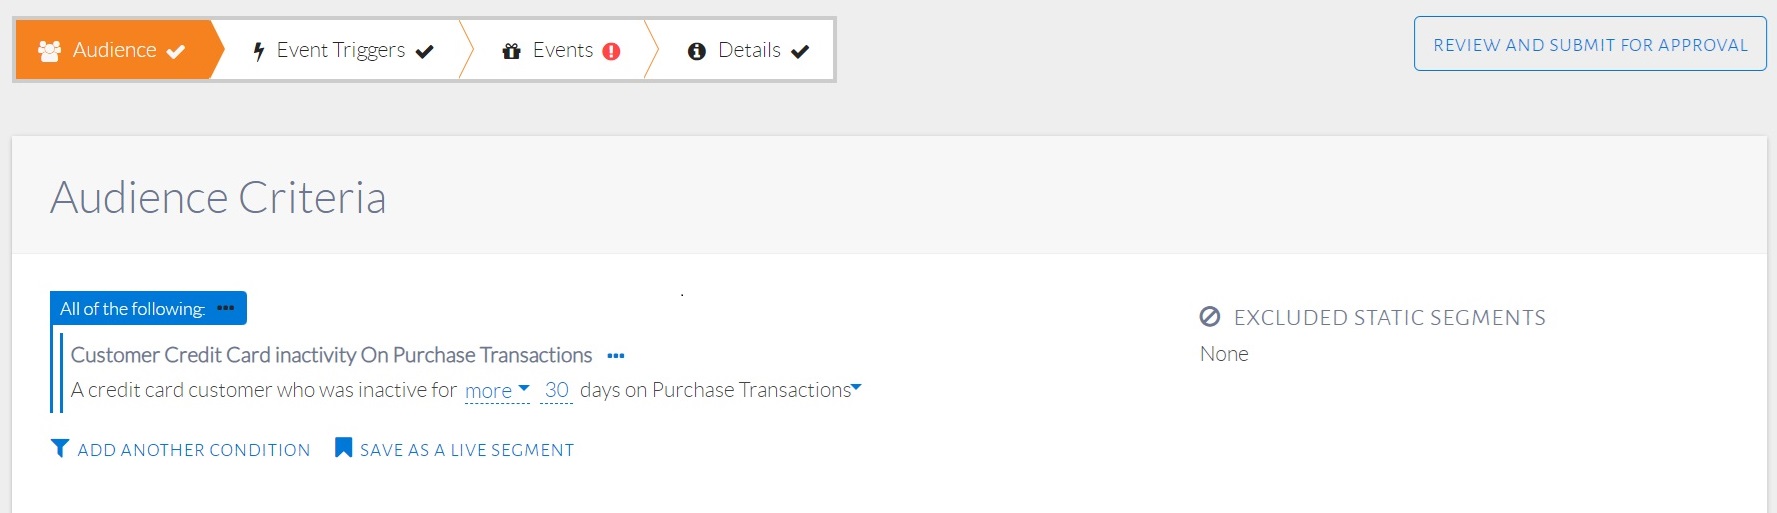
Selected audience conditions displayed
Under Audience Stats, the Estimated Size shows the number of customers who have satisfied the audience conditions, or audience size. The Percentage of Total Subscriber Base being targeted is also shown. Click Save and Next to proceed. To delete or save the draft click those respective options.
Trigger
The trigger is an action a customer must do to qualify for an event. For this event, the trigger is when a customer uses their Credit Card to make an ECOM transaction worth more than NT $200.
After proceeding from Audience, a page will be displayed as seen in the image below. Click Real-time Triggers to begin selecting conditions.
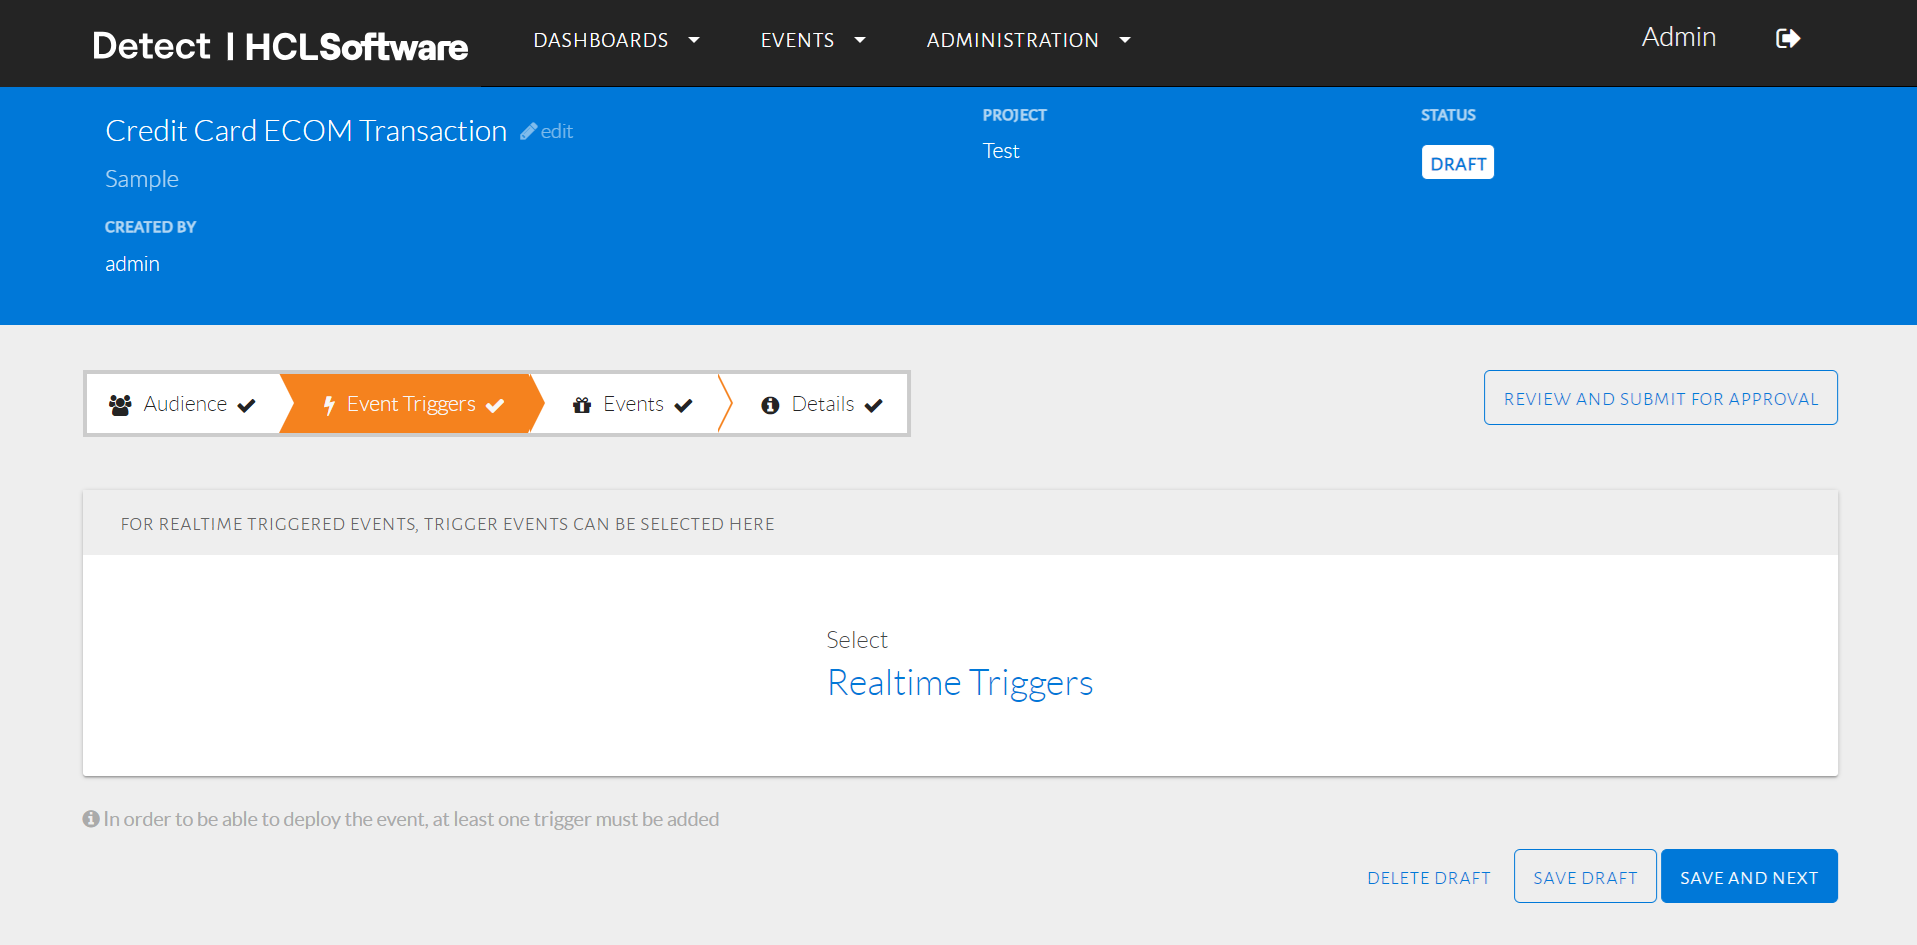
Trigger condition page displayed
A pop-up will be displayed as seen in the image below where the user can select from different conditions. The generic category for trigger condition here represents the real-time source feed.
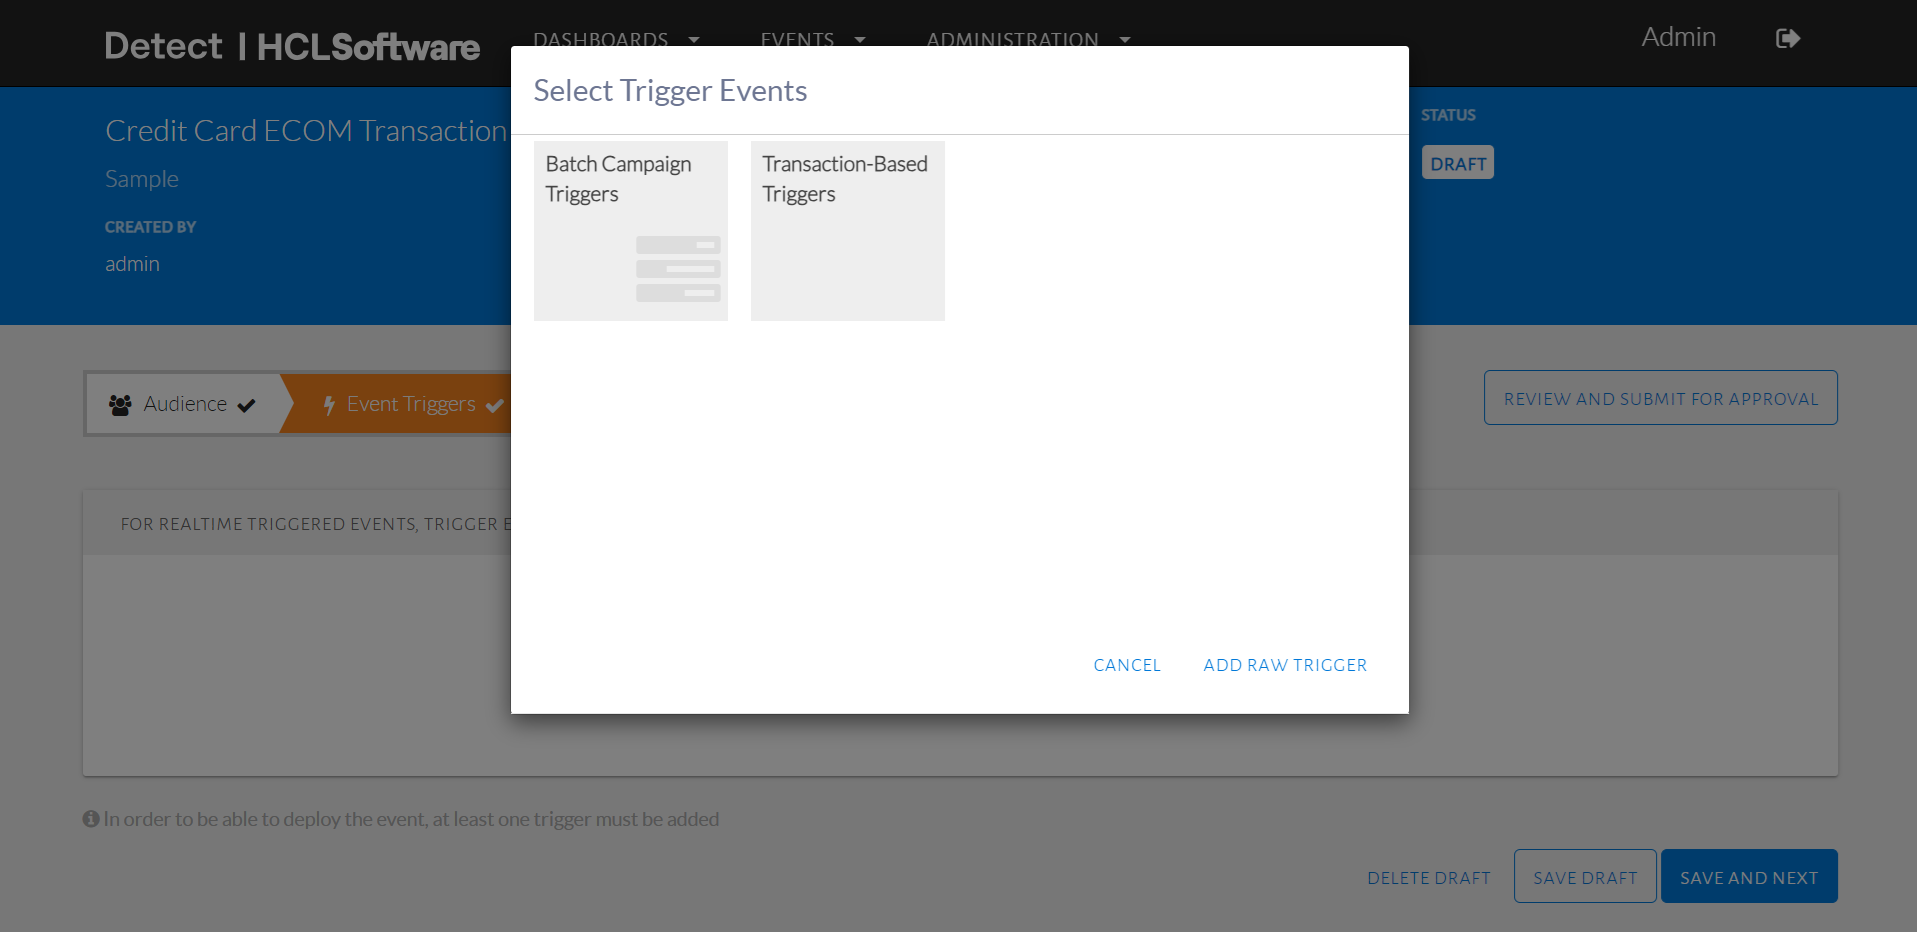
Select trigger conditions
Transaction-Based Triggers monitor all customers (not just those in the audience) and identify those who have done a specific type of transaction, the moment they do it. The different trigger conditions can be seen in the image below. Hovering over a condition will show an example, where underlines represent values that can be edited for the filter.
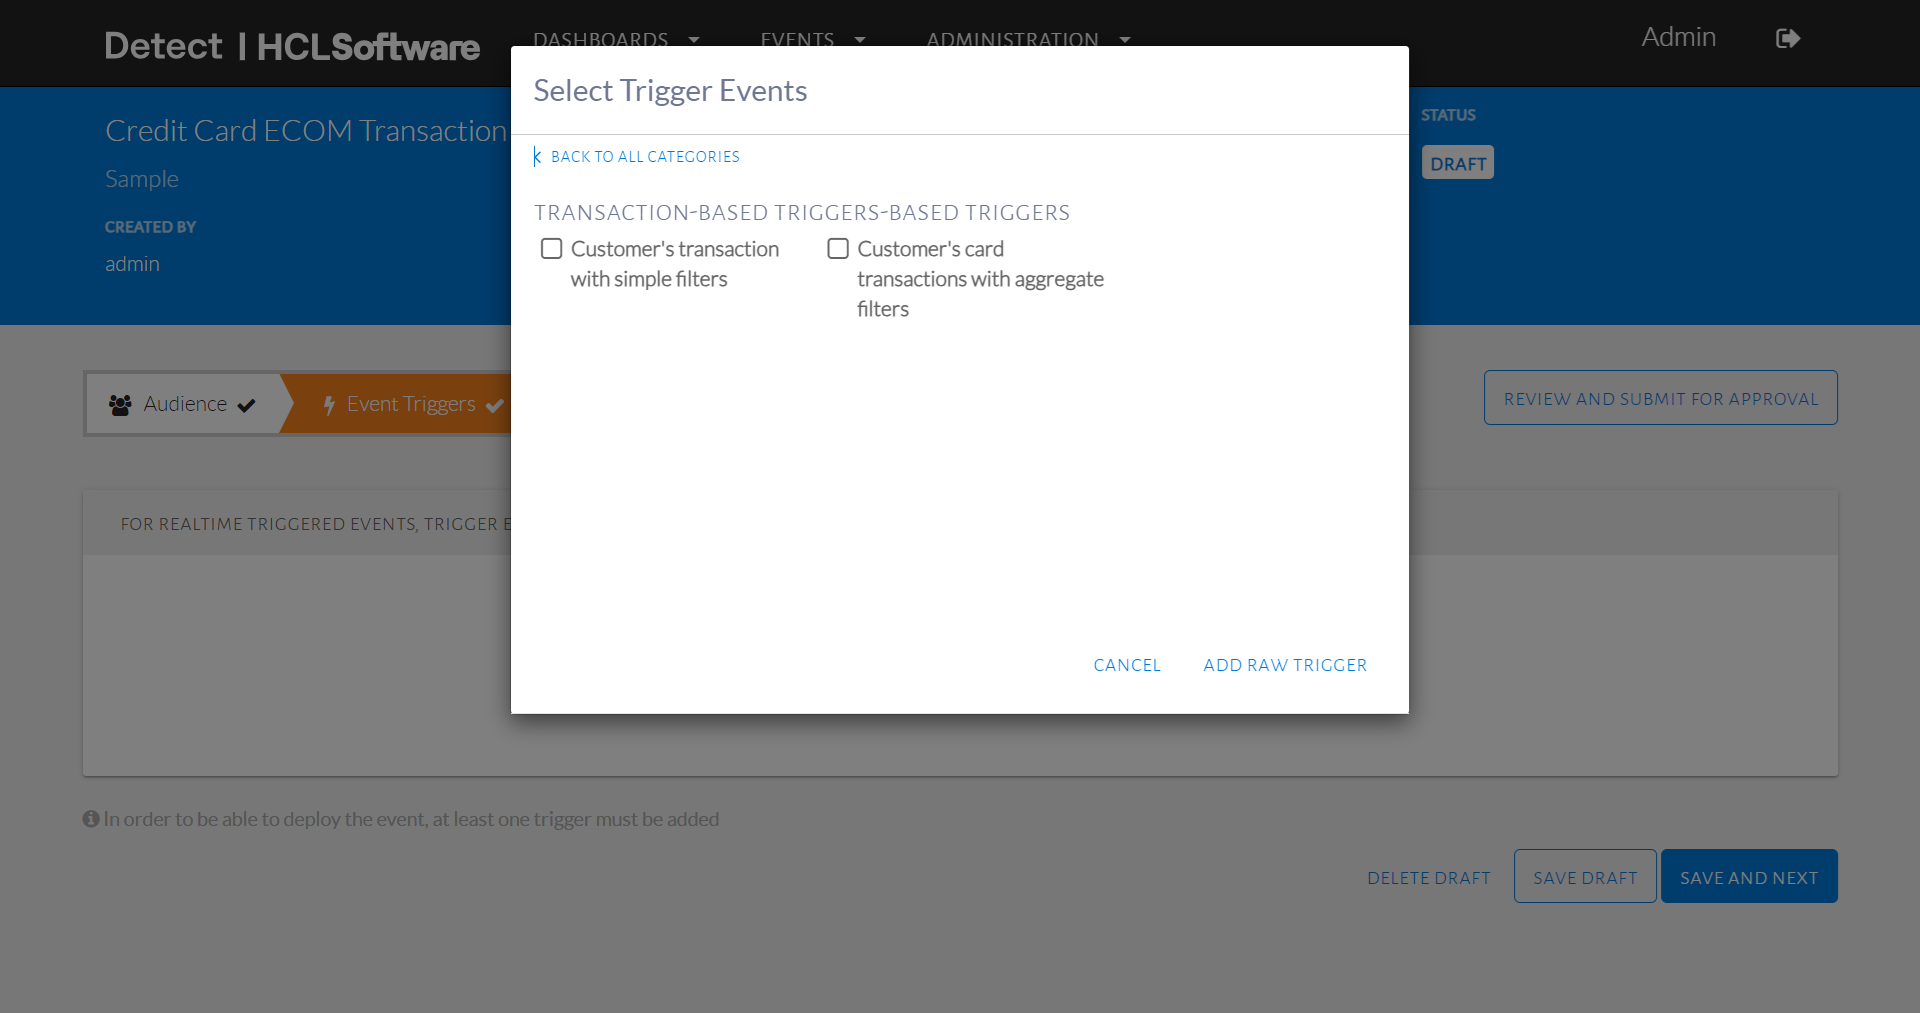
Transaction-based trigger conditions
Modifiers for each condition are also available, which are additional filters. These can be seen when a trigger condition is selected and viewed on the Selected tab, as shown in the image below.
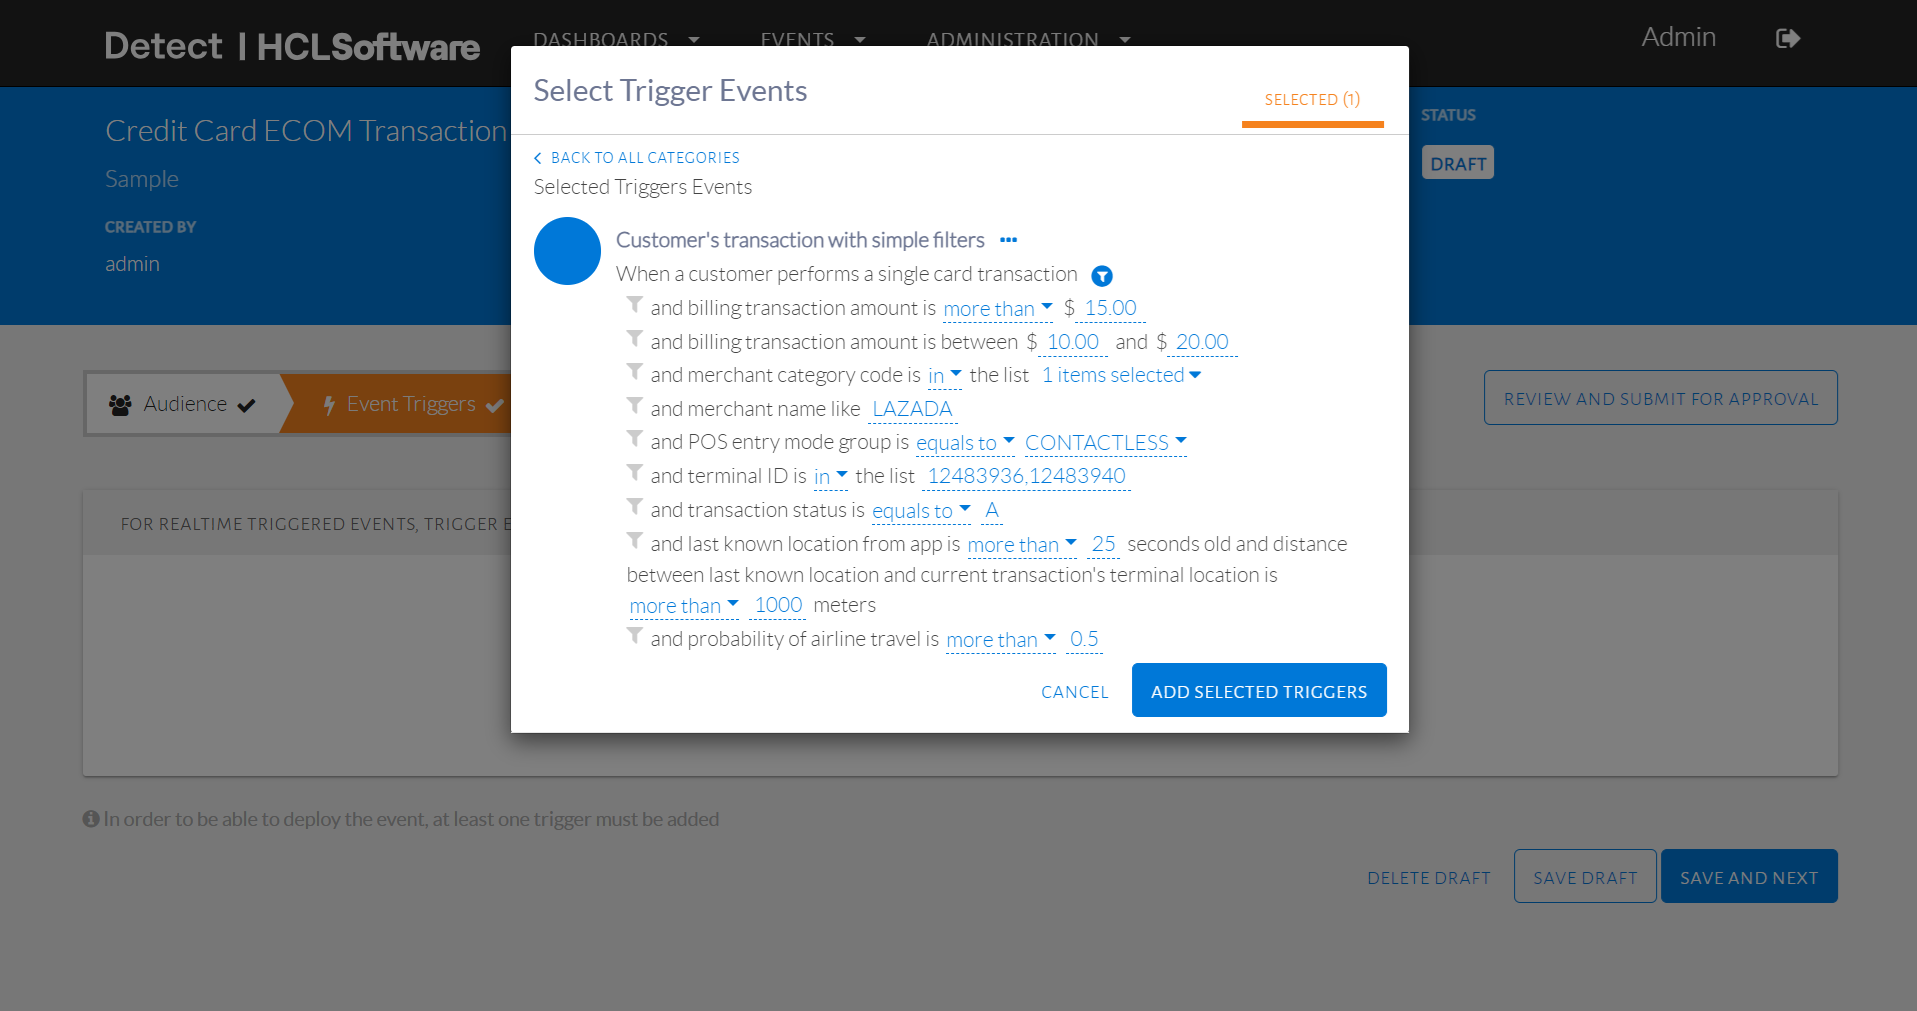
Filters for each trigger displayed on Selected tab
Modifiers can be selected or unselected by clicking the filter symbol beside the main trigger condition, as seen in the image below. This will show a checklist with a modifier that can be added in conjunction to the main filter selected. The user can also remove a selected modifier by clicking the cross icon beside its name.
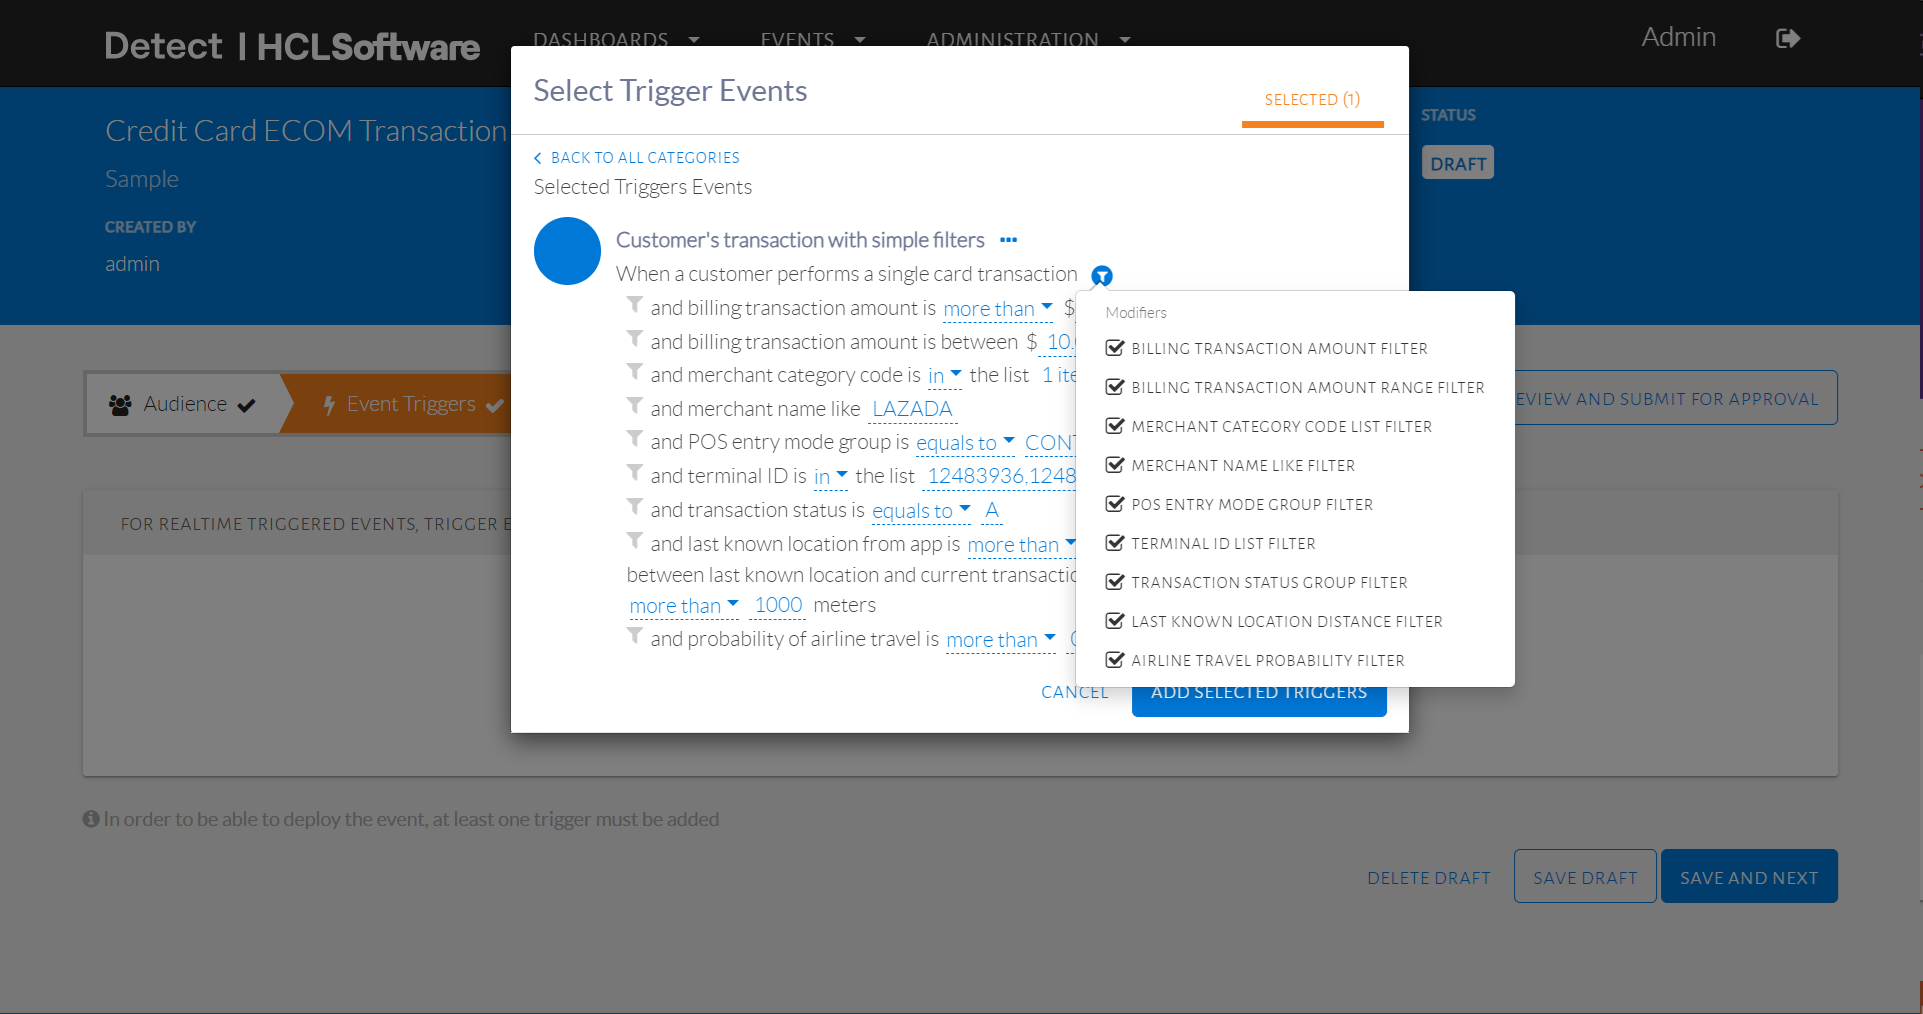
Selecting modifiers for trigger condition
Similar to audience conditions, the user can choose different kinds of trigger conditions and view all on the Selected tab. A trigger condition can be removed as seen in the image below.
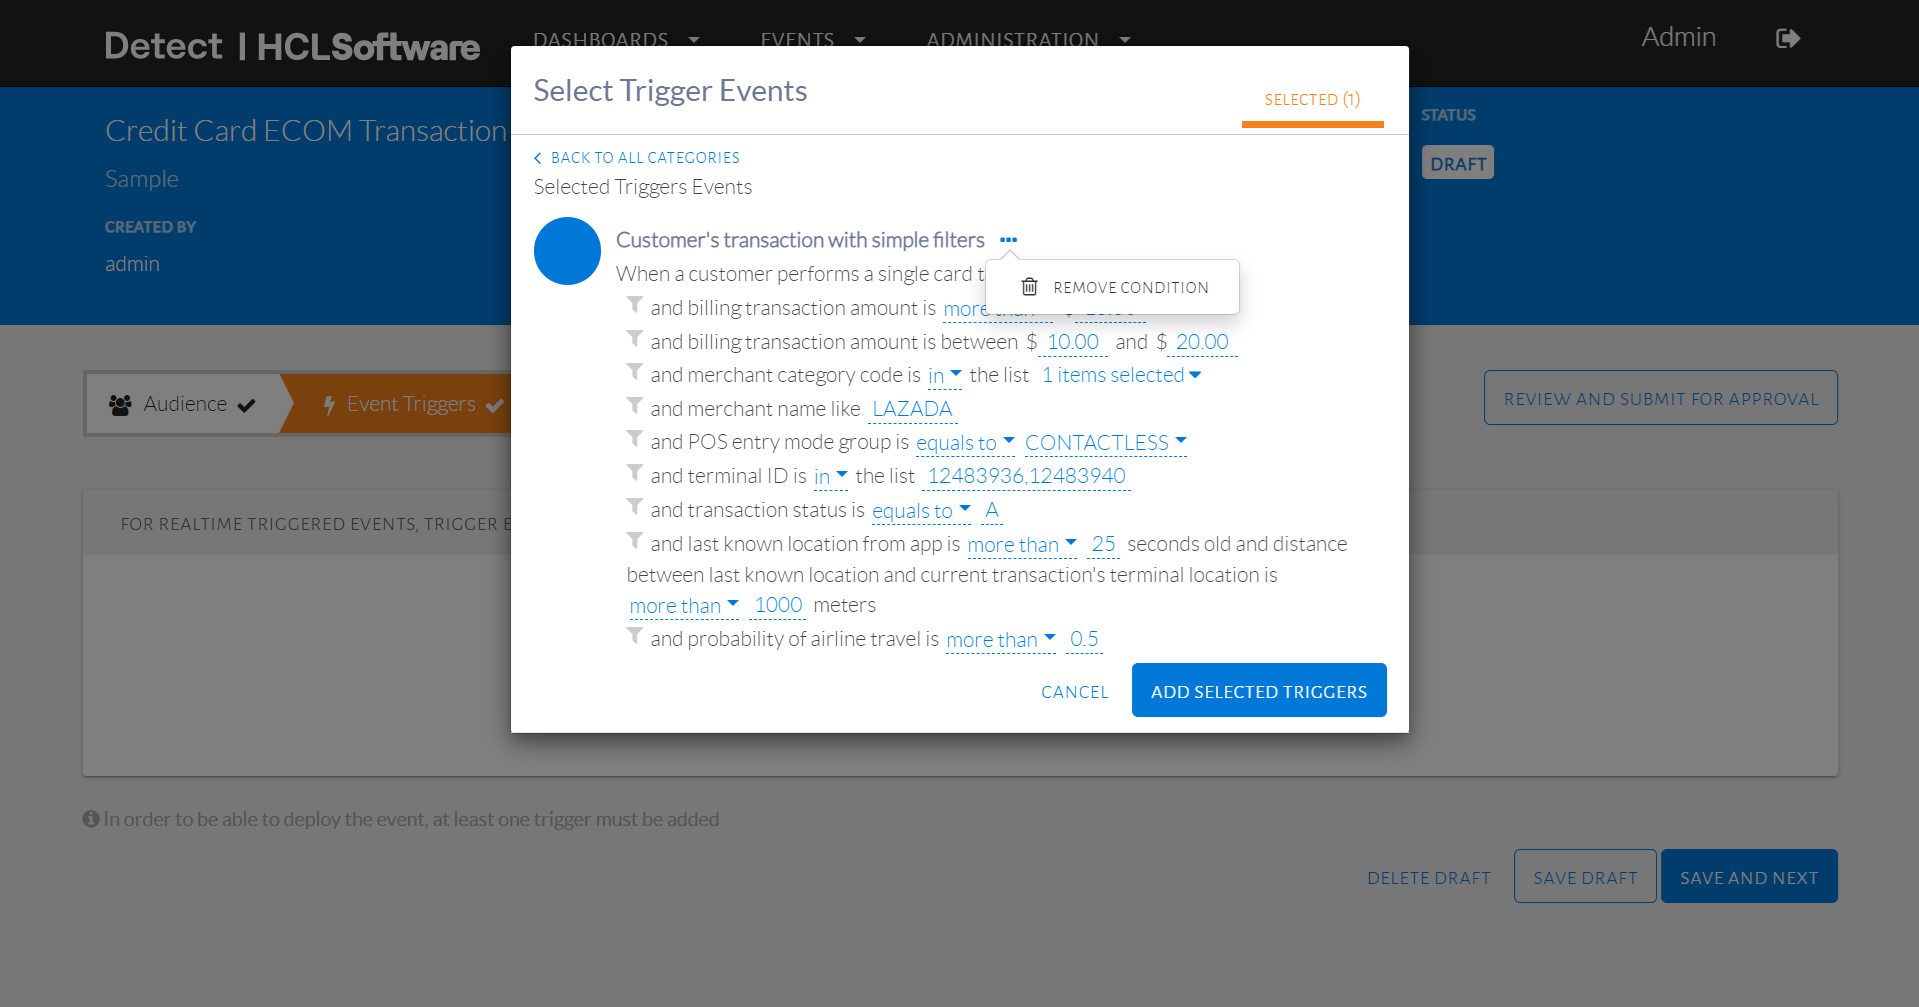
Remove a trigger condition
A trigger condition can also be edited on this tab, as seen in the image below. The values in orange represent the different filters that can be specified. Remove credit card description and click Add Selected Triggers to proceed.
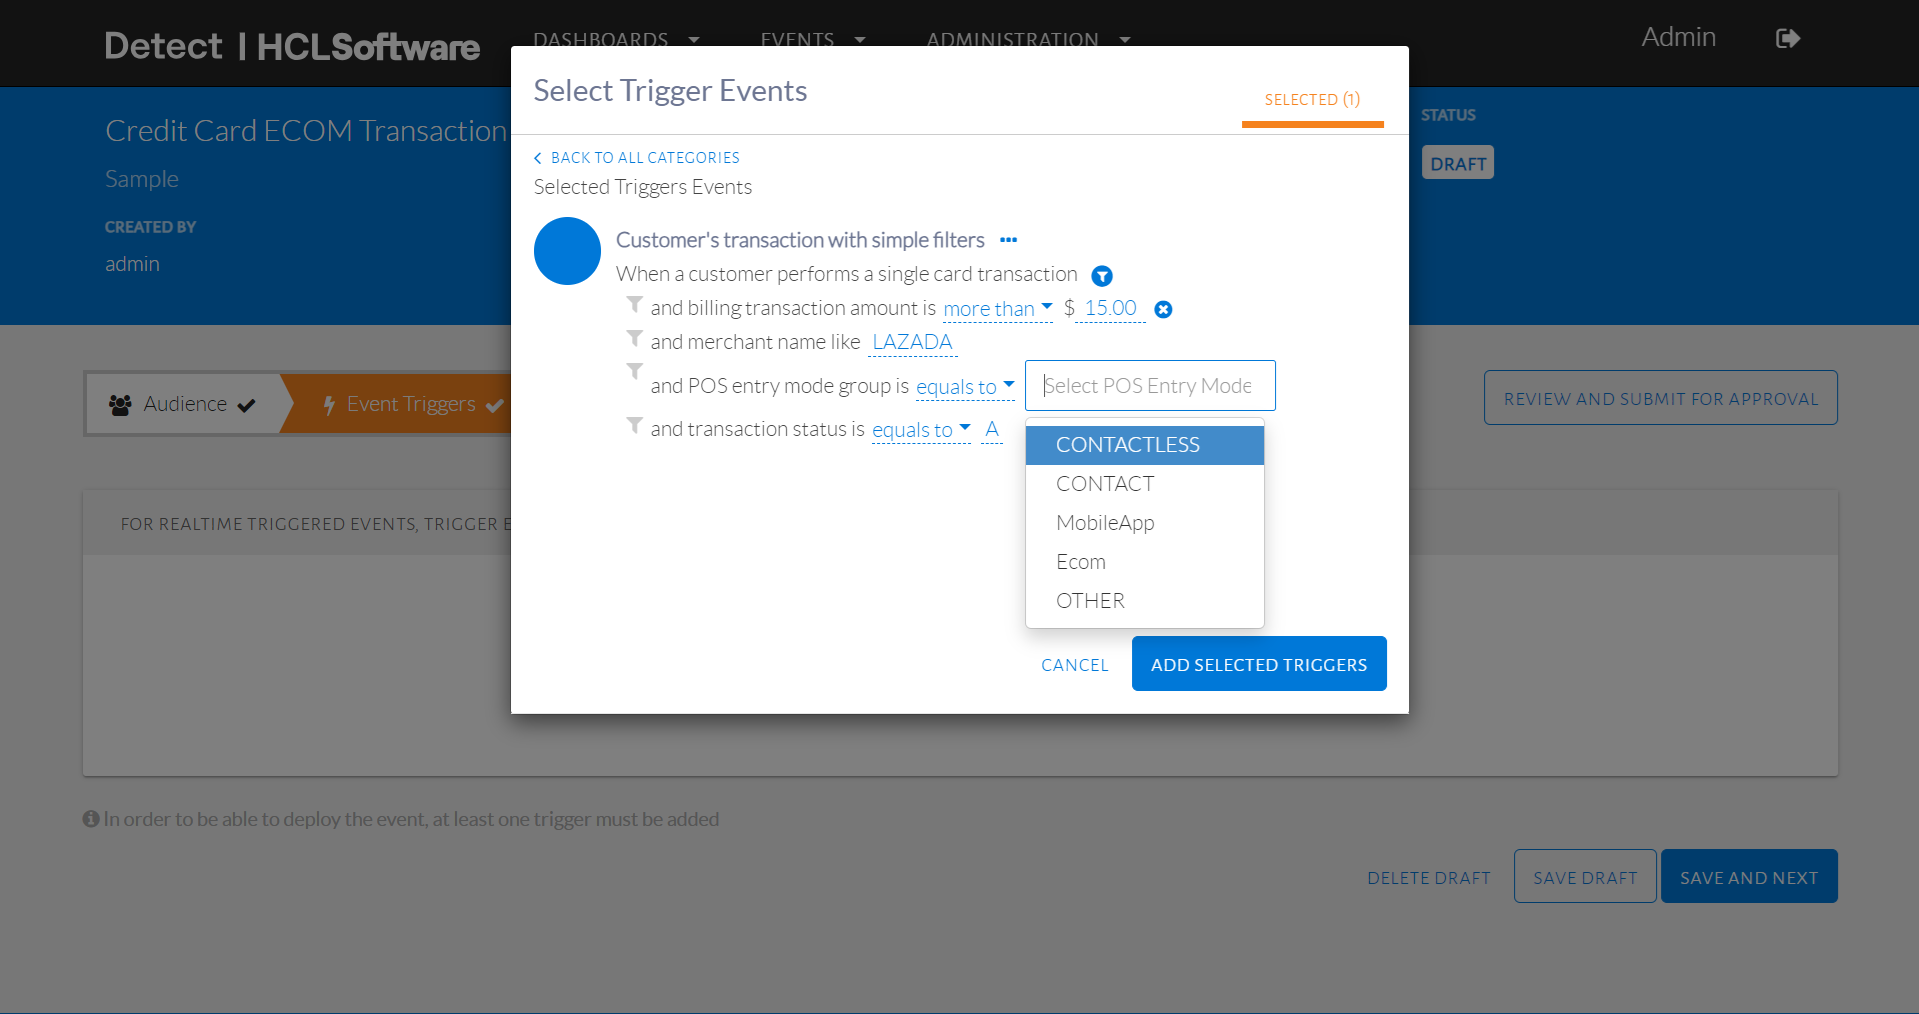
Set the values for different filters within a condition
The trigger conditions will then be displayed as in the image below. The values in orange can also be edited on this page, just as on the Selected tab.
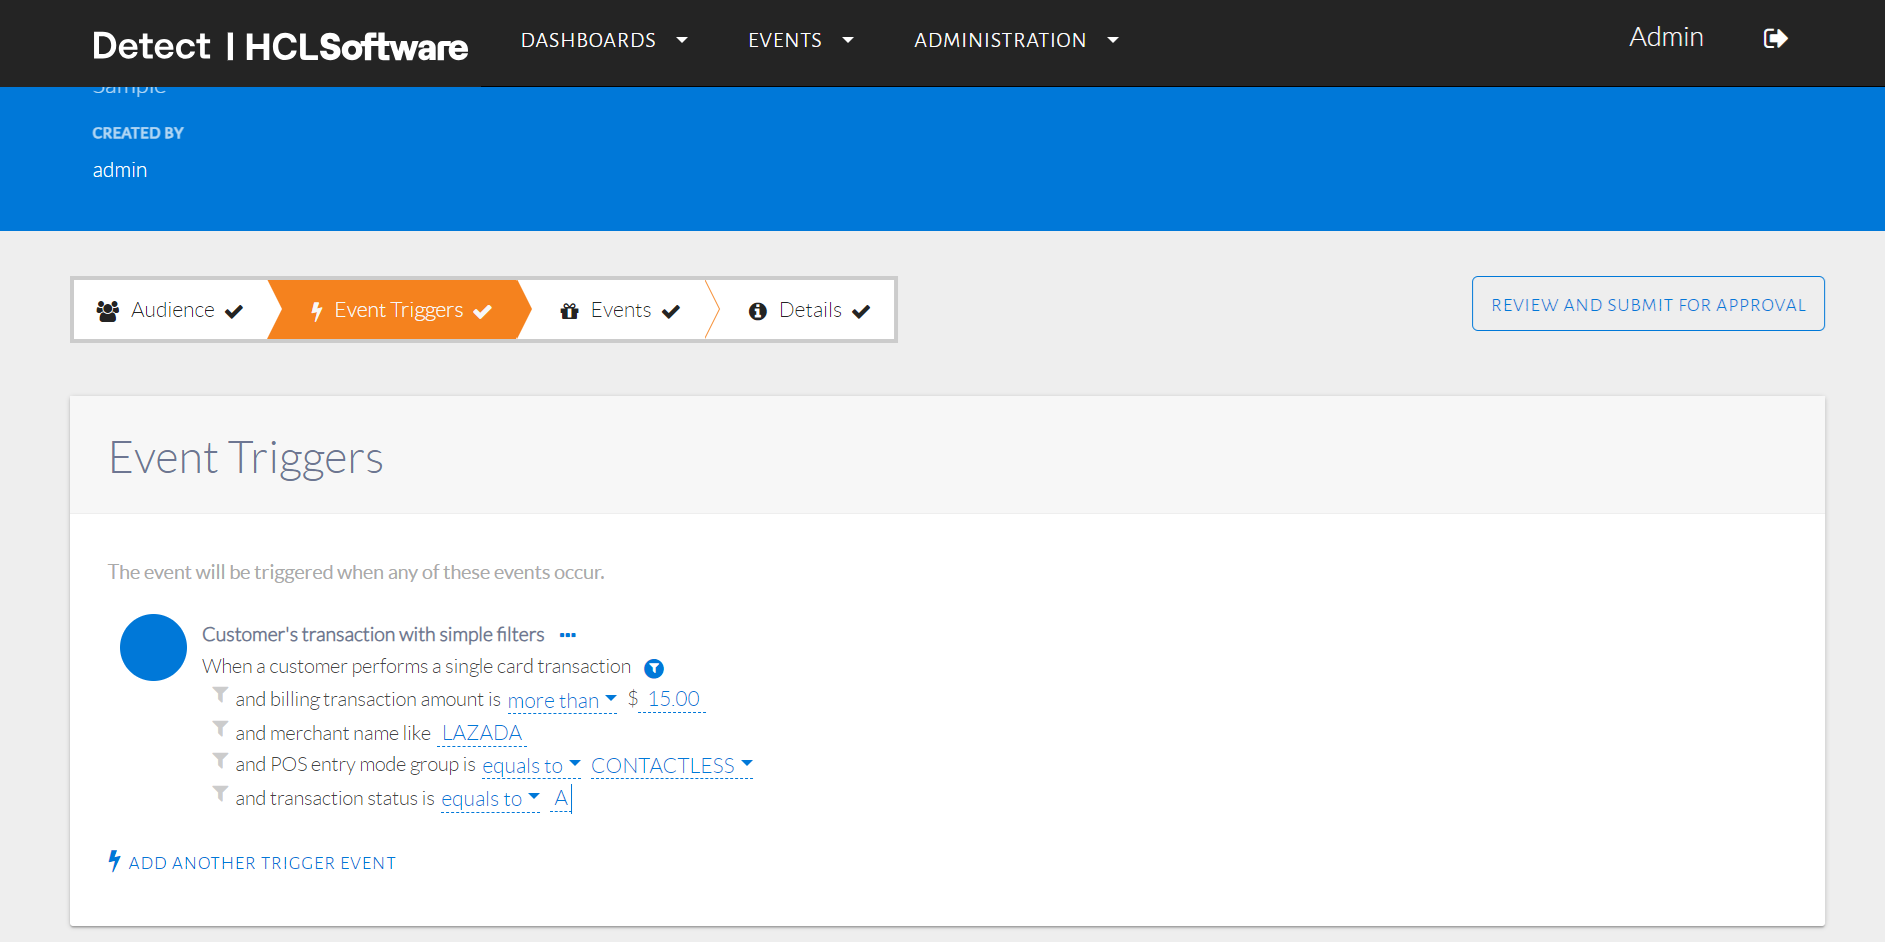
Selected trigger conditions displayed and edited
For this event, we will select ecommerceFlag = 1, with a minimum of NT $200 as the transaction amount, as seen above in the image above. The final trigger condition is configured. This condition will monitor all transactions for an ECOM transaction worth more than NT $200 made using a Credit Card. It will then identify the customers who made this transaction.
At this point, only the customers who satisfy both the audience conditions and the trigger conditions will qualify for an event. An in-depth explanation of this selection is available in the section on Audience and Trigger Condition Logic.
Click Save and Next to proceed. To delete or save the draft, click those options respectively.
Event
An event can be configured to detect an event based on time, count or amount thresholds on the customers transactions. These are applied once the customer fulfills the audience and trigger conditions. For this sample event, we will detect an event each time the customer fulfills the audience and trigger conditions.
After proceeding from Triggers, a page will be displayed as seen in the image below. Click Event to begin setting up events.
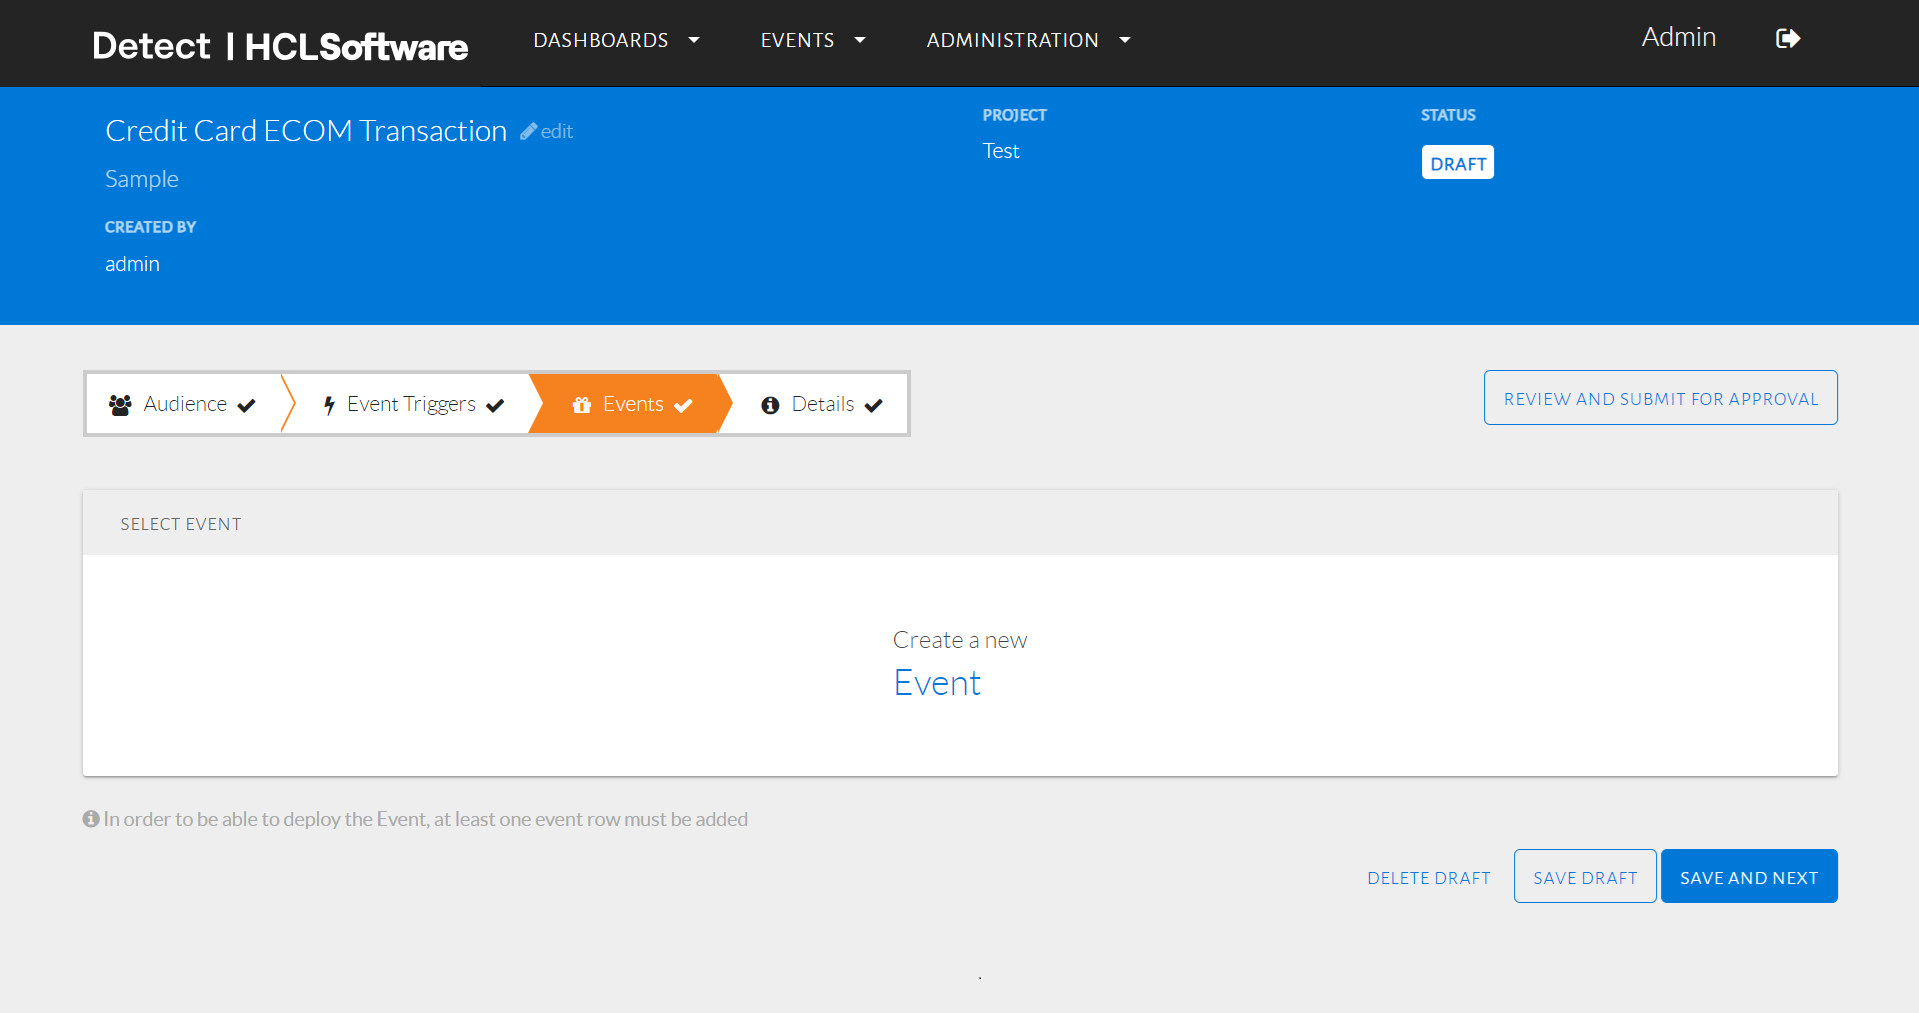
Event page displayed
A template of the event will be displayed. The default template shown is a Message-Only event which sends the downstream system a message each time the customer fulfills given conditions. An Action-Based event sends the downstream a message only after the customer also fulfills time, count or amount conditions configured. From the drop-down menu seen in the image below, the user can change the type of event.
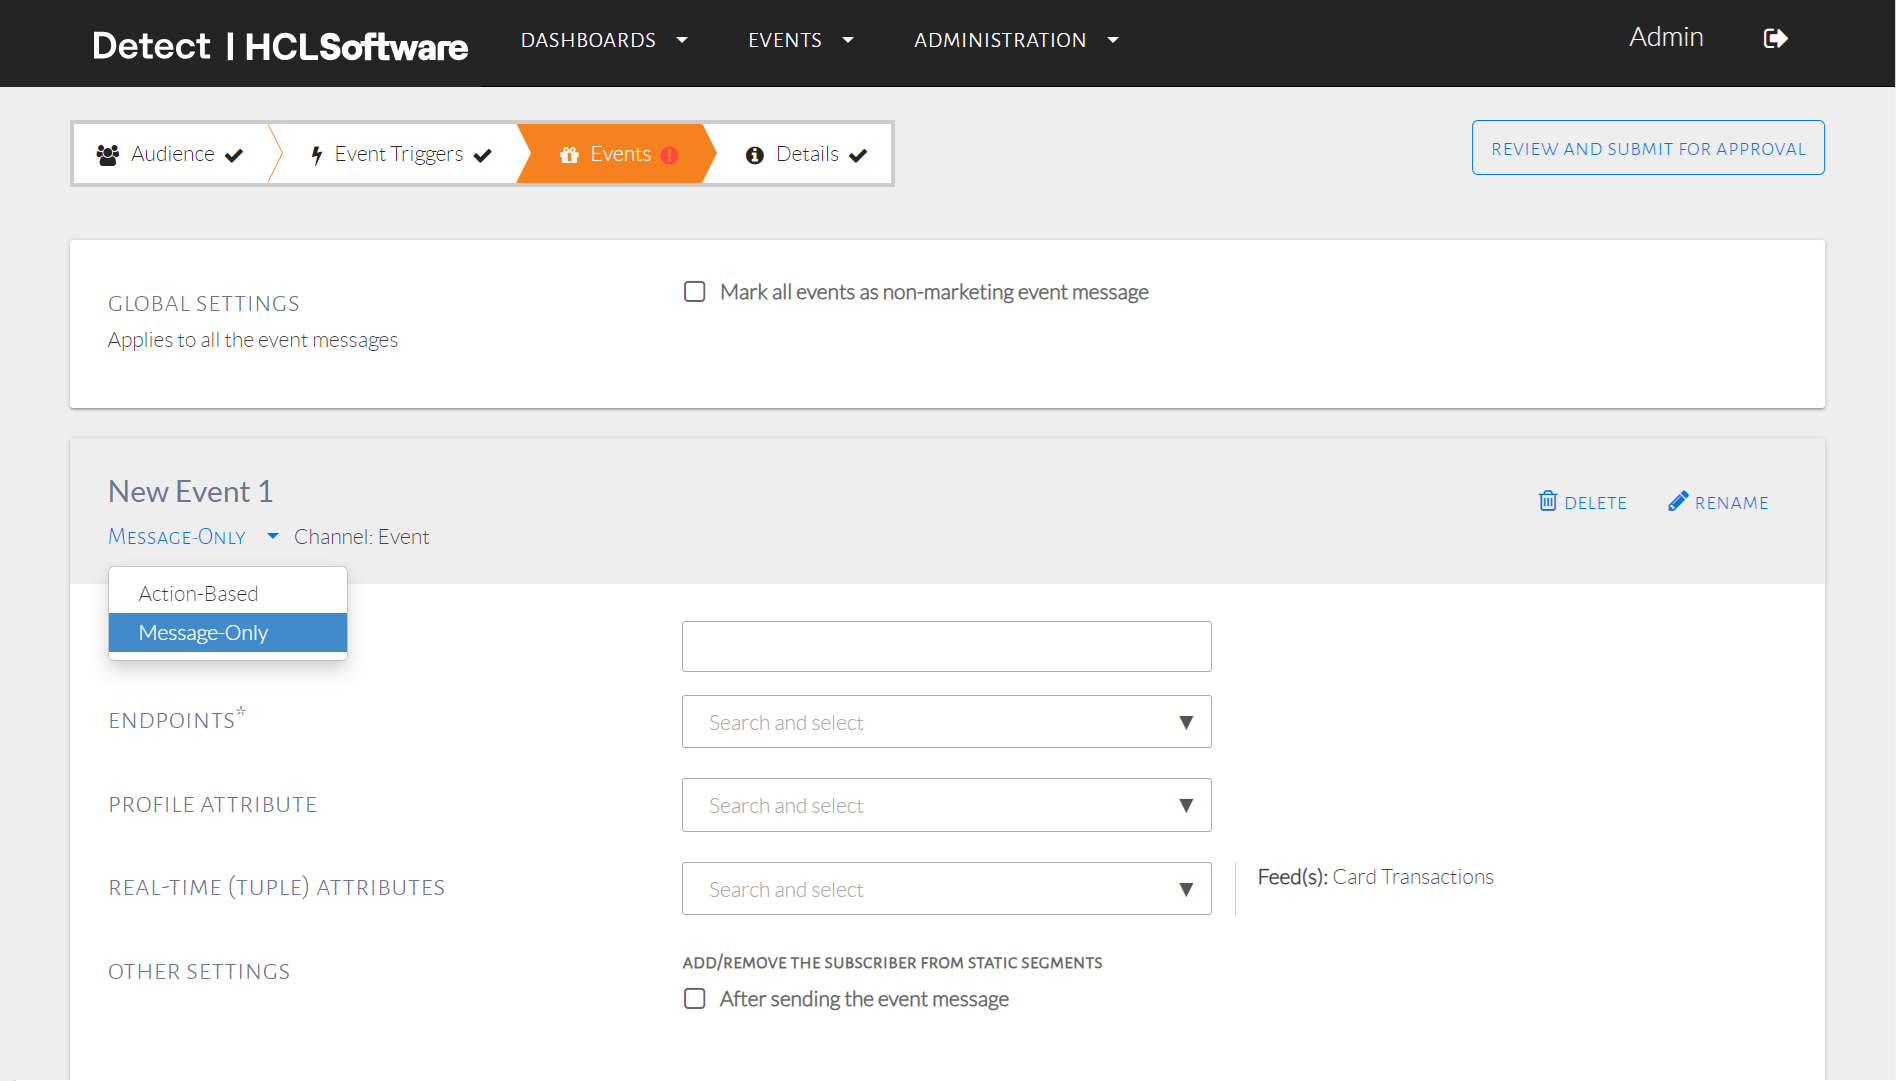
Changing the type of event
The checkbox "Mark all events as a non-marketing event message" disables our default global contact policy check. This default is currently set to limit the outgoing events to 50,000 in 1 day, per customer, across all events.
This event requires a Message-Only event. The template for this is shown in the image below.
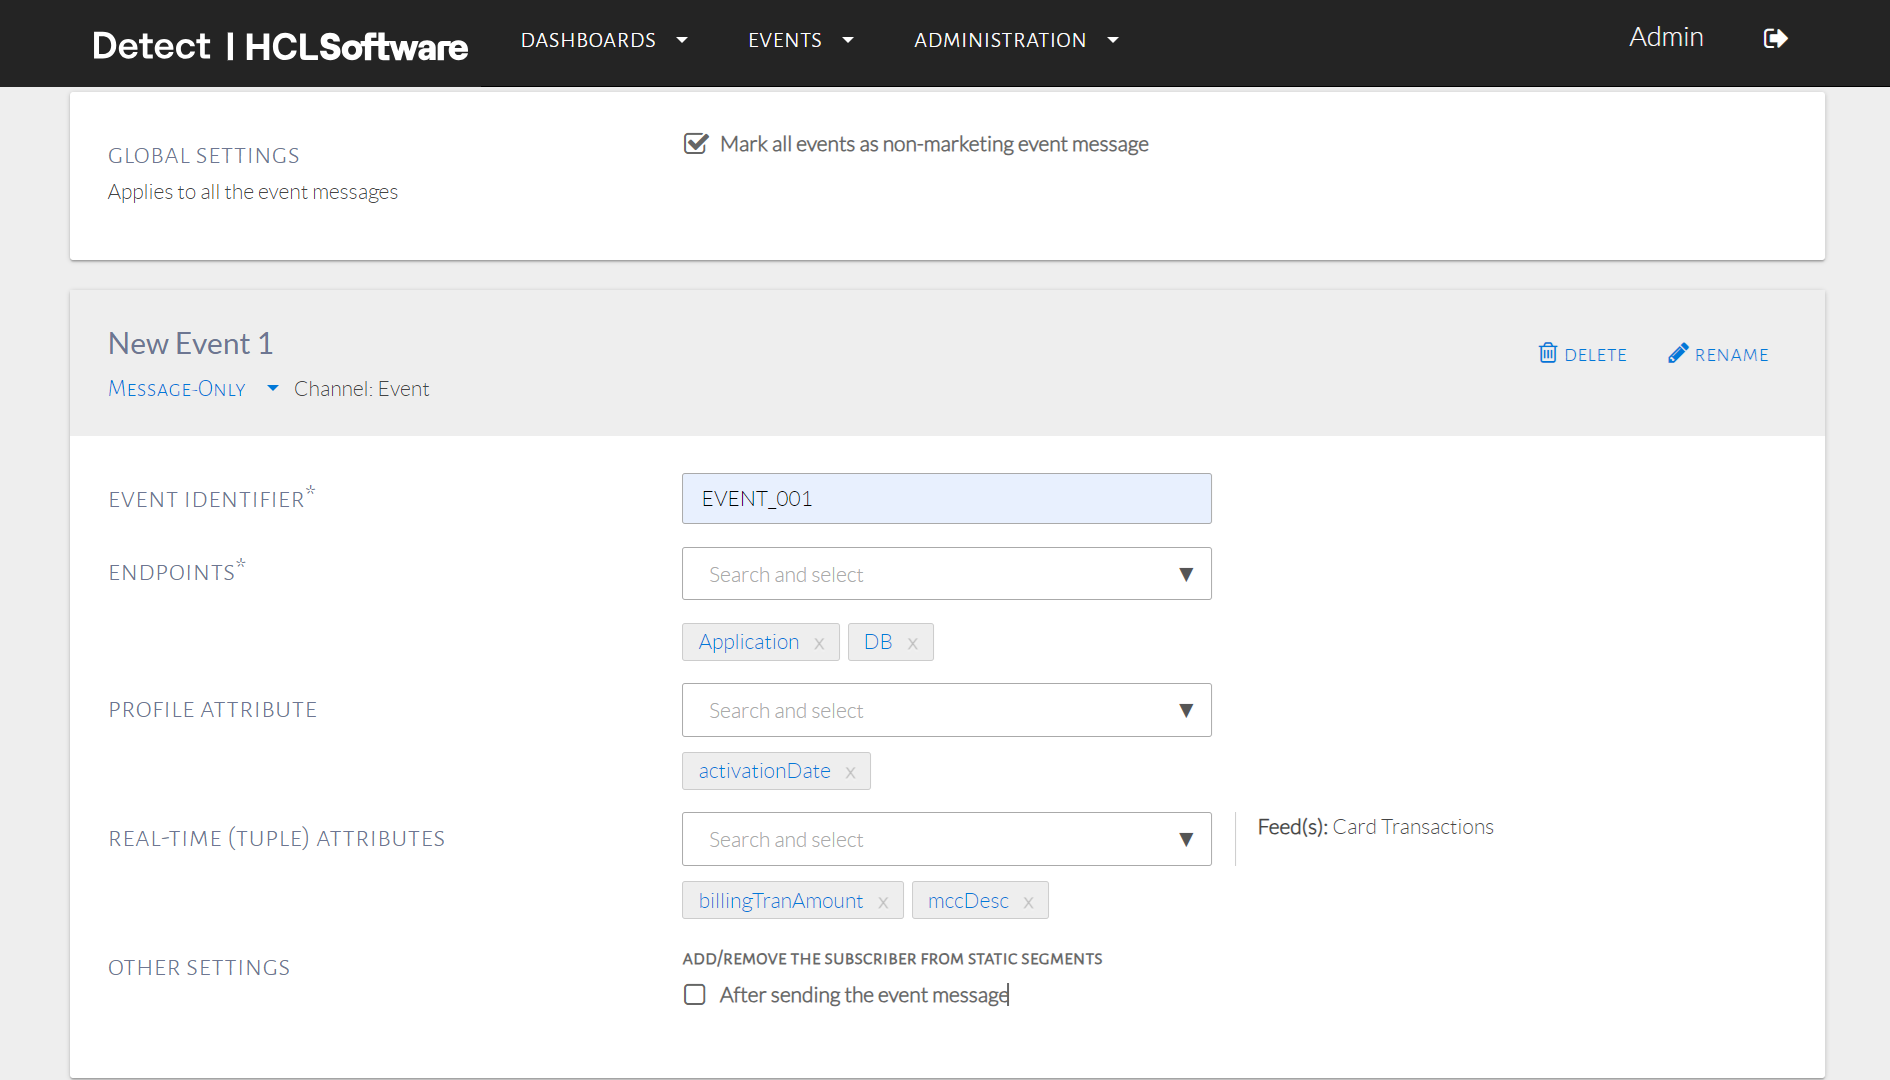
Message-only event
Populate all fields with an asterix, as they are mandatory. Fill up the Event ID to correspond with events configured in the downstream system. Downstream systems can be selected as Application (for real-time events) or DB (for batch events). Profile attributes, which represent data specific to a customer, can be added to the message also. Profile & real-time attributes can be selected based on the event & offer. For example, if the offer differs by card used by the customer during the transaction, cardDescription can be selected to forward to the downstream system. Recommended attributes include email address and phone number.
Another event can also be added by clicking Add New Event. However, this example will only make use of one.
In the Target Groups Grid, the user can divide the customers who qualified for the event into groups called Target Groups. These groups contain customers with specific criteria, which can be set by clicking the orange icon on the right in the image below.
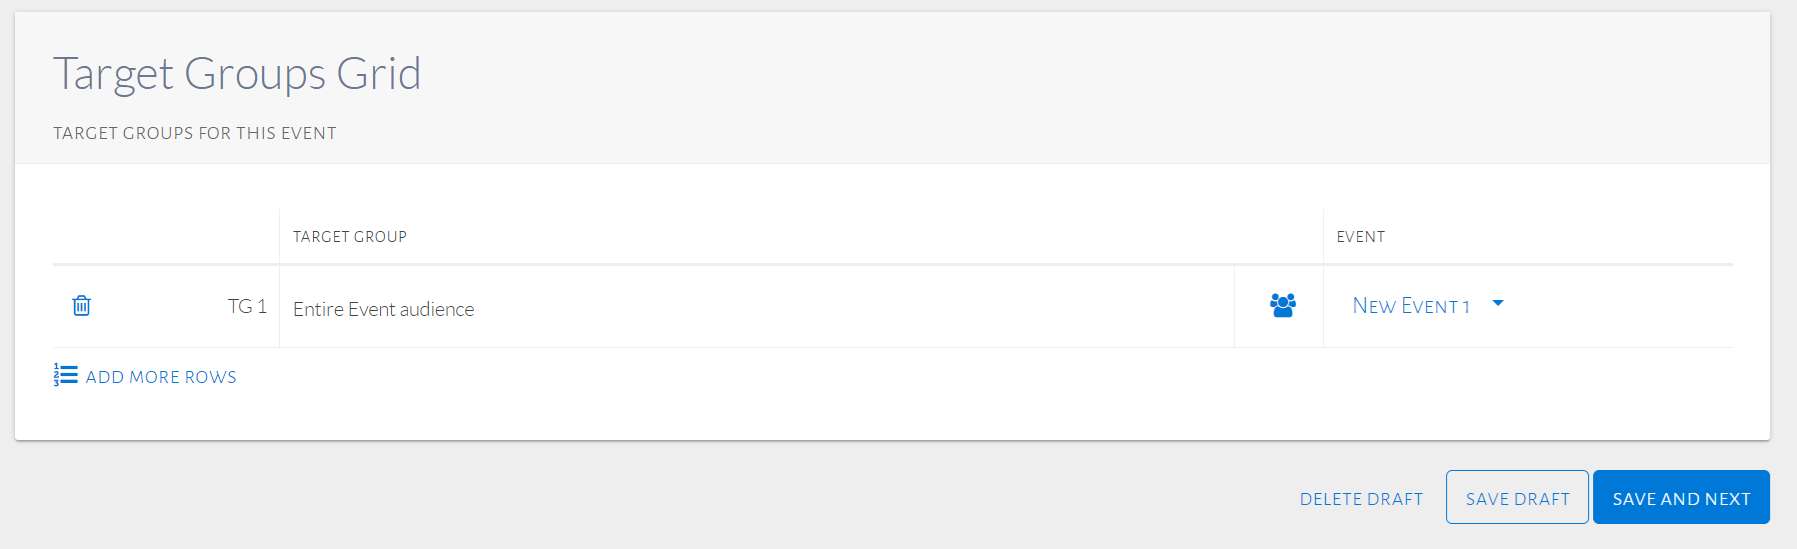
Target groups grid
Click Save and Next to proceed. To delete or save the draft, click those options respectively.
Details
After proceeding from Events, a page will be displayed as seen in the image below where event details can be set.
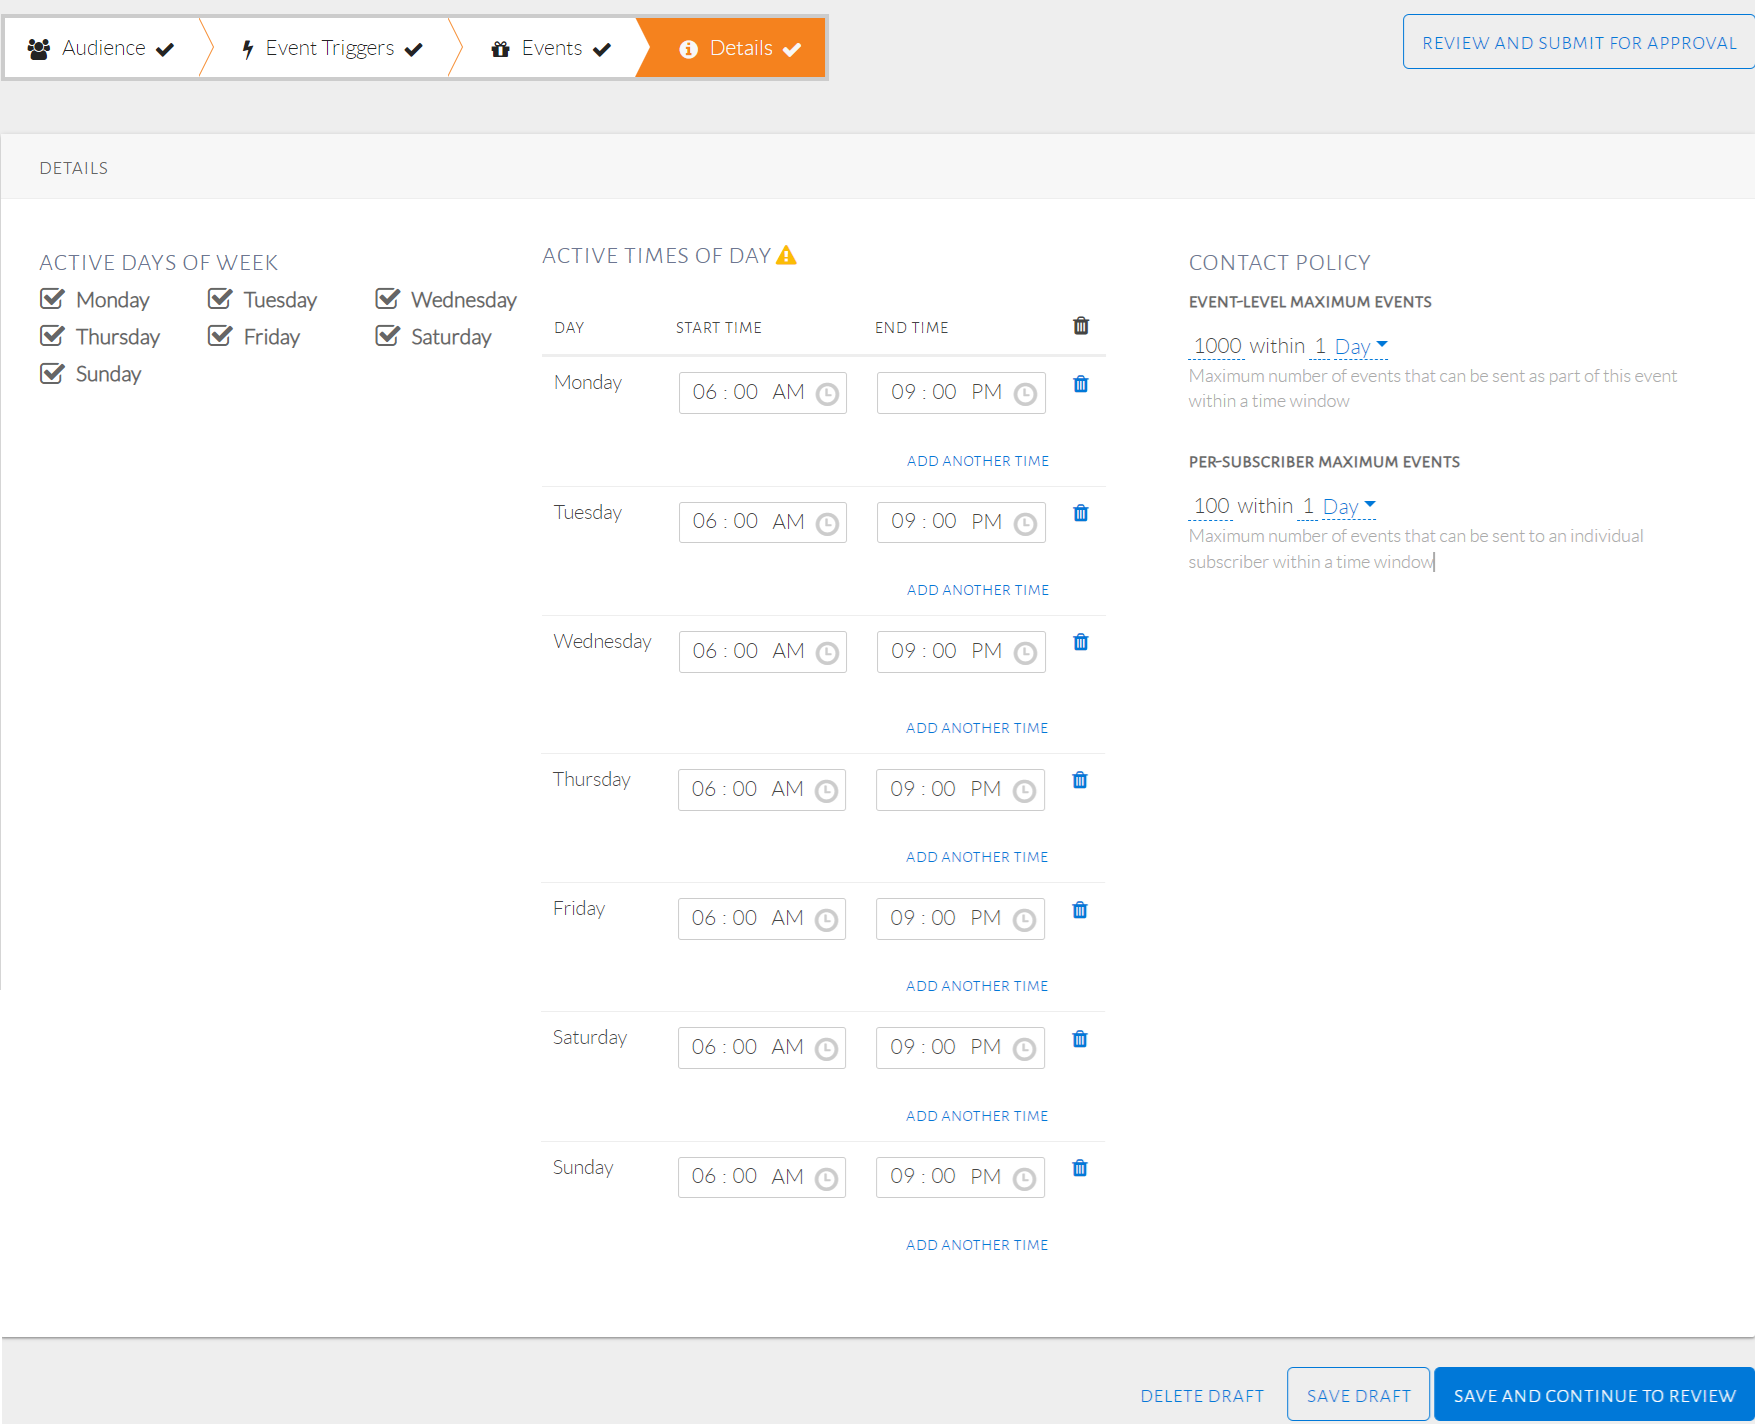
Details page displayed
Active Days of Week and Active Times of Day specify the schedule of the event. These define the days and times the events are scheduled to be detected. A shortcut to replicating the same time for each day is to first select one day and set the time window, and subsequently select the rest of the days to see this replicated across all selected days.
Contact Policy is the maximum number of events that can be detected. Under this, Event-Level Maximum Events contains the maximum number of total events that can be detected within a time window. The Per-subscriber Maximum Events is the maximum number of events that can be detected for an individual customer within a given time window.
The event should always be set up as seen in the image above so that we do not limit the events sent to the downstream in any way. Contact Policy is limited at their end as well, therefore a very high number should be entered so as not to limit events detected by Detect. Click Save and Continue to Review to proceed.
Review Event
After proceeding from Details, a page will be displayed where the Audience, Triggers, Events and Details of the event can be reviewed. The images below show this.
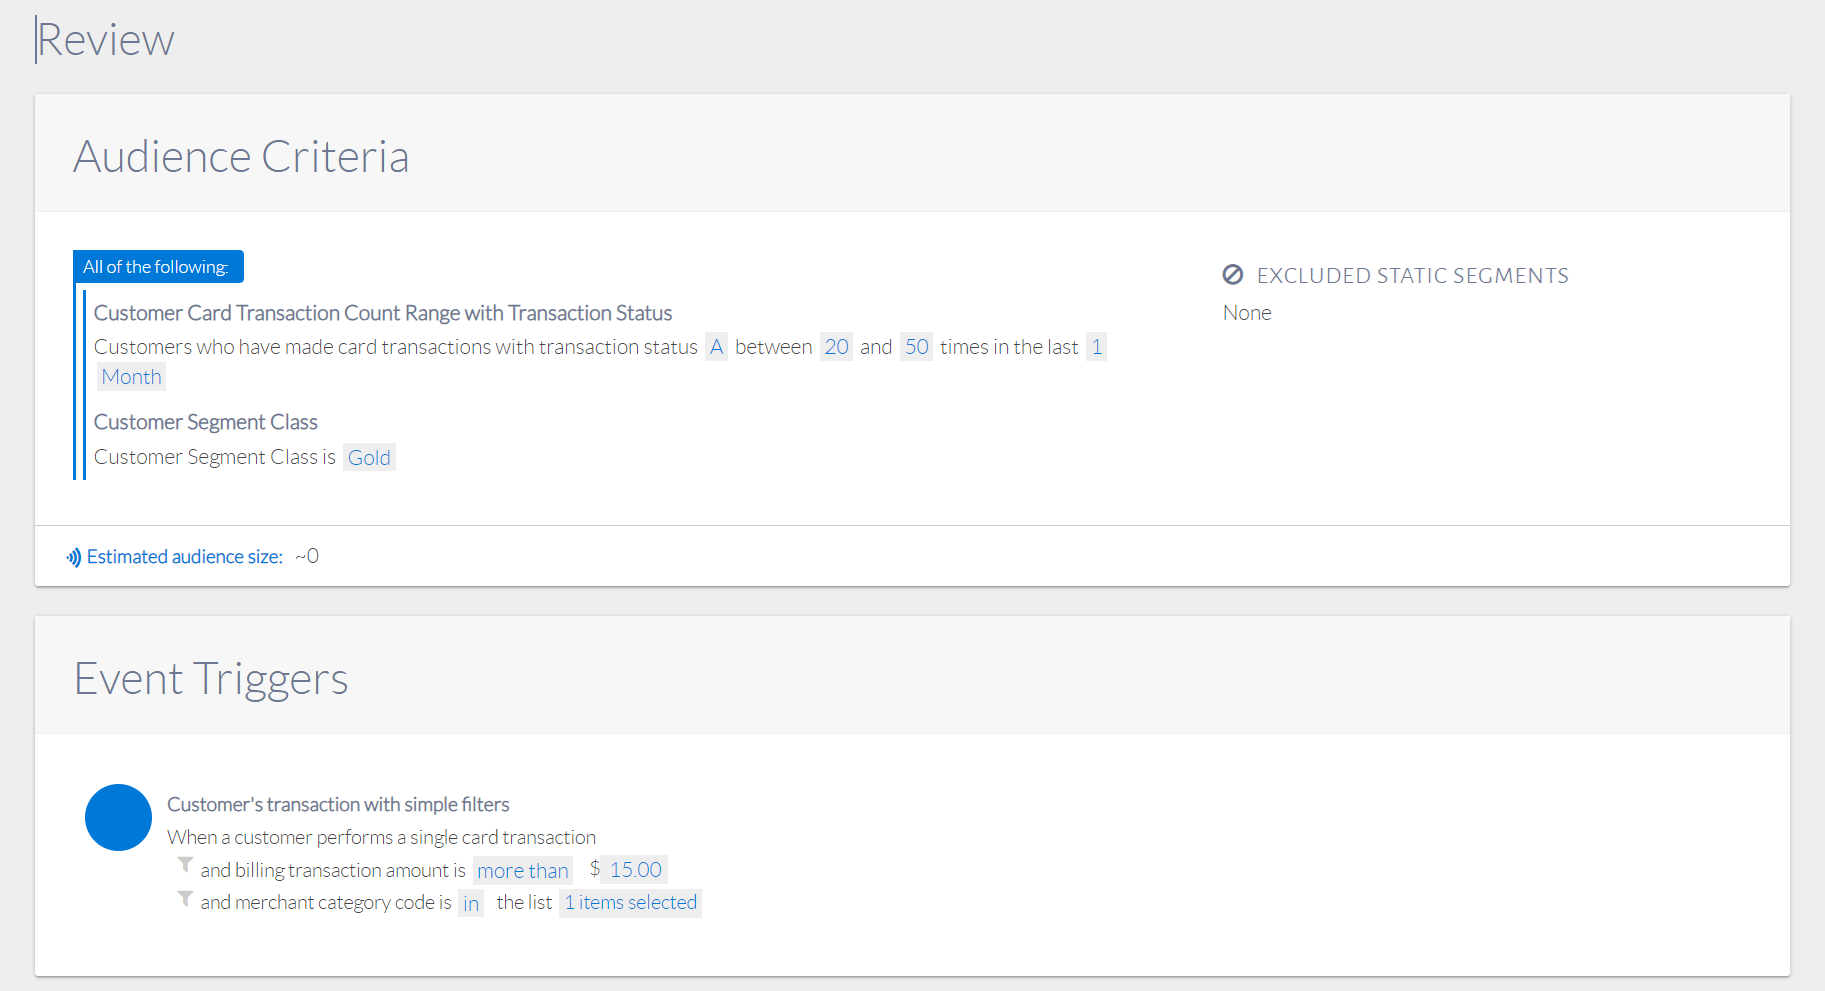
Review audience and triggers
Review event
Review details
Once the event is edited and reviewed, Submit for Approval. This will usually be done from a Makers account. The image below shows the status once submitted, from a Checkers account. This will allow a Checker (or Admin) to review the event.
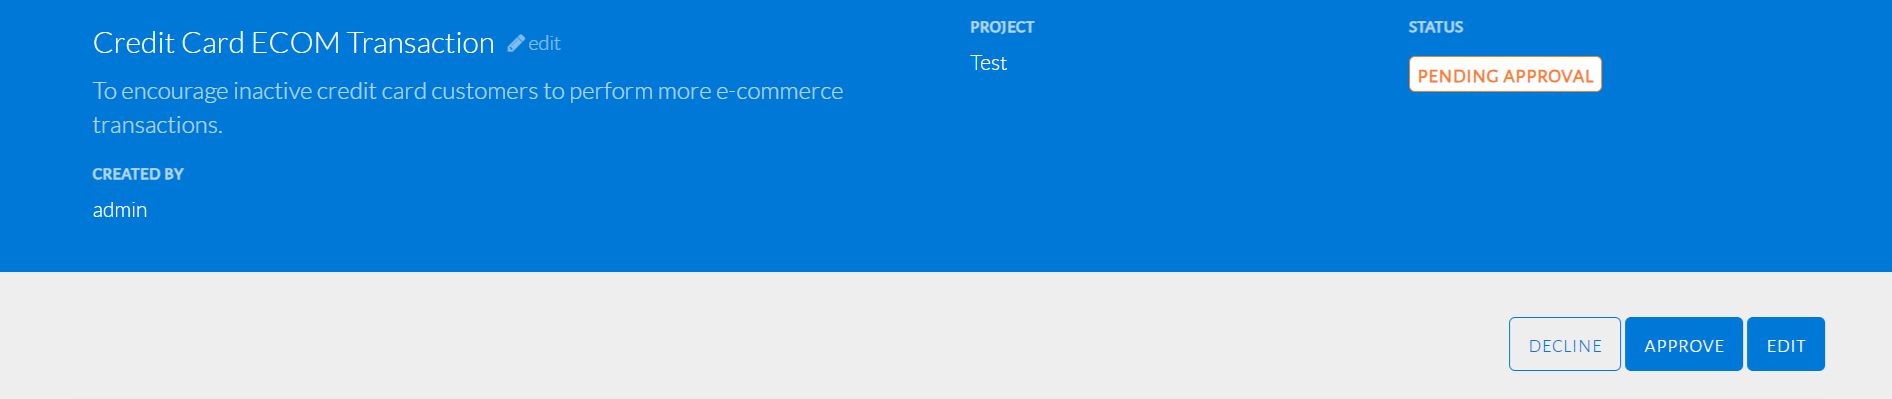
Submitted status
A Checker can decline the event allowing the Maker to make any required changes and resubmit the event. Once the event is approved, the image below shows the status change.
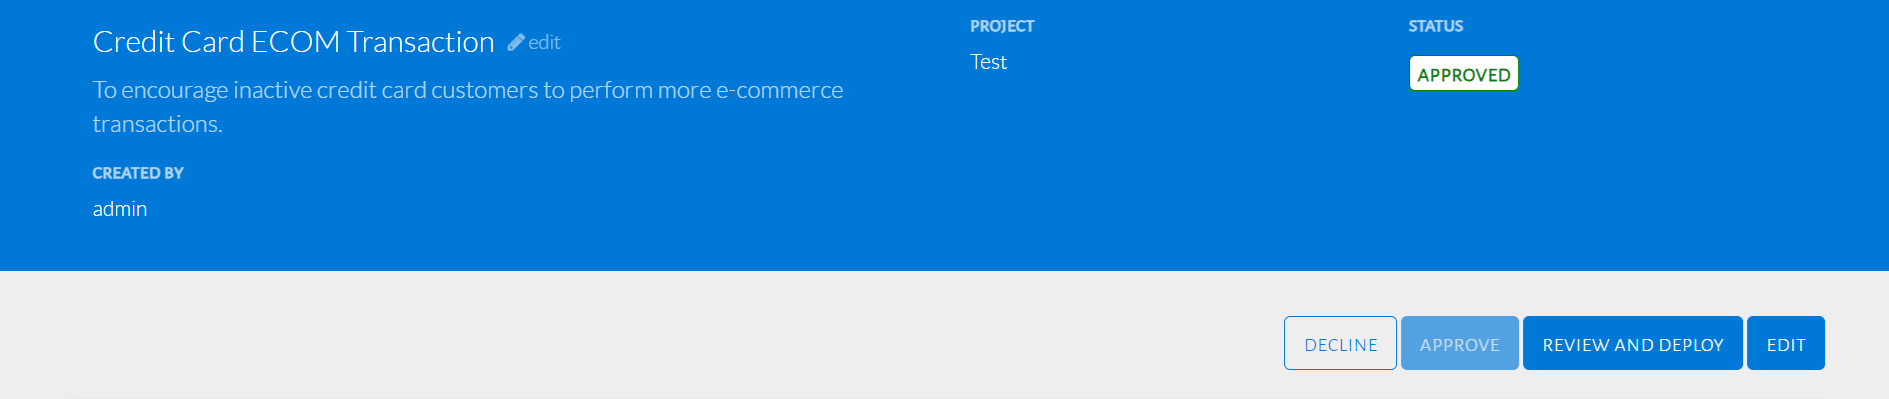
Approved status
The Checker can then select Review and Deploy and choose a time period before deploying the event. The image below shows this option.
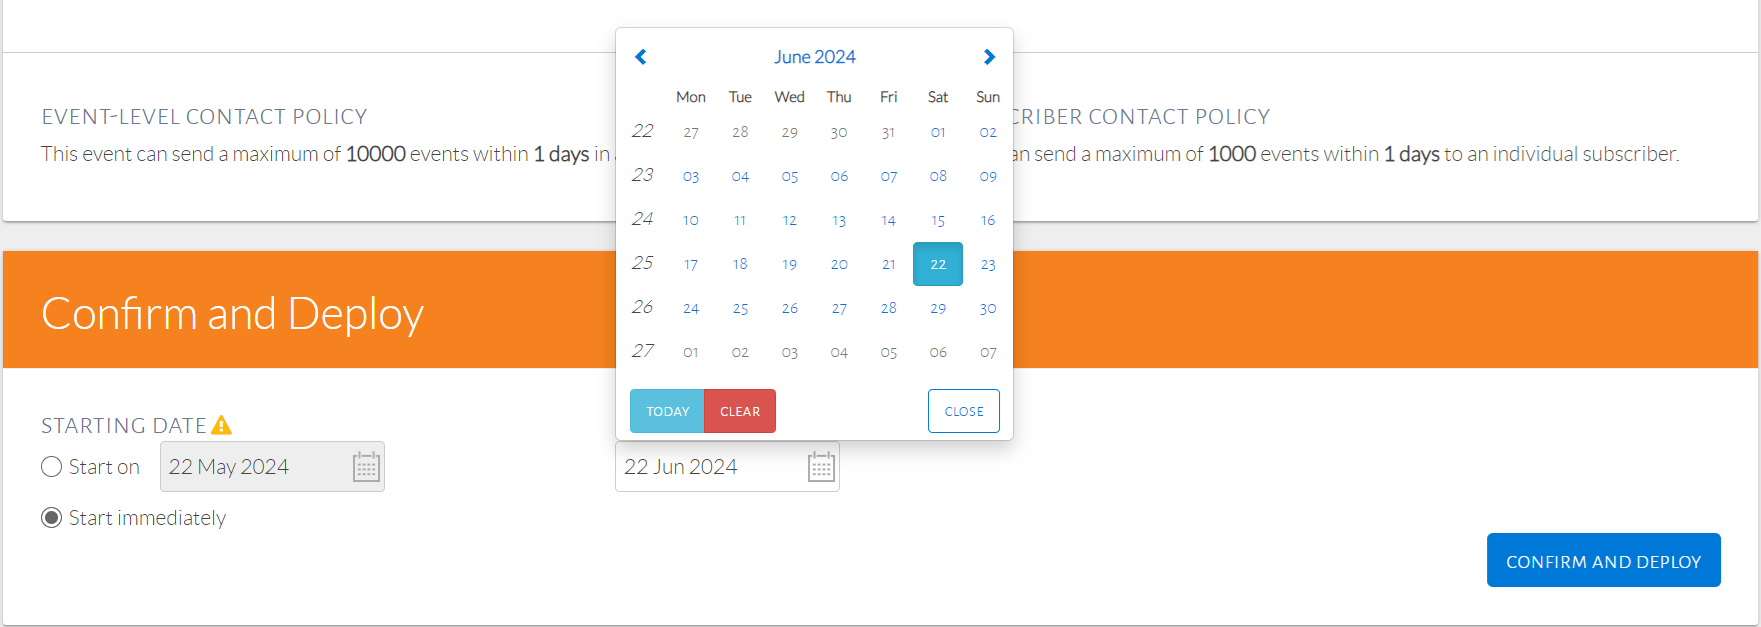
Confirm and Deploy
The figure above shows the date selection available upon clicking the calendar icon. Choose the Starting Date of the event, which is the date it will begin running and Ending Date, which is the date it will stop. The minimum duration for this event should be a week.
Click Confirm and Deploy to deploy the event. Deploying the event will change the event status to Running can be found under said tab on the Events page.