Selected embedded outline properties
About this task
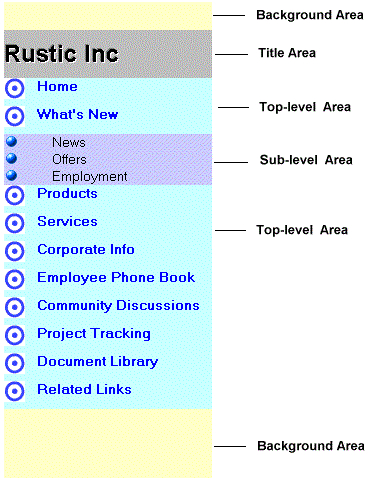
An embedded outline has several areas you can format. Using the Embedded Outline Properties box, you can set up the display of the outline, including images in the background area and a hierarchy style for entries in the title, top-level, and sub-level area.
There are two different style properties that control how the embedded outline appears to the user: type and title.
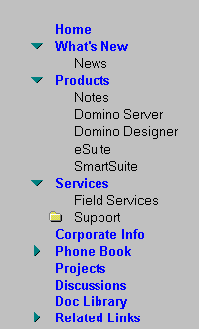
The first, Type, determines whether the outline shows the hierarchy of the outline entries. The hierarchy is set up when you outdent and indent outline entries. If you select Tree style for type, then all of the outline entries that have indented entries below them will show up as expandable sections. You can choose to have green twisties display next to expandable outline entries, or users can click on the top-level entry to expand it. In a Tree style outline, all top-level entries show at all times. Users expand and collapse entries as necessary.
Tree style outline with twisties turned on:
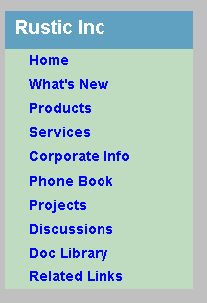
Tree style with simple title:

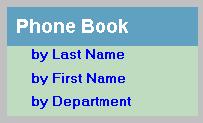
A Flat style outline displays one level of entries at a time. Initially, all top-level entries display. When you click an entry, if it is expandable, the sub-level entries associated with that entry will display. If it is not expandable, it will jump to whatever link or action is associated with it. If you want users to be able to navigate back up the outline, select Simple for the title style. The title will continue to display allowing users to click on it to get back to the previous level. If you choose Hide for the title style you must provide a button or action if you want users to be able to return to the top-level of the outline.
Initial display for flat style outline:
After clicking Phone Book entry:
To format an embedded outline
Procedure
- Open the form or page on which the outline is embedded.
- Select the outline.
- Choose Element - Outline Properties. The Embedded Outline
Properties box appears for you to set the overall display of the embedded
outline.
Info tab:
- Type - Tree or Flat. This setting allows you to decide whether to show the hierarchy of the Outline or not. Tree style shows all of the outline entries in the hierarchy, while Flat shows only one level at a time. Use the Flat style selection in conjunction with the Title style setting.
- Title style- Hide or Simple. Simple style lets users navigate back up to prior levels by displaying the parent of the current level in an outline. Hide style does not display any hierarchy, so once users go down a level in the outline they cannot navigate back up.
- Target frame - Specify the frame where you want the source (link, named element, or URL) displayed.
- Twisties (Tree style only)
- Columns (Flat Vertical style only)
- Root entry - Specify a root by using the parent entry label or the alias of the parent entry. (For backwards compatibility with Domino® Designer R5, you should specify the alias.) When you specify a root entry, the children of the specified entry only are displayed. One use of this field is to restrict access to elements in your site or database.
- Outline size
- Web access - Select HTML or Java™ applet to display an embedded outline to Web users.
- Special
Font tab
Select either Top-level font or Sub-level font to format the font of the outline entries. If Title style is set to Simple, select the Title Font. You can also select font colors for:
- Normal state of entries
- Selected (when the entry is selected)
- Moused (when the mouse passes over the entry)
Background tab
For each of the areas on the embedded Outline, you can specify color or image backgrounds. You can set mouse-over and selection colors. Images can be tiled in various ways, such as beginning to end, or left to right, or positioned under the text, for button effects. Images must be shared image resources for the database.
Layout tab
Set the positioning for the title-level (if Simple title is enabled), top-level, or the subsequent levels of:
- The entire outline entry
- The label text of the outline entry
- The outline entry image
Border tab
Set a border style, effect, and thickness.
For more information on borders, see the topic "Setting a border style, effect, and thickness" in the Notes® Help.
Results
Paragraph margins tab
Paragraph Hide-When tab