Publishing and deleting personalization rules using a script
You can use a HCL Digital Experience Personalization provided script, pznload, to export, publish, and delete Personalization rules on local or remote servers.
Before you begin
You can script the delivery of rules and campaigns from staging to production, or the offline publishing between disconnected systems (such as when production servers are secured behind a firewall). You can use this function to quickly revert production servers to an earlier state.
To run the pznload script, you must first run the setupCmdLine batch file to set up the WebSphere® Application Server parameters. The setupCmdLine.bat file is in the wp_profile\bin directory.
About this task
--help
command.Procedure
-
You can export the personalization rules on the site or you can run
the pznload command. Select one of the following methods to export
personalization objects from the site:
- Click in the Personalization Navigator. You are prompted for a location to save a nodes
file. This file contains an XML representation of all the currently selected personalization
objects. You can export entire folders.
Figure 1. Exporting a folder to the file system 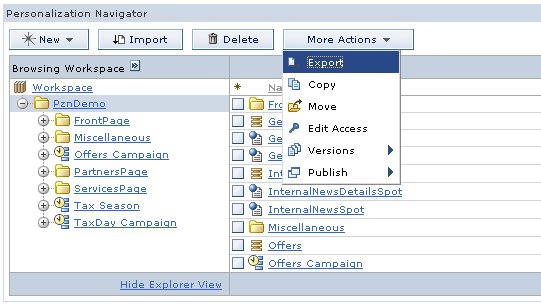
- Open a command prompt and run the following command, where
outdesignates the location of the exported data on your local system andtargetpathis the object (and child) that is exported:pznload --export --out filename --serverurl url --targetpath path --targetworkspace workspace --username username --password password
- Click in the Personalization Navigator. You are prompted for a location to save a nodes
file. This file contains an XML representation of all the currently selected personalization
objects. You can export entire folders.
- Choose the appropriate option to send this data to the
appropriate server:
The pznload script is in the PortalServer_root/pzn/prereq.pzn/publish/ directory.
Tip: This program accepts a number of command-line options and a set of nodes files to publish. Start pznload with the --help option to see a list of all options. The most important arguments are described here:- serverurl
- The URL of the remote publish servlet. If you do not specify a value, the program attempts to
connect to a HCL Portal server that is running on the local
machine. If you do specify a value, it must follow the format of
http(s)://localhost:{port}/{WpsContextRootPath}/pznpublish/pznpublishtarget. Where it's eitherhttporhttps, the port is the port of the particular Portal server you want to connect to and WpsContextRootPath is the root context path for that Portal server. For example,http://localhost:10039/wps/pznpublish/pznpublishtarget. - targetworkspace
- The name of the workspace to publish to. The default workspace name on all IBM® Content Manager runtime edition installations is ROOTWORKSPACE.
- targetpath
- The location in the target workspace, which is the parent for the published nodes. The target path must exist before publishing. For example, if the export function was used on the folder /Projects/HR website, then the target path is specified as /Projects. So that the published resources are in /Projects/HR website.
- username
- A valid user on the target system with sufficient access rights.
- password
- The password for the user.
- AIX®HP-UX Linux™Solaris: ./pznload.sh --serverurl url --targetpath path --targetworkspace workspace --username username --password password
- IBM® i: pznload.sh --serverurl url --targetpath path --targetworkspace workspace --username username --password password
- Windows™: pznload.bat --serverurl url --targetpath path --targetworkspace workspace --username username --password password
- z/OS®: ./pznload.sh --serverurl url --targetpath path --targetworkspace workspace --username username --password password
-
To delete objects, run the following command where
targetpathis the object (and all associated child) that is deleted.pznload --delete --username username --password password --targetpath path
Note: To force the deletion of a personalization rule without having to respond to a confirmation message, insert the--forceflag after the delete command. For example, pznload --delete --username username --password password --targetpath path --force