Configuring Compass for SAML2 SSOv3
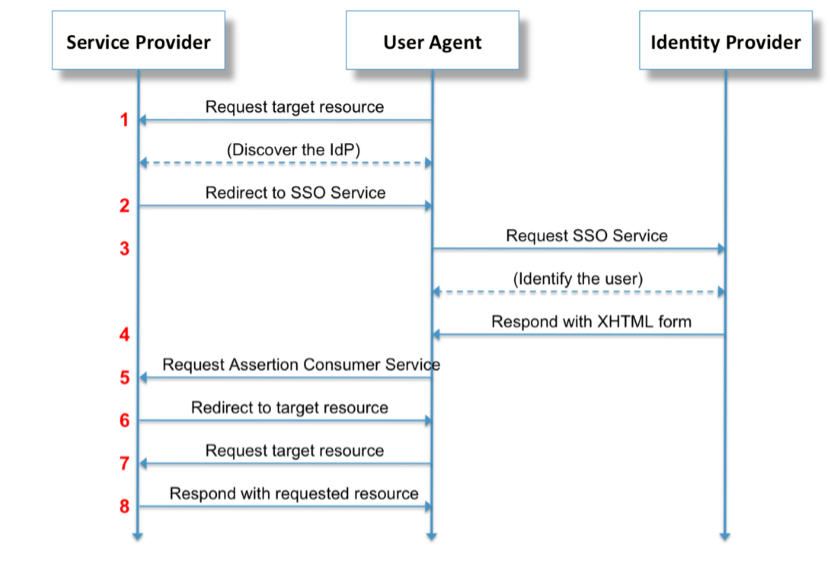
As an administrator, you can configure Compass to use SAML2 for SSO so unauthenticated users will be redirected to the SAML2 IDP for login. Once they successfully login to the IDP, they are redirected to Compass.
If there is only one dbset and database, then Compass login proceeds automatically. If there are additional dbsets or databases, then the user is presented with a dialog to choose which database to connect to.
Security Assertion Markup Language (SAML) 2.0 is a standard for exchanging authentication and authorization data between security domains. Compass can be configured to use SAML2 Identity providers (IDPs) for single sign-on (SSO).
The SAML2 assertions are stored in cookies, along with LTPA2 cookies. If you close your browser and reopen it, you will still be logged in to your SSO provider, but your Compass Web session will have been logged off.
Configuring Compass to use SAML2 for SSO is a four-step process. The first step is to register your Compass server with the administrator of your SAML2 IDP. They will provide you with a metadata file that is needed during setup. The second step is to configure the WebSphere profile as a SAML2 Service Provider (SP). The third step is to configure trust with the SAML2 identity provider (IDP). The fourth step is to configure Compass Web and the Compass database and to use SAML2 for SSO. All but the first step can be automated by the setup script.
Setting up WebSphere Profile as a SAML2 Service Provider
- Install the SAML ACS application and configure the SAML TAI in the WebSphere profile. See the procedure to enable your system to use the SAML web single sign-on (SSO) feature: http://www.ibm.com/support/knowledgecenter/SSAW57_8.5.5/com.ibm.websphere.nd.doc/ae/twbs_e nablesamlsso.html.
- For Custom Properties, you can use the information provided in the following illustration
as a guide:
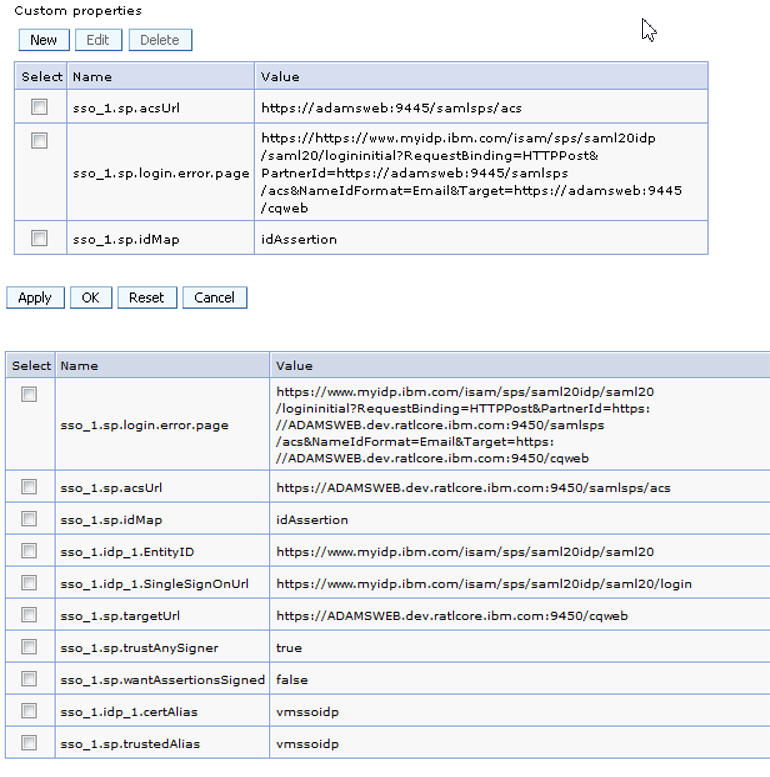
For more information about custom properties, see the following help topic: http://www.ibm.com/support/knowledgecenter/SSAW57_8.5.5/com.ibm.websphere.nd.doc/ae/twbs_e nablesamlsso.html.
Note: You can also use the AdminTask.addSAMLTAISSO command to add the SAML TAI and set its custom properties, see the following help topic: http://www.ibm.com/support/knowledgecenter/SSAW57_8.5.5/com.ibm.websphere.nd.doc/ae/twbs_a ddsamltaisso.html.
-
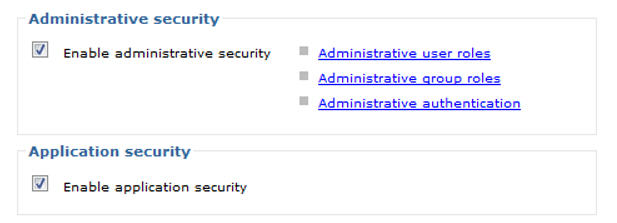
Ensure that SSO is enabled in WebSphere Global Security. These boxes must be checked in Security > Global security.
- For Security > Global security > Authentication > Web and SIP Settings > General Settings
>, you should have:
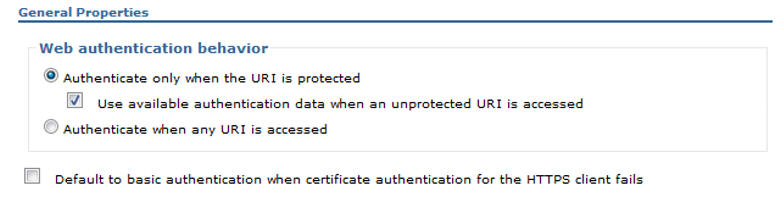 . This ensures that SSO is triggered if any
Compass Web resource is requested.
. This ensures that SSO is triggered if any
Compass Web resource is requested. - Single sign-on (SSO) >

If necessary, add a Domain name to trust. This would be the minimum part of the domain that matches your identity provider, for example, “.hcl.com”.
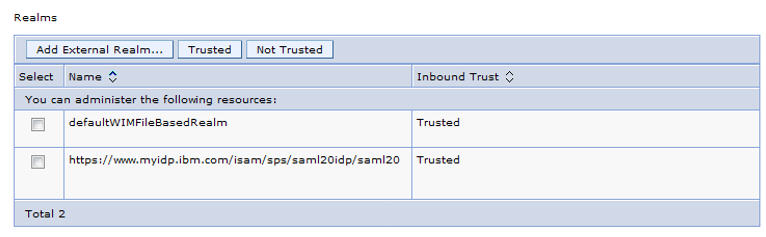
While you are here, ensure that the SAML Identity Providers realm is trusted. Go to Security > Global security. In user account repository, click Configure. Click Trusted authentication realms – inbound. Click Add External Realm and fill in the external realm name. Click OK and save your changes to the mastedr configuration.
Alternative steps, including wsadmin scripts, can be found in part two of the following help
topic: http://www.ibm.com/support/knowledgecenter/SSAW57_8.5.5/com.ibm.websphere.nd.doc/ae/twbs_c
onfiguresamlssopartners.html For example, the following shows WebSphere trusting the realm from an
IBM ISAM Identity Provider with the realm https://www.myidp.ibm.com/isam/sps/saml20idp/saml20.
Configure Trust with an Identity Provider
The WebSphere profile (the service provider) you configured above must be told that it can trust the identity provider (SiteMinder, ISAM, and so forth). As well, the identity provider must be told it can trust the WebSphere service provider that is hosting Compass Web. Follow the steps below for establishing this trust.
Note: Consult an expert in the identity provider software that you use for help determining what values to use in the commands described in the links below.
Tell the Identity Provider to Trust the Service Provider (Compass Web)
- Follow the steps below to export a metadata file for the service provider (WebSphere profile hosting Compass Web). Run these commands for the same WebSphere profile you have Compass Web installed in. See the procedure in the following help topic: http://www.ibm.com/support/knowledgecenter/SSAW57_8.5.5/com.ibm.websphere.nd.doc/ae /twbs_exportsamlspmetadata.html.
- Import this metadata file into your identity provider. This needs to be done by the administrator of your SAML2 Identity Provider.
Tell the Service Provider to Trust the Identity Provider
- Import the SAML2 Identity Provider’s metadata into the Service Provider (WebSphere profile hosting Compass Web). See the procedure in the following help topic: http://www.ibm.com/support/knowledgecenter/SSAW57_8.5.5/com.ibm.websphere.nd.doc/ae /twbs_importsamlidpmetadata.html.
Compass SSO Setup
- Configure Compass database for SSO.
- Configure Compass Web server for SSO
- Map LTPA/LDAP users to Compass Web application.
Configure Compass database for SSO
- You must set an SSO password in the database. See the procedure in help topic Configuring HCL Compass databases for container authentication .
- Create an sso.properties file using cqrpc/cqrpc.exe and the password you used in step 1. See the procedure in help topic Configuring the HCL Compass Web client for container authentication. Note: The sso.properties generated by cqrpc should remain in the same directory as the cqrpc executable. This file is used by the cqrpc executable as well. This sso.properties file is different than the one you edit in step 3, below. Configure the sso.properties file for SAML2. See the procedure in help topic Configuring the HCL Compass Web client for container authentication. For the SAML2, in sso.properties, the SSO_LOGIN_MODE must be set to “SAML2”.
Configure Compass Web server for SSO
Reference the help topic Configuring client certificate authentication for Compass Web
to modify the web.xml descriptor, but for the security constraint and other clauses in web.xml use
the following: 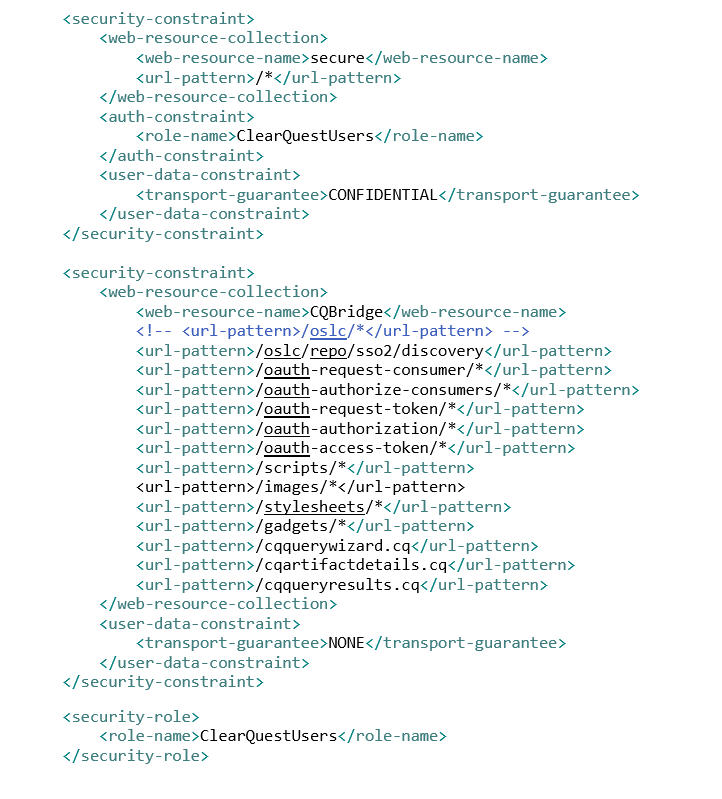
Map authenticated users to Compass Web application
Currently there is no way to choose which SAML2 authenticated users can access the Compass Web application. You must allow all authenticated users access to the application. Just accessing the application, however, does not mean that they can actually log in to Compass Web, it only means that they can load the Compass Web resources in their browser. Whether they can actually log in to a Compass database depends on whether the user is already subscribed to the Compass database. For example, if the user “tom” is allowed access to the Compass Web application but does not have any access to a Compass database, they will only see the database selection dialog but will not be able to actually connect to the database.
- Using the WebSphere Application Server administrative console, click Applications > Application types > WebSphere enterprise applications in the navigation pane. The Enterprise Applications page opens.
- In the Enterprise Applications table, click TeamEar. The Configuration page opens.
- In the Detail Properties section, click Security role to user/group mapping.
- In the table row in which the CompassUsers role displays, select the check box in the Select column and click on Map Special Subjects and choose All Authenticated in Trusted Realms.
- Click OK on the Security role to user/group mapping page to save the mappings.
- Restart the WebSphere Application Server.