Configuring HCL Compass for OpenID Connect SSO
As an administrator, you can configure HCL Compass to use OpenID Connect for single sign-on (SSO).
OpenID Connect 1.0 is a simple identity layer built on top of OpenID 2.0. An Identity Provider (IDP) serves for information about identity, authentication, and authorization. A service provider (SP) is a service that makes use of the identity services the IDP provides. As an example, the Jazz Authorization Server (JAS) functions as an IDP while the HCL Compass Web is the SP. You must configure the SP to use the IDP for identity services, and then configure IDP to allow the SP to use it (SP registration).
OpenID Connect 1.0 uses Lightweight Third-Party Authentication for storing identity information on the browser, but OpenID Connect 1.0 defines a full method of interaction between the IDP and SP. For example, when the SP (for example, HCL Compass Web) is accessed and the user’s identity has not yet been determined, the SP will redirect to the authentication UI of the IDP (for example, JAS). Once authentication is complete, the IDP (JAS) will redirect back to the SP (HCL Compass Web) and continue the login process for that service.
Configuring HCL Compass to use OpenID Connect for single sign-on (SSO) is a three-step process. The first step is to configure the HCL Compass Web WebSphere profile and the Open ID Connect ID provider interactively perform identity operations. The second step is to tell the HCL Compass database and Web server that it should use OpenID Connect for SSO. The third step is the register the Compass application on your identity provider. All but the third step can be automated by the setup script.
Configuring WebSphere for OpenID Connect
The procedure assumes that you already have HCL Compass installed in IBM® WebSphere® and you also have an OpenID connect ID provider in the form of a Jazz™ Authorization Server or a basic WAS Liberty Profile with OpenID Connect “openidConnectServer-1.0” feature enabled.
The HCL Compass Web WebSphere profile must have administrative security enabled. It is easiest to do this if you create the profile with administrative security enabled. It is more of a challenge to add administrative security later. Administrative security protects the administrative functions of WebSphere.
- Read, but do not execute the procedure in the following help topic link for setting up WAS as an OpenID Connect Relying Party (RP). Execute the steps below. The relying party runs in the same WebSphere profile as the service provider (for example, HCL Compass Web). You will be following these steps with any variations described below in Configuring an OpenID Connect Relying Party.
- Add the interceptor class (step 1-4).
For custom TAI properties, reference this link (step 5-6)
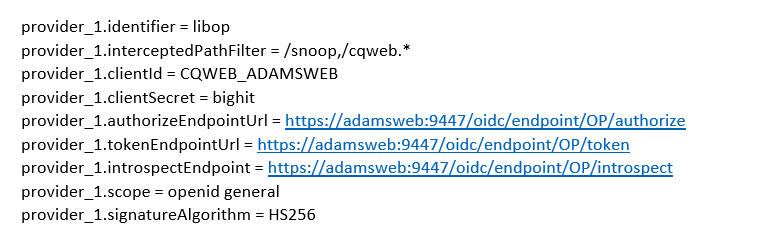
Example settings where JAS is on host adamsweb port 9447.
- Add the com.ibm.websphere.security.InvokeTAIbeforeSSO (step 7-8) .
- Import the OpenID Connect providers (Liberty server, or JAS servers) certificate (step 9). To
get the certificate, go to one of the sites used in the provider set up (step 3), for example,
https://adamsweb:9447/oidc/endpoint/OP/authorize then click on the lock to get certificate info.
Click More Information, then View Certificate. Select Details, then
Export. Export as X.509 Certificate with chain (PEM) (*.crt). When importing the certificate,
you have to go to SSL certificate and key management > Key stores and certificates >
NodeDefaultTrustStore > Signer certificates, and select Binary DER data for the Date
Type. For File name, you must provide the full path to the certificate that you exported.
Alternate method to get the certificate imported: Follow “step 9” on link given in step 1 of this document. In the IBM console go to Security > SSL certificate and key management > Key stores and certificates > NodeDefaultTrustStore > Signer certificates. Click Retrieve from port, then enter your OpenID Connect providers host and port (full URL not required). Enter a name for the certificate. Websphere will then fetch the certificate and import it.
- Install the OpenID Connect RP app (step 10). First, change directory (cd) into the WebSphere
AppServer bin directory (not the profile bin directory). For an AppServer with one plain profile
created for development the commands are similar to
cd <AppServerRoot>/binwsadmin -f installOIDCRP.py install yourNodeName server1 - When it completes, one of the last lines will be, for example: ADMA5013I: Application WebSphereOIDCRP installed successfully. Restart WebSphere Application Server.
HCL Compass SSO Setup
- Configure HCL Compass database for SSO.
- Configure HCL Compass Web server for SSO.
- Map OpenID Connect users to HCL Compass Web application.
- You must set an SSO password in the database. See the procedure in help topic Configuring HCL Compass databases for container authentication .
- Create an sso.properties file using cqrpc/cqrpc.exe and the password you used in
step 1. See the procedure in help topic Configuring HCL Compass databases for container
authentication. Configure the sso.properties file for OpenID Connect. See the
procedure in the help topic Configuring the HCL Compass Web client for container
authentication. For the sso.properties, make these additional changes to the SSO_LOGIN_MODE and SSO_USES_JAS_OIDC.
SSO_LOGIN_MODE=OIDC
The first line tells HCL Compass Web that we will be using OpenID Connect. The second line says that HCL Compass Web will integrate with a Jazz server that also uses OpenID Connect. The last line is only needed for HCL Compass and Jazz integrations.SSO_USES_JAS_OIDC=true - Follow most of the steps for setting up HCL Compass for smart card authentication, but leave out steps 4 and 5.
Configure HCL Compass Web server for SSO
Reference the help topic
Configuring client certificate authentication for HCL Compass Webto modify the
web.xml descriptor, but for the security constraint and other clauses in web.xml use
this: 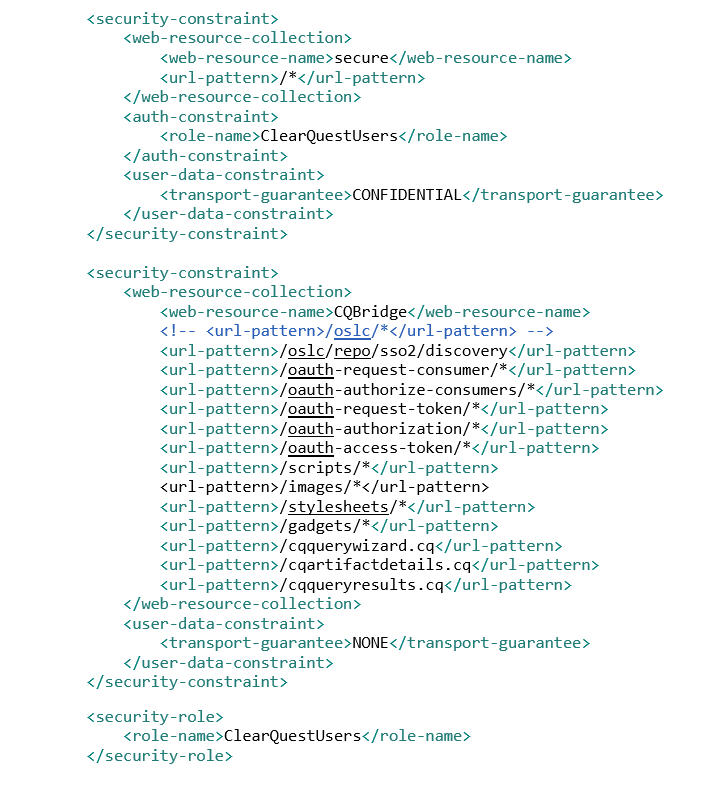
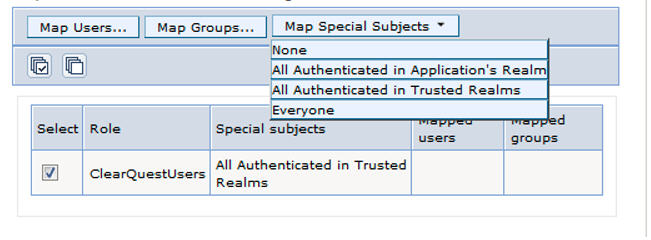
Map OpenID Connect users to HCL Compass Web application
The WebSphere profile hosting HCL Compass Web application must be told which users can access it. For now, we have chosen to allow all OpenID Connect authenticated users to access the HCL Compass Web login page. Just accessing the application does not mean they can actually log in to HCL Compass Web, it only means that they can load the HCL Compass Web resources in their browser. Whether they can actually log in to a HCL Compass database depends on whether the user is already subscribed to the HCL Compass database. For example, if the user “tom” is allowed access to the HCL Compass Web application but does not have any access to a HCL Compass database, they will probably only see the database selection dialog but will not be able to actually connect to the database.
- Using the WebSphere Application Server administrative console, click Applications > Application types > WebSphere enterprise applications in the navigation pane. The Enterprise Applications page opens.
- In the Enterprise Applications table, click TeamEar. The Configuration page opens.
- In the Detail Properties section, click Security role to user/group mapping.
- In the table row in which the HCL CompassUsers role displays, select the check box and click on Map Special Subjects and select
All Authenticated in Trusted Realms.
- Restart the WebSphere Application Server.
Register HCL Compass Web Relying Party on the Identity Provider
- http://www.ibm.com/support/knowledgecenter/SSD28V_8.5.5/com.ibm.websphere.wlp.core.d oc/ae/twlp_config_oidc_op.html
- http://www.ibm.com/support/knowledgecenter/SSD28V_8.5.5/com.ibm.websphere.wlp.core.d oc/ae/twlp_client_registration.html
- Create a JSON file with the client registration JSON in it. Name the file cqwebreg.json.
You can use the same JSON that you would use for the RESTful registration described above. For
example,
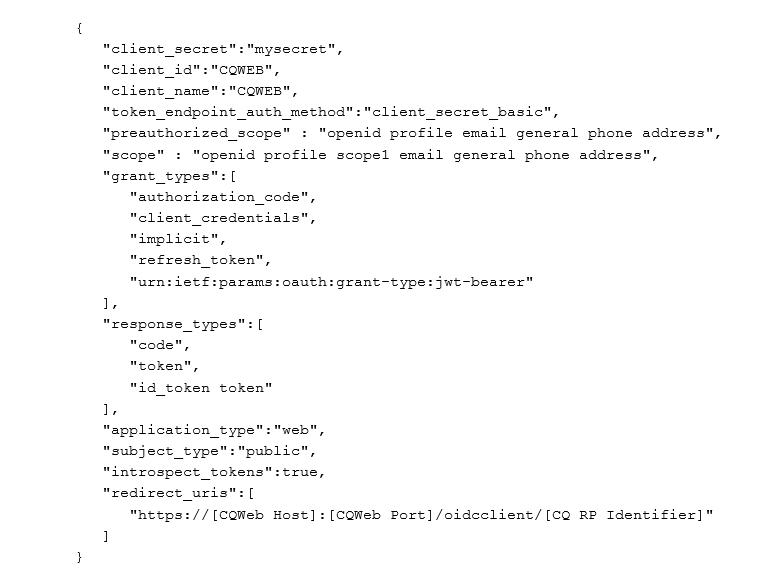
Note: For parts in brackets [ ], you should supply values for your HCL Compass Web server. The HCL Compass RP Identifier is the provider identifier you gave in the custom properties for the RP TAI. In the example above, we used provider_1.identifier = libop, so here you would put “libop”. For example, https://host.mydomain.com:12443/oidcclient/libop.
- Open a shell and change to the cli directory in JAS, for example,
cd C:\IBM\JazzAuthServer\cli - Run the following command to register your HCL Compass WEB RP, substituting the JAS admin user
and password and using the full path to the cqwebreg.json you created in step
1.
ldclient.bat -u "user:password" cqwebreg.json
In response, you will see JSON output with the client information you just registered. Once restarted, the HCL Compass Web application will use OpenID Connect for single sign-on.