Creating a central repository using eAssemblies

If you have access to the eAssemblies on IBM Passport Advantage, you can use the instructions in this topic to create the central repository.

Before you begin

  1. Download the following product eAssemblies from Passport Advantage to the server:
    • Rational Application Developer Version 8.5.5.3, or a higher fix pack for Version 8.5.5
    • WebSphere Application Server Test Environment (WTE) V7.0.
    • WebSphere Commerce Developer Version V7.0.
    • The most recent WebSphere Commerce Developer fix pack you want to install.
    • The most recent WebSphere Commerce Developer feature pack you want to install.
  2. Extract each package to a temporary location. For example:
    • RAD_WTE_image_location
    • WCDE_image_location
    • FP_image_location
    • FEP_image_location
  3. Download the latest fix pack for IBM Installation Manager and extract it to a temporary location. For example: IM_image_location.
    Note: You can add only Installation Manger fix packs to the repository. You cannot add installer packages to the repository. For more information, see Using the Package Utility and Installation Manager.

Procedure

  1. Run the IBM Packaging Utility.
  2. Click Copy Packages.
  3. Click Open Repository.
  4. Add the latest version of the Installation Manager to the central repository:
    1. Browse to the IM_image_location and select repository.config.
    2. Optional: Enter a name in the Repository Name field to replace the default.
    3. Click OK.
  5. Add the Rational Application Developer and WebSphere Application Server Test Environment (WTE) repositories to the central repository:
    1. Browse to the RAD_WTE_image_location\RAD_SETUP and select diskTag.inf.
    2. Optional: Enter a name in the Repository Name field to replace the default.
    3. Click OK.
  6. Add the WebSphere Commerce Developer V7.0 repository to the central repository:
    1. Browse to the WCDE_image_location and select repository.config.
    2. Optional: Enter a name in the Repository Name field to replace the default.
    3. Click OK.
  7. Add the WebSphere Commerce Developer V7.0 fix pack repository to the central repository:
    1. Browse to the FP_image_location and select repository.config.
    2. Optional: Enter a name in the Repository Name field to replace the default.
    3. Click OK.
  8. Add the WebSphere Commerce Developer V7.0 feature pack repository to the central repository:
    1. Browse to FEP_image_location\developer and select repository.config.
    2. Optional: Enter a name in the Repository Name field to replace the default.
    3. Click OK.
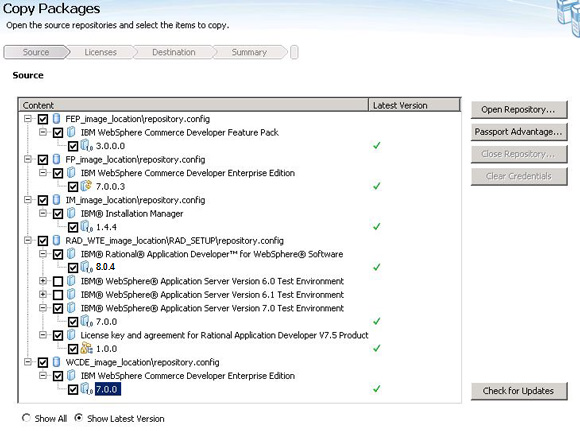
  9. Select all the required products to be copied to the central repository, as shown in this example:

    Example of products you might select to be copied to the central repository
  10. Click Next.
  11. Review the license agreements and click Accept.
  12. Select a location on the server where you want to create the central repository. This location is referred to using the common_repo variable in subsequent topics.
  13. Click Next.
  14. Review the summary page and click Copy to begin creating the central repository.
  15. After the repository is successfully created, click Finish and close the IBM Packaging Utility.

Results

Your central repository is now created under the common_repo location on the server that you specified in Step 12. To update your repository, see Maintaining your central repository.