Introducing the BigFix console user interface
- Domain Panel
- This vertical panel on the left provides a high-level view of
the extensive content, allowing you to quickly subdivide the information
by major IT functions. Within each domain, this panel presents navigation
trees that make it easy to zoom in on Fixlet, reports, analyses, and
other content. This panel might be subdivided into sections, depending
on the style of the domain. Some of these sections might include:
- Content Filters
- If it exists, this section is at the top and provides various content filters and reports that are a part of the selected domain. Click the disclosure icon to the left (either a triangle or a plus sign) to produce a navigation tree to refine your choices.
- General Content
- This section lets you navigate all the content in the domain. The content might include Fixlet, tasks, actions, analyses, and computers, all collected from various sites. Click the disclosure icon to the left (either a triangle or a plus sign) to open up the tree.
- Domain Buttons
- At the bottom of the Domain Panel, these buttons represent the set of domains that are currently available to you. When you subscribe to a site, it is automatically entered into the correct domain. If a new domain is required, a button for it is added to this group. At the bottom of the buttons is a control that allows you to adjust the number of buttons to display.
- Console Toolbar
- This toolbar allows you to navigate back and forth through the items you have selected from the Domain navigation tree. These Back and Forward buttons act like their counterparts in a browser, and are an important method for navigating through your content. In addition there are buttons that allow you to display items you might have hidden and items that are not currently relevant to any of your clients (this allows you to view all the available content for research or cloning purposes). There is also a refresh button that reloads content from the database for the console display.
- List Panel
- This is a listing of the items specified by the content filters and the navigation trees in the Domain Panel. You can sort this list by clicking the column headers and you can rearrange the headers by dragging them left or right. In addition, you can right-click the headers to see a pop-up menu containing a list of all the possible fields. Check those you want to use as headers.
- Context Menu
- This is the menu that opens when you right-click any item in a list. Different lists have different context menus.
- Work Area Toolbar
- This bar contains context-sensitive buttons that can run various actions based on the content of the current work area. It also contains two icons, upper right, that let you maximize or detach a specific document. Detaching allows you to examine more than one document at a time.
- Work Area
- Below the List Panel and the Work Area Toolbar is the Work Area.
When you click an item from the List Panel, the console opens a detailed
document in this window. The following list describes, for example,
the elements of a Fixlet:
- Document tabs
- Each type of document has a unique set of tabs to go along with it. For a Fixlet, the tabs include items such as Description, Details, Applicable Computers, and Action History.
- Fixlet
- When a Fixlet is opened from the list, the default Description tab is selected and the Fixlet document explains the issue in plain English.
- Action Button
- A Fixlet document typically contains at least one Action, represented by a link in the Work Area (also available from the Take Action button in the Work Area Toolbar). Click it to deploy the Action across your network.
Below is a screen shot from a typical session. A subset of Fixlets and Tasks have been selected from the Domain navigation tree, and the user is viewing the description of a Task opened from the list panel:
| Domain Panel | Console Toolbar | List Panel | Context Menu |
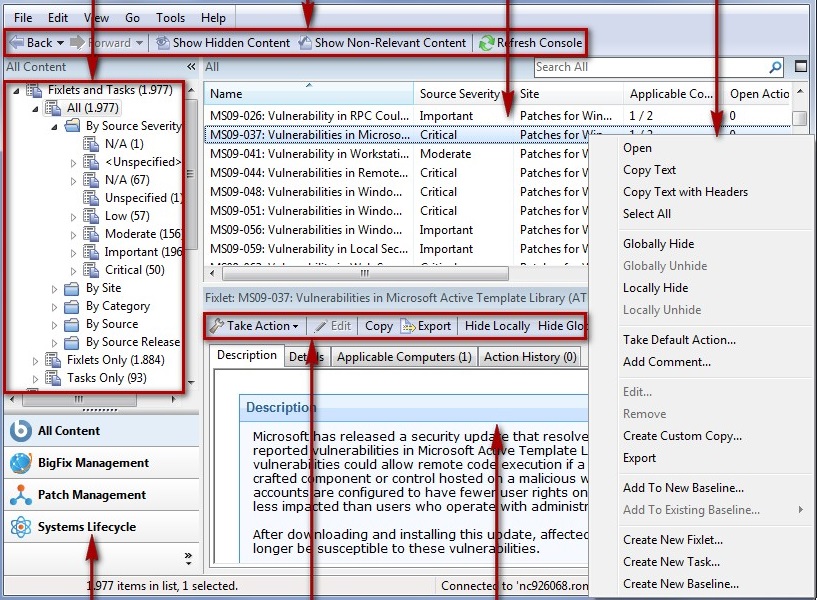 |
|||
| Domain Buttons | Work Area Toolbar | Work Area | |
In general, your workflow proceeds first from the Domain Panel to the List Panel. After selecting an item from that list, you follow the instructions in the Work Area to complete the task.
How you proceed depends on the content type. Fixlet describe problems that have been discovered on one or more clients. Analyses present you with information collected from the clients on your network. The computer branch of the tree allows you to examine specific clients under your control.
For example, if you select Fixlets from the Domain Panel, a list of the relevant Fixlets is shown in the List Panel. Select one from the list and it is shown in the Work Area below. The Fixlet document presents you with a short, clear explanation of a problem that is currently affecting your clients. If you want, you can inspect the underlying code used in the relevance expression and the proposed actions by clicking the Details tab. When you have decided to deploy the action to the affected computers, click the action (represented by a button in the Work Area Toolbar or a hyperlink in the Work Area) and follow the prompts. After deploying the action, the affected clients are remediated and no longer report the problem. At that point, the Fixlet is removed from the relevant Fixlet list.
You can set preferences that govern how responsive and secure you want your network to be. To adjust the default values, select Preferences from the File menu.