Creating Bare Metal Profiles for Linux Images
Create Bare Metal profiles from the Image Library dashboard, to perform bare metal deployments on Linux targets.
Select a Linux image (.LIM) and click Create Bare Metal Profile.
A wizard with the information retrieved from the selected Linux image is displayed. Some field values are already set but you can change them as appropriate. Depending on whether the selected image is captured or created from installation media, not all fields apply.
You can deploy your bare metal profiles in multicast, if your network supports it, by specifying the required parameters in the Multicast tab.
The default network configuration for targets is DHCP. You can specify different network configuration parameters for the targets receiving the profile by using the Network tab. If your targets have multiple network interface cards, use the Change Bare Metal Target Network Configuration task (354) to configure them.
{{yes}- Common bare metal profile fields (both setup and captured images)
Required fields:
- Display name
- The name of the bare metal profile created from the image that you selected. by default it is the same name as the image.
- Image Locale
- Choose the image locale for the operating system if different form the preset one.
- Time Zone
- Select the time zone of the target operating system
- Hostname Rule
- Specify the hostname rule that will be used to build the hostname,
computer name, and full computer name of the target. You can specify
values in the following forms:
- A prefix.
- A prefix and one or more variables.
- One or more variables.
[variable]enclosed by square brackets. You can concatenate variables. Allowed variables are:- [IP] - IP Address of the primary interface that has completed a PXE boot
- [MAC] - Hardware Address of the primary interface that has completed the PXE boot)
- [UUID] - System UUID as found in DMI (SMBIOS)
- [SN] - Serial number as found in DMI (SMBIOS)
- [AT] - Asset TAG as found in DMI (SMBIOS)
- [BBSN] - Base Board Serial Number as found in DMI (SMBIOS)
Every variable keyword supports a range extension, and you can decide to include only part of the information. The range starts at value zero. The value [IP3] corresponds to the last byte of the IP address. In IP addresses bytes are separated by dots. For example, if you specify a hostname rule of
pc-[IP3]and the IP address of the target is192.168.0.232, the hostname becomespc-232. If you specify[IP0-2], the first three bytes of the IP address are included. For SN, UUID, AT, and BBSN values, the range corresponds to a substring. You can also addRat the end of the range to start it from the last character specified. Dots are always removed from the IP address in the final string.Note: If the deployment is started from network boot media, the IP address used in the hostname rule is the one assigned during the network boot. - Root Password
- Specify the root password for the target system. You are asked to specify it twice.
The following figure displays a bare metal profile for an image created from installation media (Setup).
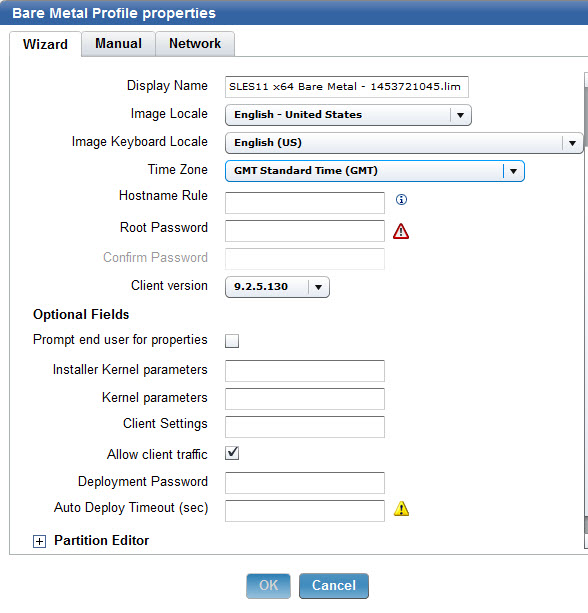
Optional fields
- Prompt end user for properties
- Select this option to prompt the user at the target computer for a hostname and network parameters. When the deployment starts on the target, a user interface is displayed and the user can configure the hostname and network settings for one or more network interfaces (NICs) available on the target system. For more information about the properties displayed at the target, see Specifying target network parameters at deployment time, and Changing Bare Metal Target Network Configuration Settings.
- Installer Kernel parameters
- Specify one or more optional kernel parameters for the Linux installer, and the corresponding values if required.
- Kernel parameters
- Specify one or more optional kernel parameters for the installed Linux operating system.
- Client Settings
- Use this field to set named variables that are assigned to the
deployed computer. The values you assign can be used either as labels
to identify computers with specific roles or as filters in Fixlet
actions and in Fixlet relevance to exclude an action on a target.
You must specify the variables in a
NAME:VALUEformat. If you specify multiple variables, each one must be separated by a vertical bar|
Edit Computer Settings
. The settings are listed underCustom Settings.
Examples of how to use client settings to configure the target after a deployment are available on the Endpoint Manager wiki at this link: https://www.ibm.com/developerworks/community/wikis/home?lang=en#!/wiki/Tivoli%20Endpoint%20Manager/page/Using%20the%20Client%20Settings%20field%20to%20configure%20targets%20during%20deployments.
A complete list of available client configuration settings, and a description of how to use them is available on the BigFix wiki at this link: https://www.ibm.com/developerworks/community/wikis/home?lang=en#!/wiki/Tivoli%20Endpoint%20Manager/page/Configuration%20Settings?section=Clients/library/cc749015%28v=ws.10%29.aspx
- Deployment password
- Providing a deployment password protects the profile during deployment. Protected profiles are installed only after you provide the correct password at the target when prompted.
- Auto Deploy Timeout (sec)
- If you specify a value in seconds, a counter is started during the PXE boot on the target machine. When the specified time expires, the profile is automatically installed on the target.
- Unique fields for images created from installation media (setup)
Required fields
- Client Version
- Specify the version of the BigFix client to be installed on the target. The default selection is the same version as the BigFix server.
Optional fields
- Allow client traffic
- This option is selected by default. It is needed if the selected target has the operating system firewall enabled, to allow inbound udp traffic from the Server. You can also allow inbound traffic on the target by running fixlets 678 or 682. For more information, see Changing Firewall settings.
- Unique fields for captured images
Required fields
- Linux OS Resource
- The OS Resource to be used for the deployment of the selected image. This field displays the OS resource that best matches the selected image.
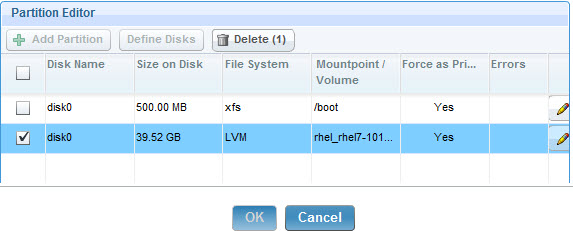
Using the Partition Editor
- Resize selected primary partitions and logical volumes. Highlight
the partition and click the edit icon to change the size.
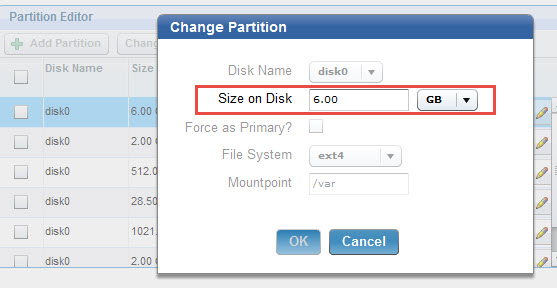
You can specify the size in kilobytes, megabytes, gigabytes, terabytes and percentages. If more than one partition is defined, specifying a value of one hundred percent (100%) for a partition, means that it will occupy all remaining space after the specified sizes have been allocated to the other partitions. You cannot delete captured partitions.
If you are deploying images imported from installation media ( setup) you do not have to edit partitions. In this case, the default partitioning is applied. If you want to edit partitions, you can specify a partition layout by expanding the Partition Editor section of the wizard tab. Consider the following partitioning use cases, depending on the characteristics of your target systems:
- I want to define multiple partitions on a single physical disk:
- Define the partitions on the disk by clicking the corresponding
option:
 You can add partitions or logical volumes. Specify the required information.
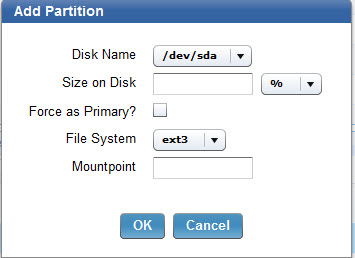
- If you want to add a logical volume, select
LVMfrom the File system list, and specify a Volume Group name. When you click OK the Logical volume Editor becomes available at the bottom of the section. Click Add Logical volume and specify the characteristics of the logical volume.
- Define the partitions on the disk by clicking the corresponding
option:
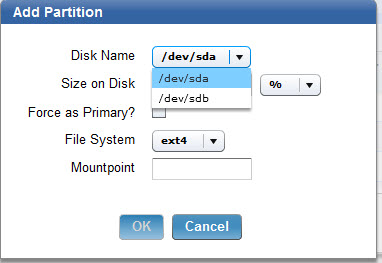
- I want to define multiple partitions on different physical disks
- Define the physical disks on the machine that receives the profile
. Click Define Disks The default disk name
is
/dev/sda. To define more physical disks, specify each disk element separated by a semicolon. For example:/dev/sda;/dev/sdb. Click OK to save your changes. - Click Add Partition and select a disk that
you defined in the previous step to partition it.
Specify the size of the partition, mount point and file system type. You can set the disk as primary. Specify the partition mount point. To add a logical volume, select LVM from the File System List, and specify a Logical Volume Group name. When you click OK the Logical volume Editor becomes available at the bottom of the section. Click Add Logical volume and specify the characteristics of the logical volume. - Repeat step 2 for each physical disk that you defined.
- Define the physical disks on the machine that receives the profile
. Click Define Disks The default disk name
is
You cannot delete captured partitions.
- You can define up to three primary partitions, by selecting the appropriate option. If you want to deploy the profile in multicast to BIOS targets, you can define a maximum of two primary partitions.
- If you are deploying a Linux Setup image in multicast on a target that has existing Windows partitions not on the primary disk, these partitions will not be formatted. This must be considered when defining multiple disks using the partition editor in the profile.
- When you define multiple partitions for a disk, make sure you specify the size of at least one of the partitions using percentage (%) not with a fixed value, so as to optimize disk allocation and avoid disk space errors. This best practice applies to Logical Volumes too. When you define a fixed size for a Volume Group, for example 10 gigabytes, the actual size available to create Logical Volumes is slightly less (usually in the order of a few megabytes). To avoid space allocation problems, when you define volume groups you should specify the size of at least one Logical Volume in percentage (%).
- When you edit a profile containing a partition layout, if you change the disk mapping, the current layout is erased. A warning message is issued asking you to confirm or to cancel the operation.
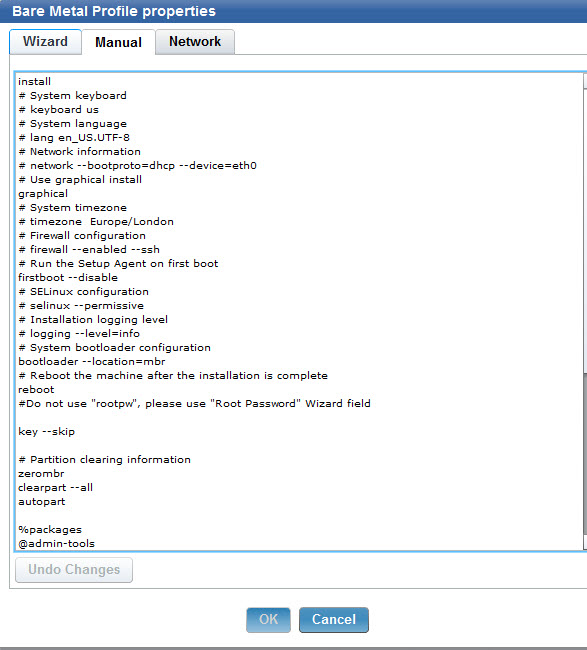
Manual tab settings
Using the Manual tab, you can customize the installation of Linux images imported from installation media (Setup) with specific settings that are not available in the wizard. Uncomment the settings you want to customize and include in your deployment. For more information about the customization of the configuration files, see Linux configuration options or refer to the specific Linux vendor documentation.
Deploying bare metal profiles in multicast

- Multicast Mode
- Defines how the multicast distribution is managed on the targets
at deployment time for the profile:
- Probe and Fail
- If the probe on the target fails, the deployment task also fails.
- Probe and Fall back to Unicast
- If the probe on the target fails, deployment of the profile occurs in unicast
- Force
- Deployment on the target is forced to multicast regardless of probe results.
- Group Setup
- Select the type of multicast group that is used for the deployment.
You can accept or change the associated parameters.
- Closed Group
- Targets join the group as they are ready. When the following criteria
are satisfied, the group is closed and distribution begins. This is
the default.
- Number of targets in group
- Specify the maximum number of targets allowed in the group. The default value is 12.
- Wait for targets up to minutes
- Specify the maximum number of minutes to wait for targets before starting the multicast deployment. The default value is 10 minutes.
- Minimum number of targets in group
- Specify the minimum number of targets that must join for a multicast deployment. If the specified value is not reached, deployment is completed in unicast. The default value is 2.
- Open Group
- Targets can join the group as they are ready, at any time during
deployment. You can change the associated parameter.
- Average number of targets in group
- Specify the average number of targets expected in the group. This value is used to optimize block synchronization. The closer the number of actual targets is to this value, the more efficient the multicast deployment. The default value is 16.
- Advanced Parameters
- Multicast advanced customization and tuning options that apply
to both multicast group types.
- Block synchronization wait time in seconds
- Specify how many seconds the server must wait before sending the next block. This value is preset to 120 seconds. If you specify a value less than 5 seconds, the block synchronization wait time is forced to 5.
- Block size in MB
- The image is divided into blocks that are sent to the targets. This parameter sets the maximum size of the data blocks (in megabytes) sent in each transmission packet. The default value is 16 Megabytes.
- Enable block encryption
- Specify if the blocks must be encrypted during transmission.
Specifying target network parameters
You can define bare metal target network configuration settings with Task 354, by specifying them in the bare metal profile in the Network tab, or using a combination of both.
The actual network configuration settings used by the targets receiving the profile is determined by the type of configuration (Static or Dynamic), by the selected configuration policy, and by the Configure Bare Metal Target Network parameters task (354), if you have run it on targets before deploying this profile.
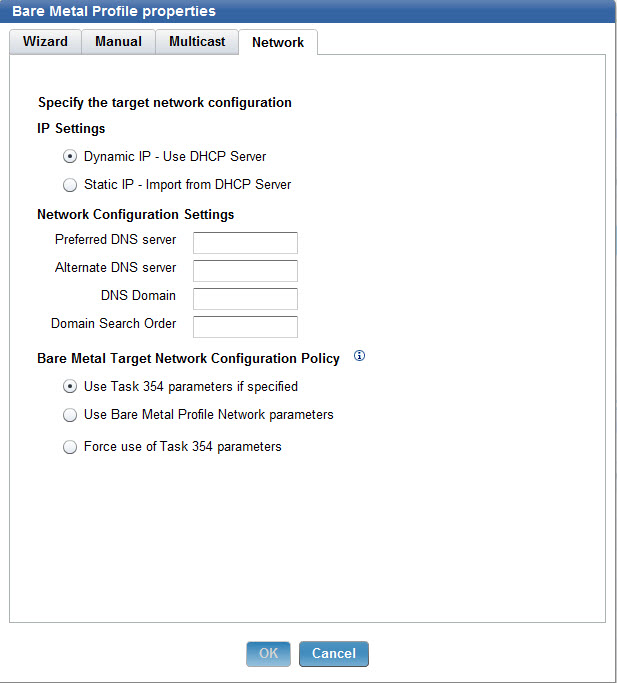
- IP Settings
- Specify the type of configuration for the targets:
- Dynamic IP - Use DHCP Server
- Ths is the default selection. A dynamic IP address is assigned by the DHCP Server
- Static IP - Import from DHCP Server
- IP address, gateway, and network mask are imported from the DHCP Server
- Network Configuration Settings
- Optional. These parameters are used only if you select a static IP configuration. If your policy is to use the bare metal target configuration parameters previously defined with task 354, the parameters that were not already set with the task and specified in this section are considered. If there are parameters in common, the ones specified in the task take precedence. The parameters specified in this section are also used if you select a static IP configuration and you select to ignore any parameter defined with task 354. The configuration settings in this section are disabled if you are configuring a dynamic IP and you have selected to ignore any previously defined target network configuration using task 354).
- Bare Metal Target Network Configuration Policy
- Choose the configuration policy that must be applied to the selected
targets for this profile.
- Use Task 354 parameters if specified
If you have run the Change Bare Metal Target Network configuration task 354 to configure network parameters on targets of this profile, and you have selected this option, the parameters you specified in the task will have precedence over the same parameters specified in the profile. A field by field check is performed, and the profile parameters that were not specified in the task are also used.
- Use Bare Metal Network Profile Parameters
Select this option if you want to ignore any previously defined target network parameters with task 354. Only the parameters specified in the profile are used.
- Force use of Task 354 parameters
Select this option if you want to use only network parameters defined with Task 354. If you have not previously run task 354 on the targets of this profile, the deployment fails.
Specifying target network parameters at deployment time
- Network interface card (NIC)
- All settings defined with task 354 or specified in the Network tab of the bare metal profile properties wizard are displayed. If the target has more than one network interface card (NIC), a separate configuration window is displayed for each one. Each interface is identified by the corresponding MAC address.
- Hostname
- Displays the hostname previously set with task 350 if used, or
the final hostname value resulting from the application of the hostname
rule you specified in the bare metal profile.Note: If you set the hostname for a target at deployment time, this value is maintained for any subsequent bare metal deployments, independently of the hostname rule specified in the bare metal profile. To change the hostname, you can either use task 350 or deploy a new profile selecting the "Prompt end user for properties" option.
- Partition mapping
- Displays the partition mapping information that was specified using task 350. You can resize the partitions or accept the current mapping. If this information is not available, the related page is not displayed at the target.