User Interface Overview
BigFix Runbook AI lets users to act on to unresolved open tickets, keep a log of archived tickets, and view key performance indicators and metrics on the dashboard. The user interface consists of four main menus: Tickets, Ticket Logs, Dashboard, and Knowledge. Users can manage tickets, execute runbooks, view ticket logs, search knowledge repositories, and customize the dashboard.
BigFix Runbook AI allows users to respond to unresolved open tickets, keep a log of the archived tickets closed by BigFix Runbook AI, and automatically update the dashboard to let users view key performance indicators and metrics at a glance.
The user interface comprises of four main menus:
Tickets
This section describes the recommended steps to view or manage a ticket. On occurrence of an incident or if an IT product or service is required, the user submits a ticket that is considered as the incident documentation or the service request.
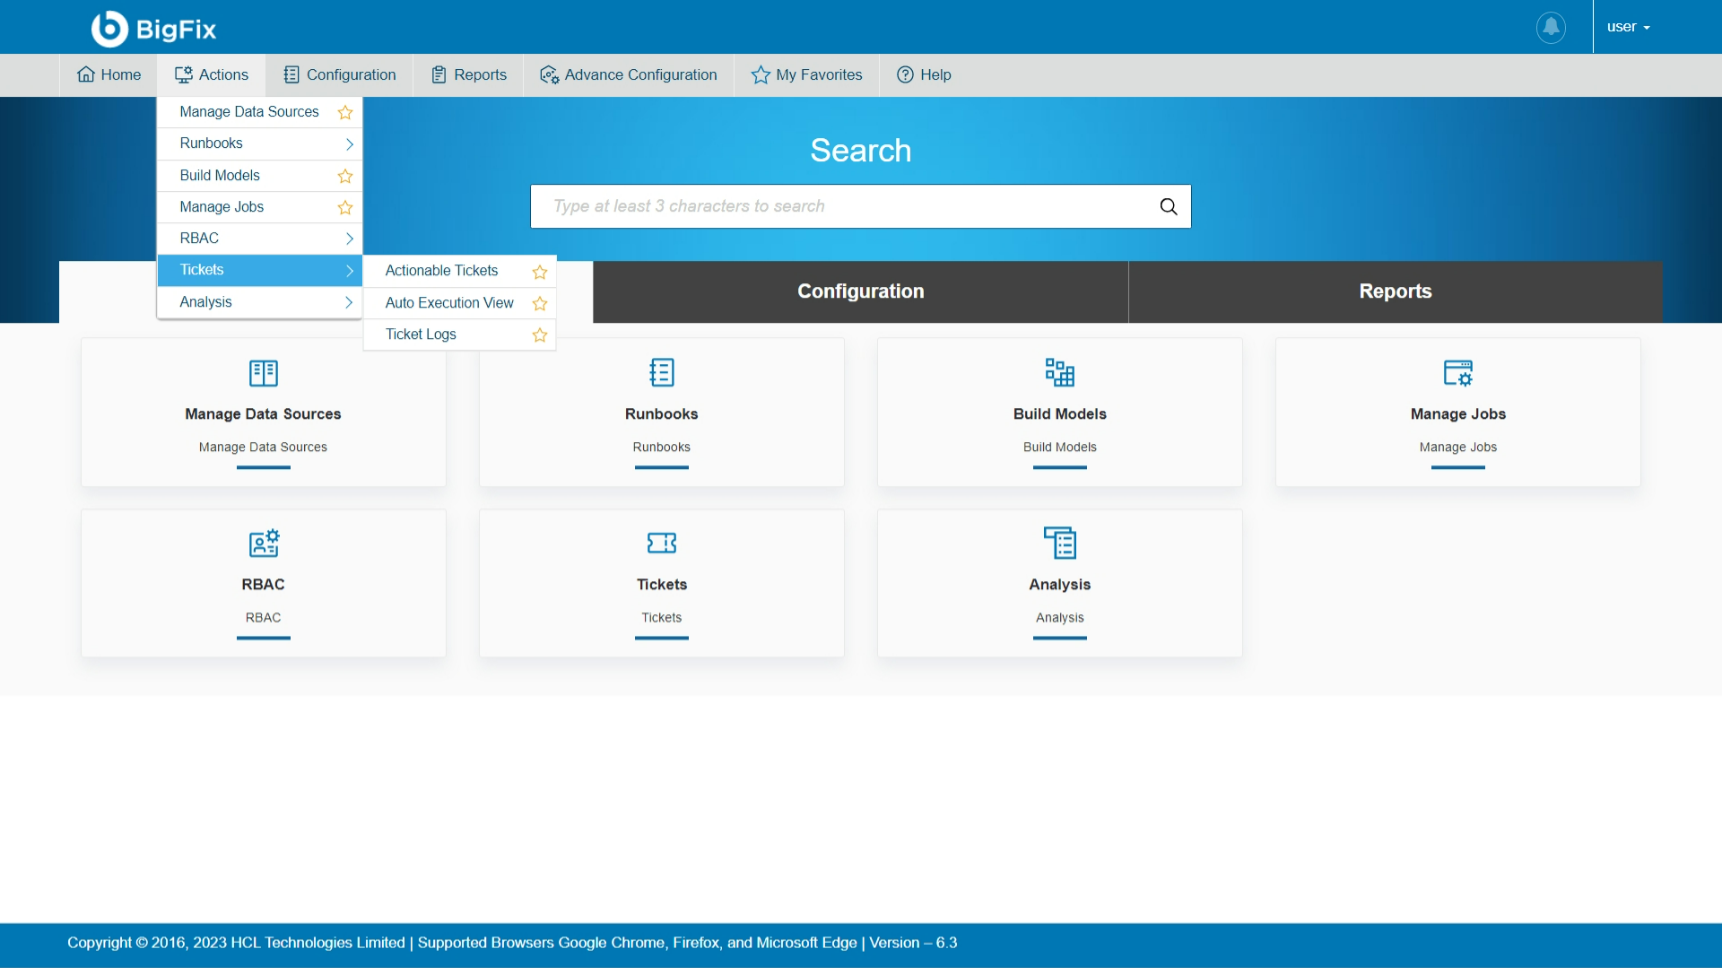
To manage tickets, go to main menu bar and click Actions->Tickets. A drop-down menu appears with the following options:
- Actionable Tickets
- Auto Execution View
- Ticket Logs
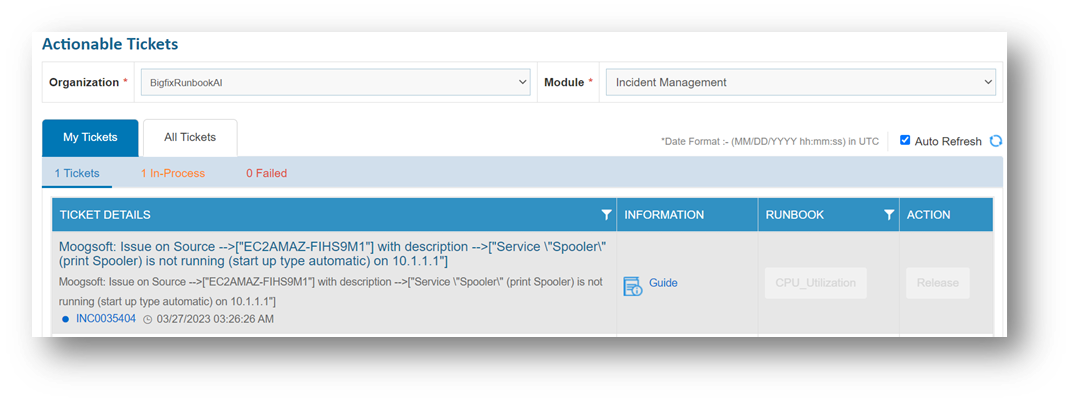
Actionable Tickets
This section describes how unresolved open tickets in BigFix Runbook AI are executed in either Auto or Manual mode.
To view or manage actionable tickets,
- Click Actions->Tickets on the main menu bar, and then click Actionable Tickets.
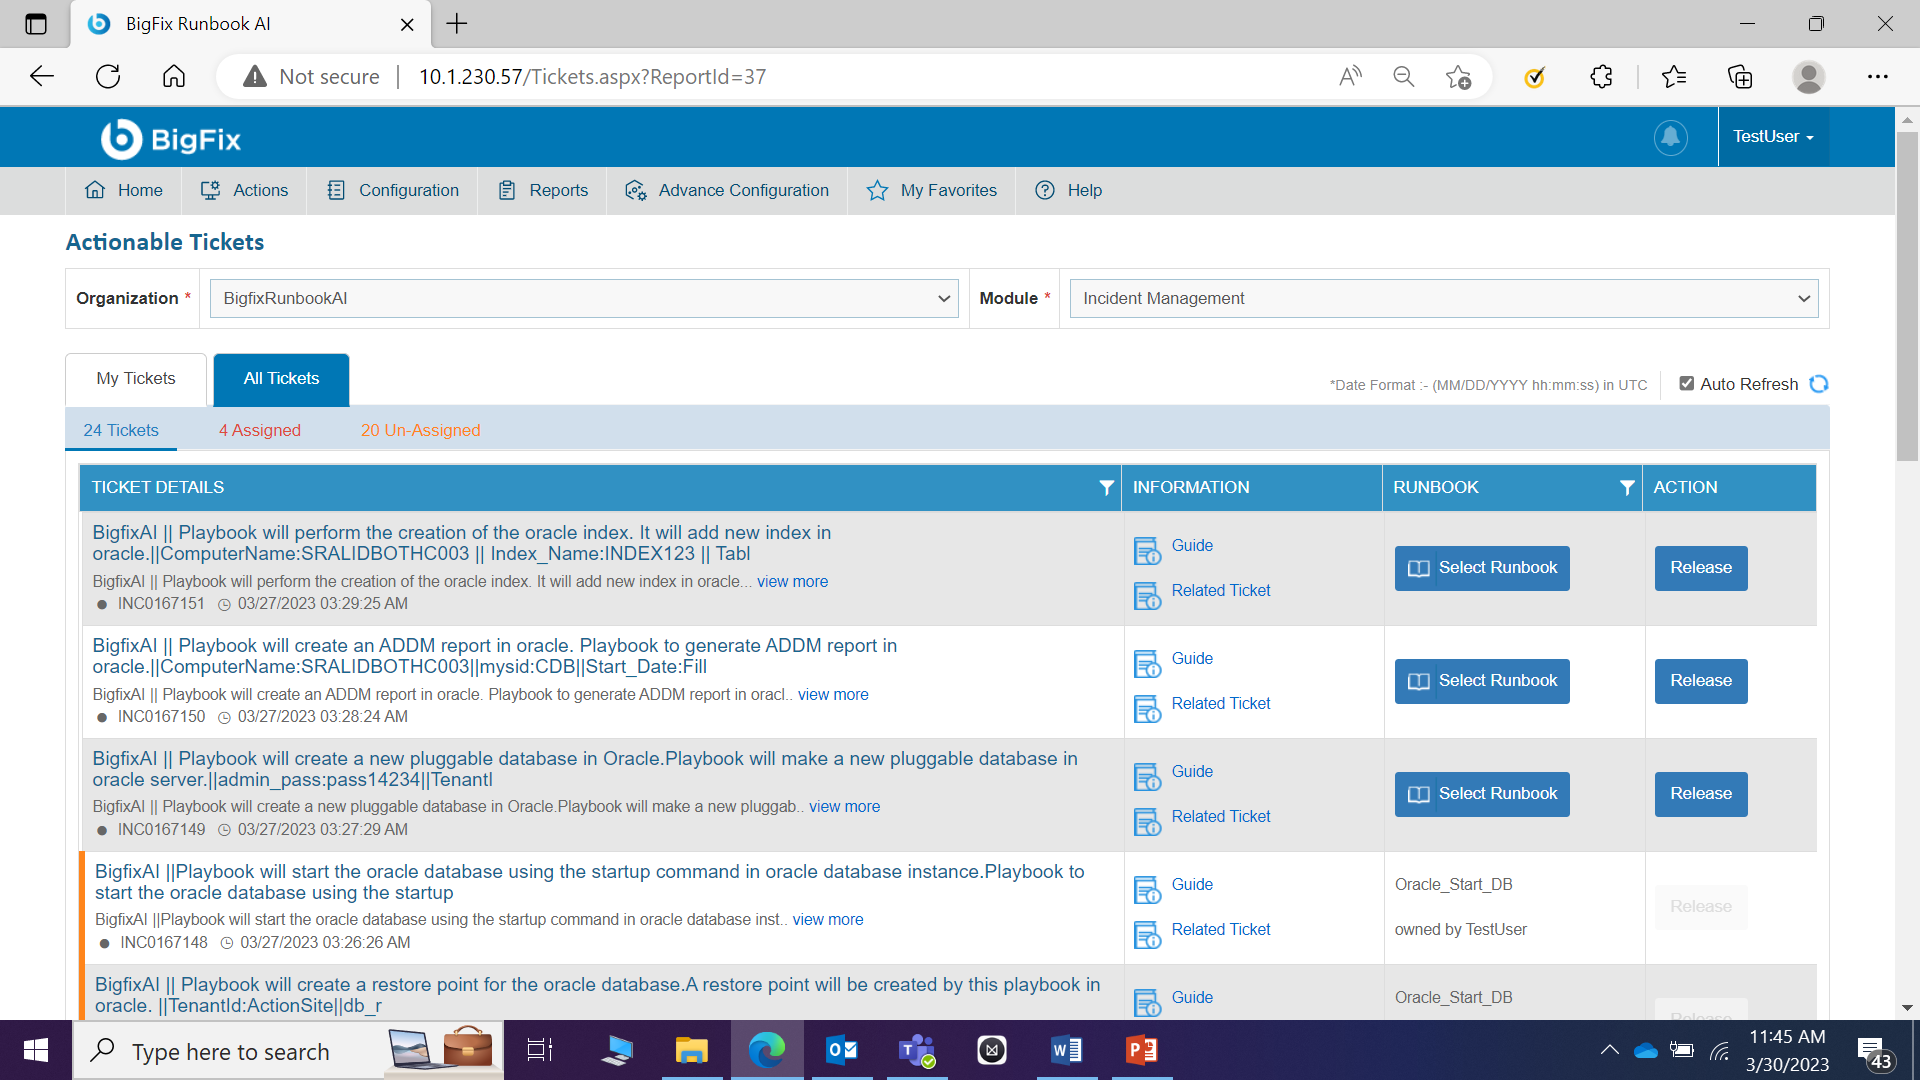
- The Actionable Tickets screen appears, displaying the summary and status of all tickets. It also lists the in-progress or failed tickets, either auto-executed or manually executed, in the following tabs:
- All Tickets: Lists the organization’s tickets, both assigned and unassigned.
- My Tickets: Lists only the tickets assigned to the current user, including in process or failed tickets.
All Tickets
This section describes the organization-specific tickets available in BigFix Runbook AI and how to manage them.
To view and use the All Tickets tab, perform the following steps:
- Select an Organization and then select a Module .
- The specific tickets for the selected organization and module appear in a tabular view.
- The All Tickets tab is categorized into the following tabs:
| Tab | Description |
|---|---|
| Tickets |
Lists the tickets that are a part of the BigFix Runbook AI queue and must be executed by BigFix Runbook AI Lists the consolidated tickets from the Assigned and Unassigned tabs |
| Assigned |
A subset of the Tickets tab; lists the tickets allotted for either automated or manual execution Shows the allocation status of a ticket and the runbook initiated for it |
| Unassigned |
A subset of the Tickets tab; lists the tickets pending for allocation Enables the current user to self-assign any ticket by selecting the most relevant runbook suggested and then initiating execution |
- Each tab includes columns with the following values:
- Ticket Details: Provides information about a request, including the ticket description, summary, identification number, and creation date
- Information: Includes Guide and Related Tickets links
- Runbook: Auto fills details based on the selected tab:
- In case of Assigned Ticket, the user and the runbook operating on the ticket are displayed.
- In case of Unassigned Ticket, if runbooks with a confidence score above the threshold are available for a ticket, then the Select Runbook button appears in the same column. This enables the user to select the desired runbook and acknowledge the ticket. For runbook execution details, see Runbook_Execution.

- Action: It enables the Release button in specific circumstances:
- If the execution criteria for a ticket, as detailed in the Runbook_Execution, are not met, a Release button appears next to the ticket so the user can release the ticket from the BigFix Runbook AI queue.
- For manual execution, the Release button is always active. Click Release to follow the steps as configured in the environment. See Runbook_Execution for detailed information.
The Action column remains unavailable in the Assigned Tickets tab.
Runbook Execution
To execute the runbook for a ticket, perform the following steps:
- On the All Tickets tab, click the Un-Assigned tab to filter tickets based on user allocation or identify the ticket to be executed from the Tickets tab.
- To initiate ticket execution in the BigFix Runbook AI queue, first, collect the necessary ticket data from the IT Service Management (ITSM) tool.
- The following table describes the execution status for each activity.
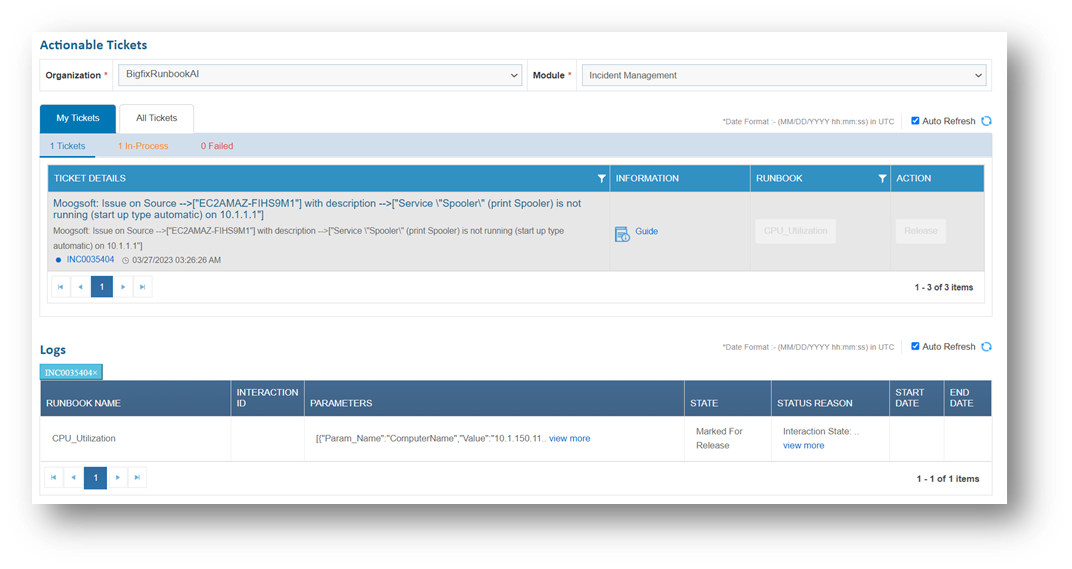
Figure 6. Figure 11 - All Tickets 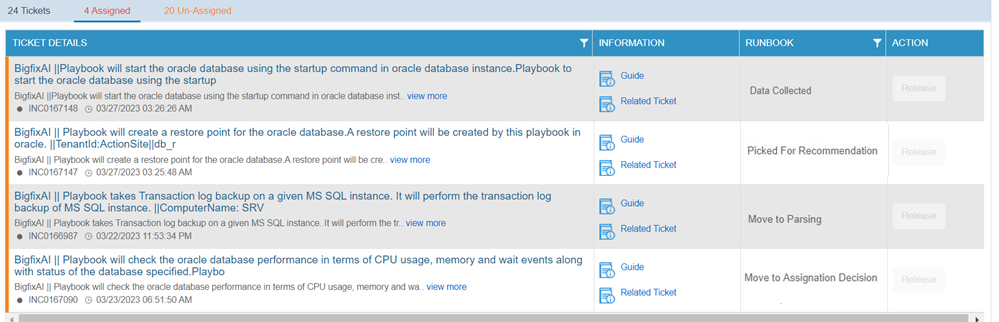
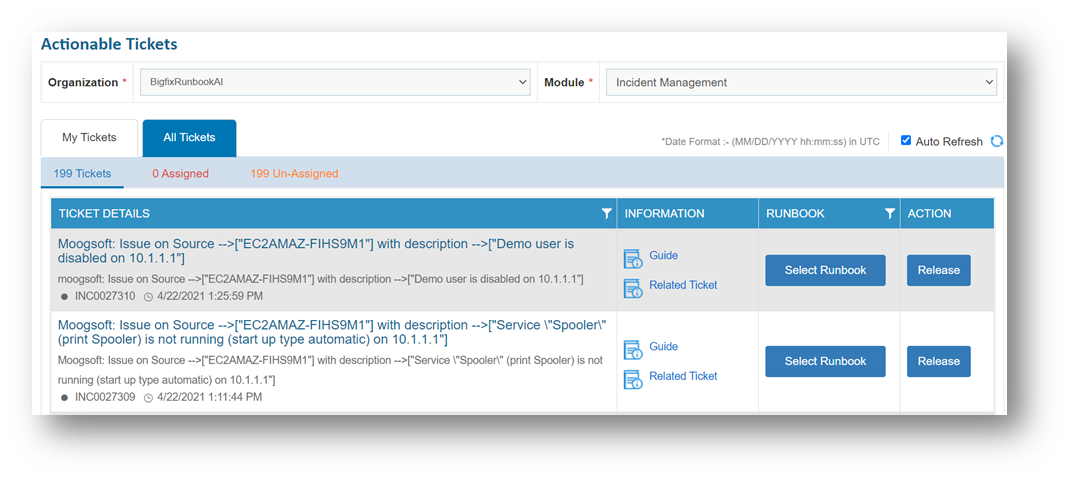
- For a condition where multiple runbooks above a defined threshold are available against a ticket, a Select Runbook button appears in the Runbook column. However, if the appropriate runbook is not configured, the Release button is enabled so the ticket can be released from the BigFix Runbook AI queue.
- Click Select Runbook.
Figure 7. Figure 12 - Select Runbook and Release Options 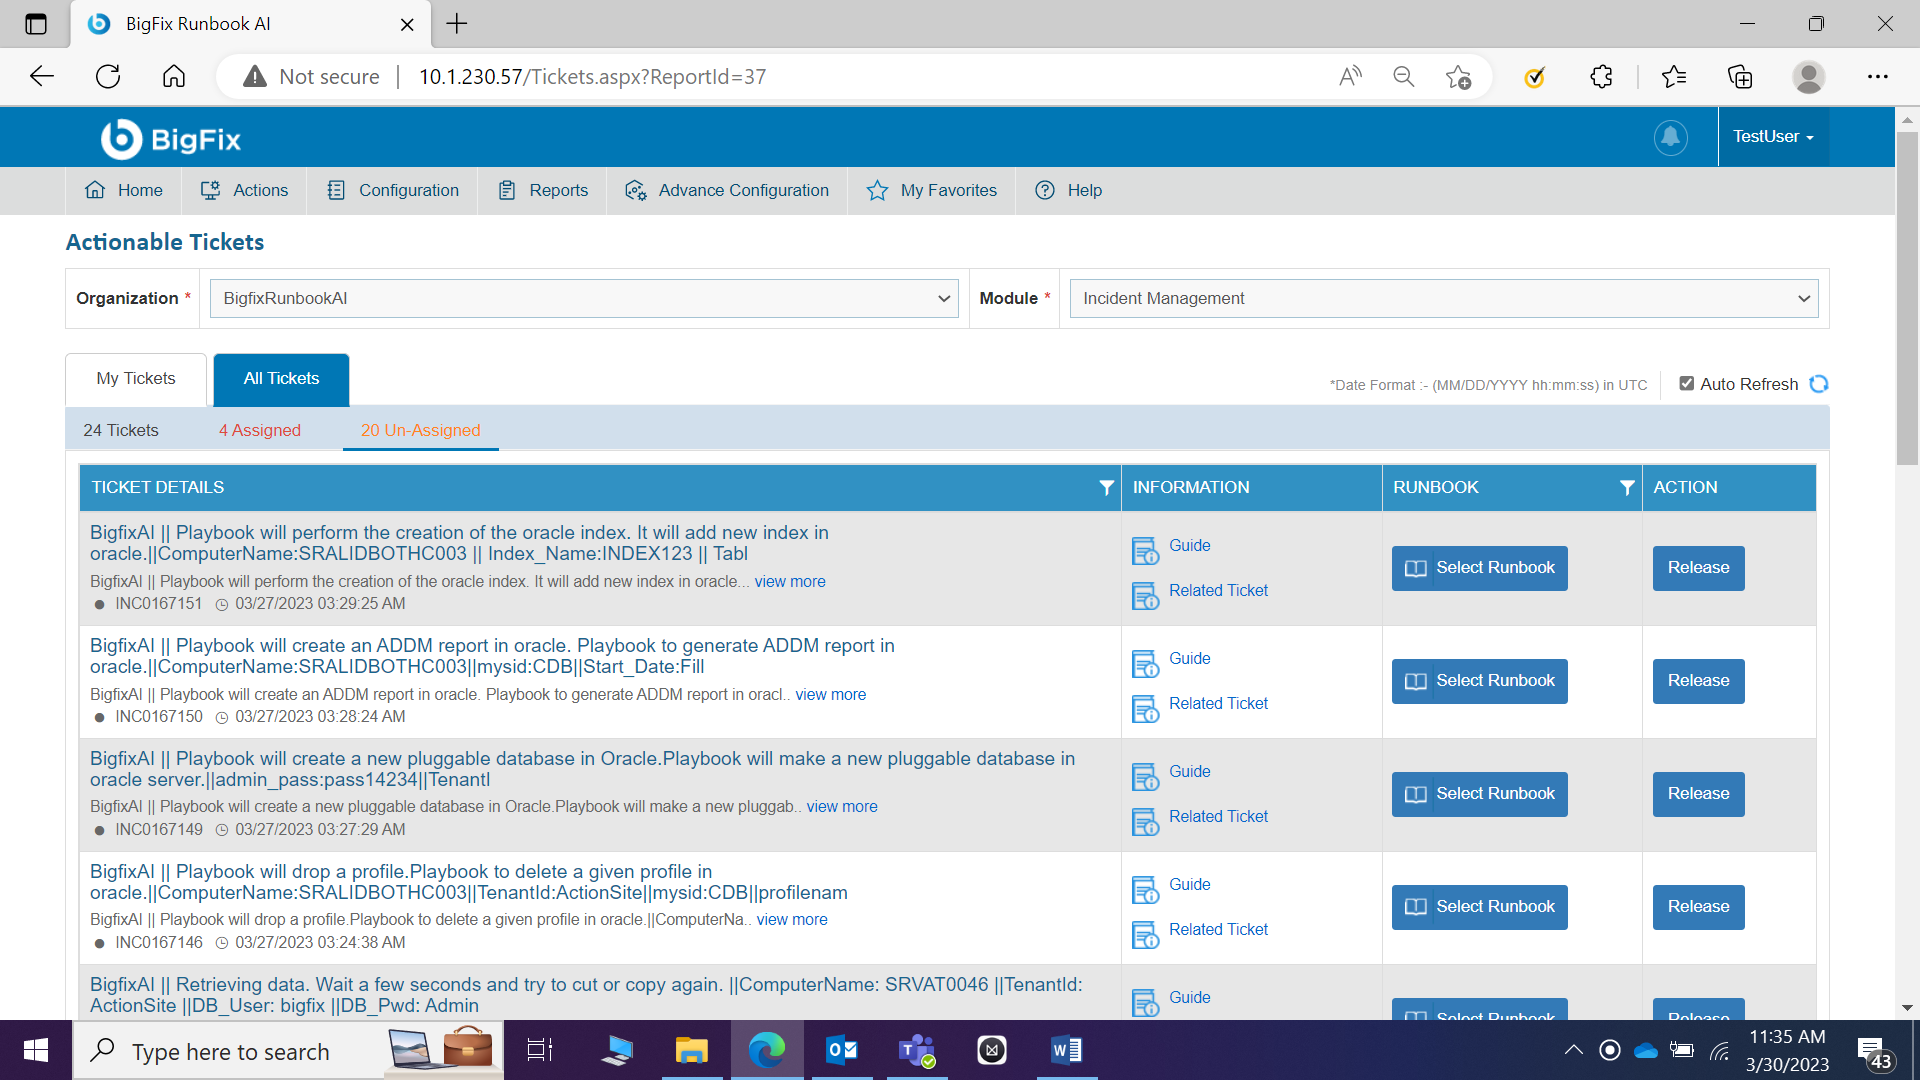
- A pop-up window displays the summary and description of the tickets and the list of runbooks in descending order of confidence score.
Figure 8. Figure 13 - Summary and Description Options 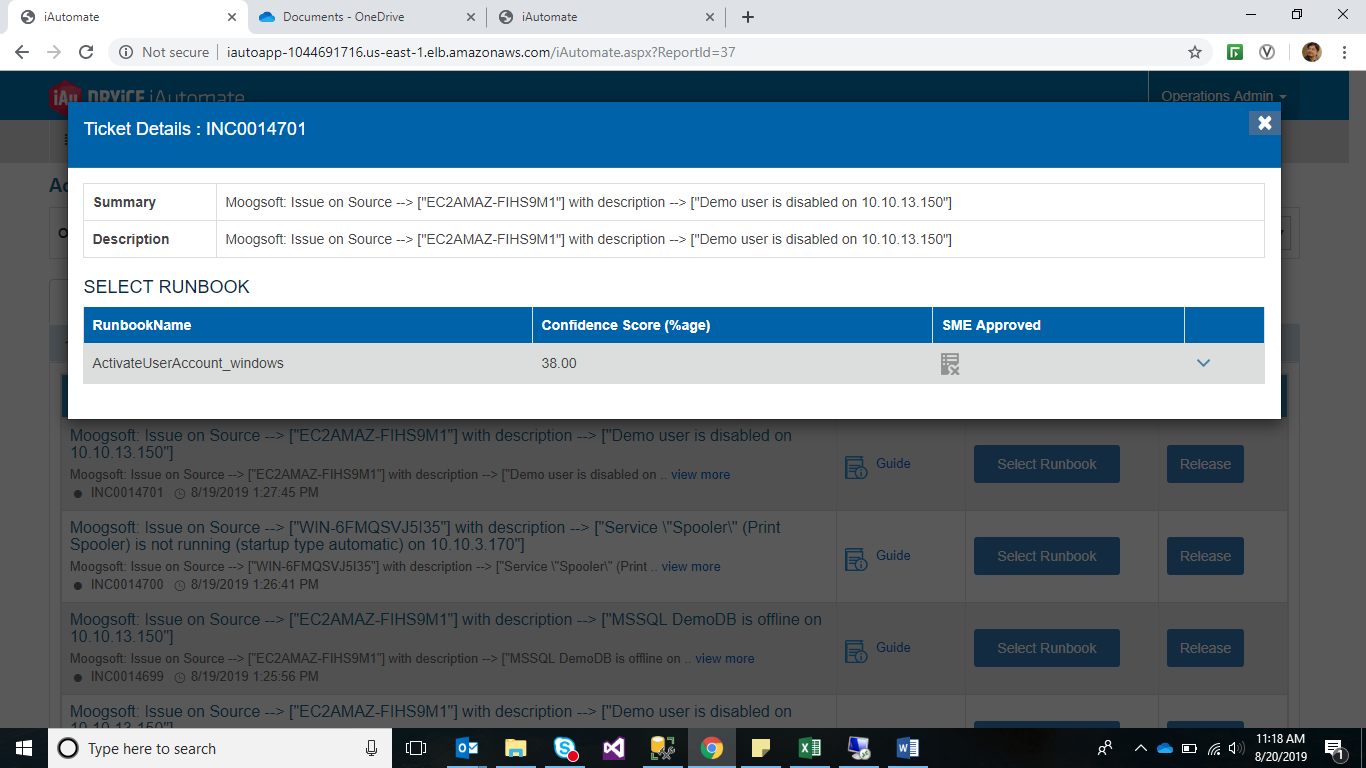
- In addition to the confidence score, the SME Approved column displays the result of SME validation against the runbooks. Both parameters help the user to identify the runbook for execution.
- After the runbook is identified, click Runbook Name to expand the selected row.
Figure 9. Figure 14 - Select Runbook 
- This displays the runbook description and parameters for the selected runbook. These parameter values are retrieved from the ticket. The user may select the runbook with the highest confidence score or the one recommended by the SME.
If the values are available, then they are referenced from the ticket description, or the default values are provided. The user can either retain these values or change them.
- Click Execute to start runbook execution for the selected ticket.
- On successful initialization of the execution, a confirmation dialogue box appears.
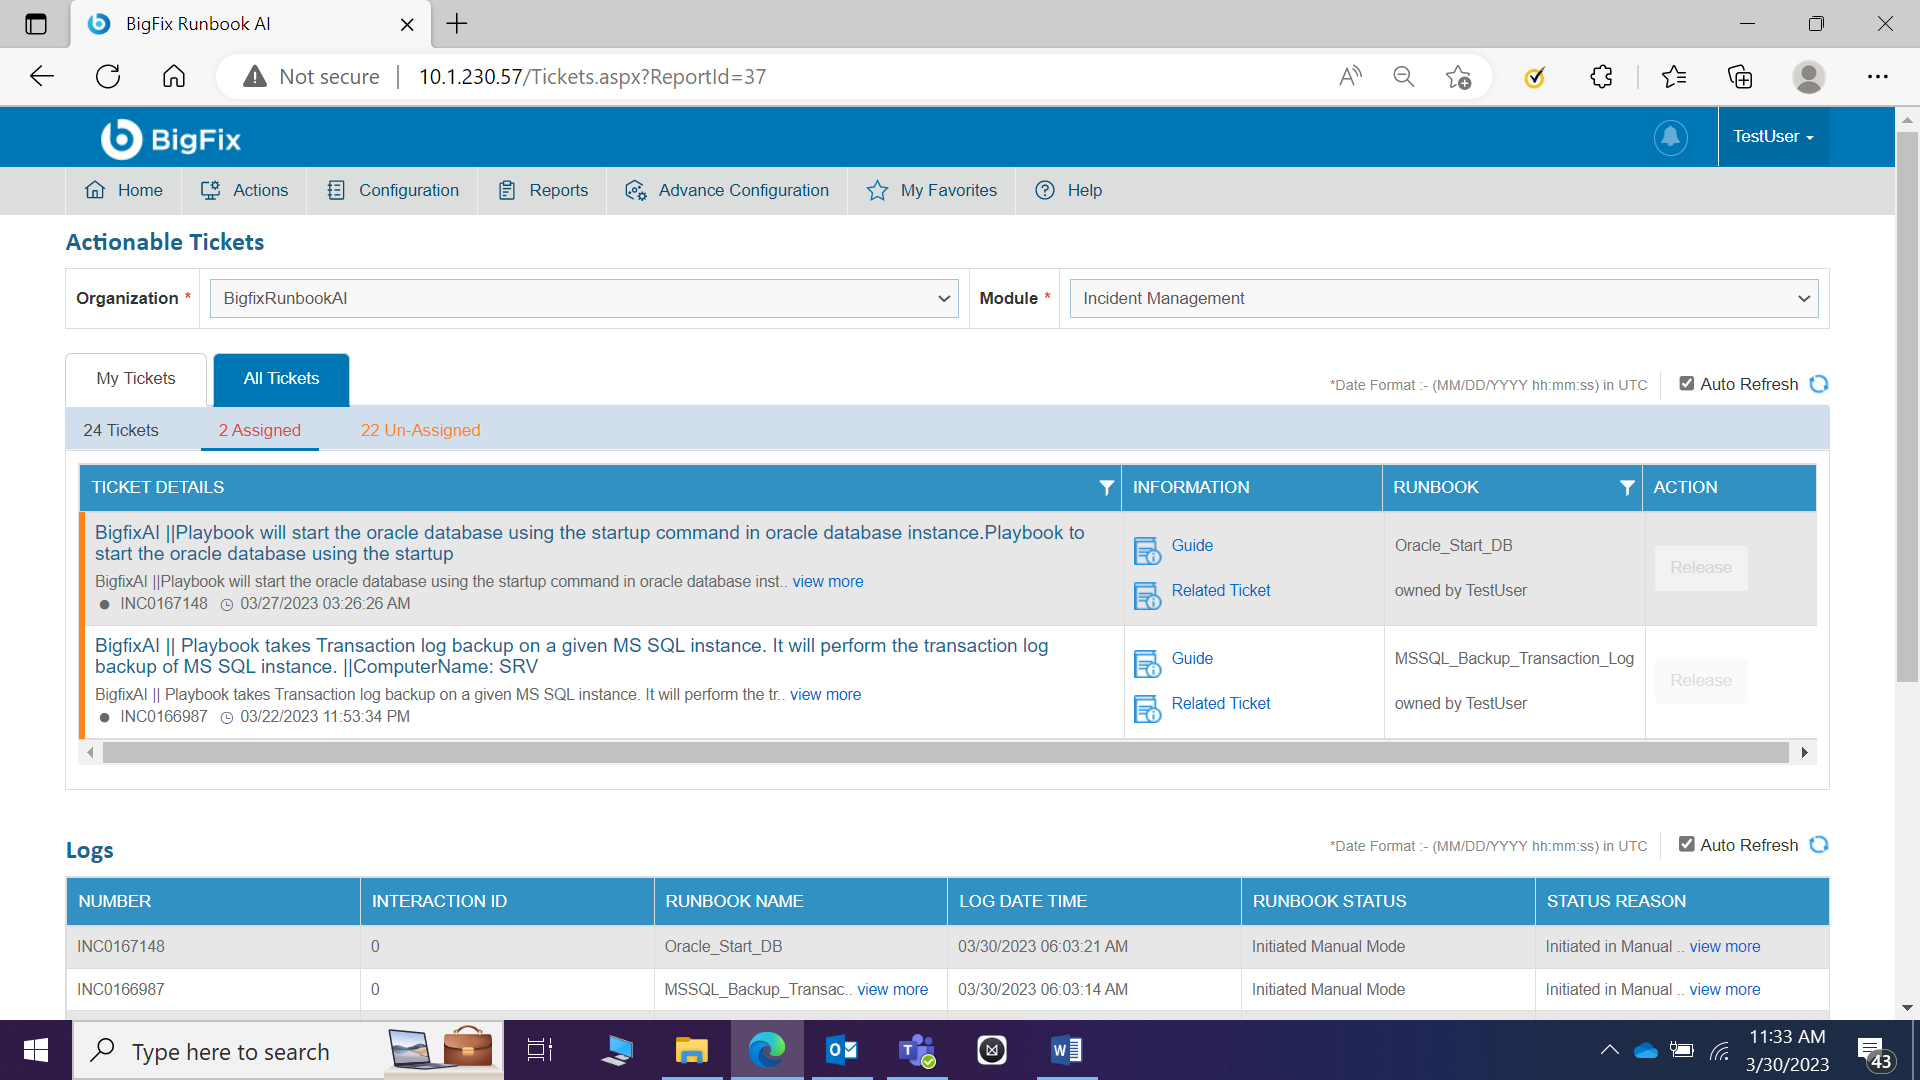
- Simultaneously, the following updates happen in the All Tickets tab:
- In the Tickets and Assigned tabs, the ticket is marked as Owned By, replacing the Select Runbook button with text specifying the runbook that is being initiated for execution. The username appears next to Owned by under the tab.
- If the user selects Assigned in the All Tickets tab, then the same ticket is added in the Tickets and In-Process tabs under the My Tickets tab.

- The Logs grid displays the ticket status as Initiated.
- The Assigned Ticket remains unavailable for allocation by another user unless the Owned by user releases the ticket from their queue.
Guide
This section describes how to retrieve the relevant knowledge for a ticket, from different sources, for a user in a single view. The sources from where this information will be retrieved depend on the configuration in your environment.
To use the Guide , perform the following steps:
- Click Guide for the ticket for which you want to view the information.
.png)
- The Knowledge Repositories screen appears with the most relevant information specific to the ticket from across the configured sources.
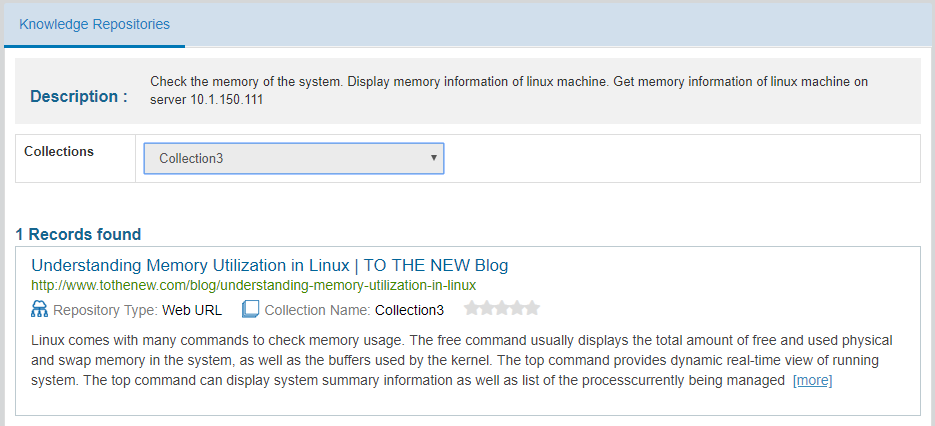
- BigFix Runbook AI can fetch data from the Collections of an organization, and if the data is not available in Collections , then it retrieves results from Google.
Related Tickets
This section describes the bucket in which the ticket resides and lists all tickets in that bucket.
-
Click Related Tickets for the ticket for which user wants to view the related tickets.
The Bucket Details window appears.
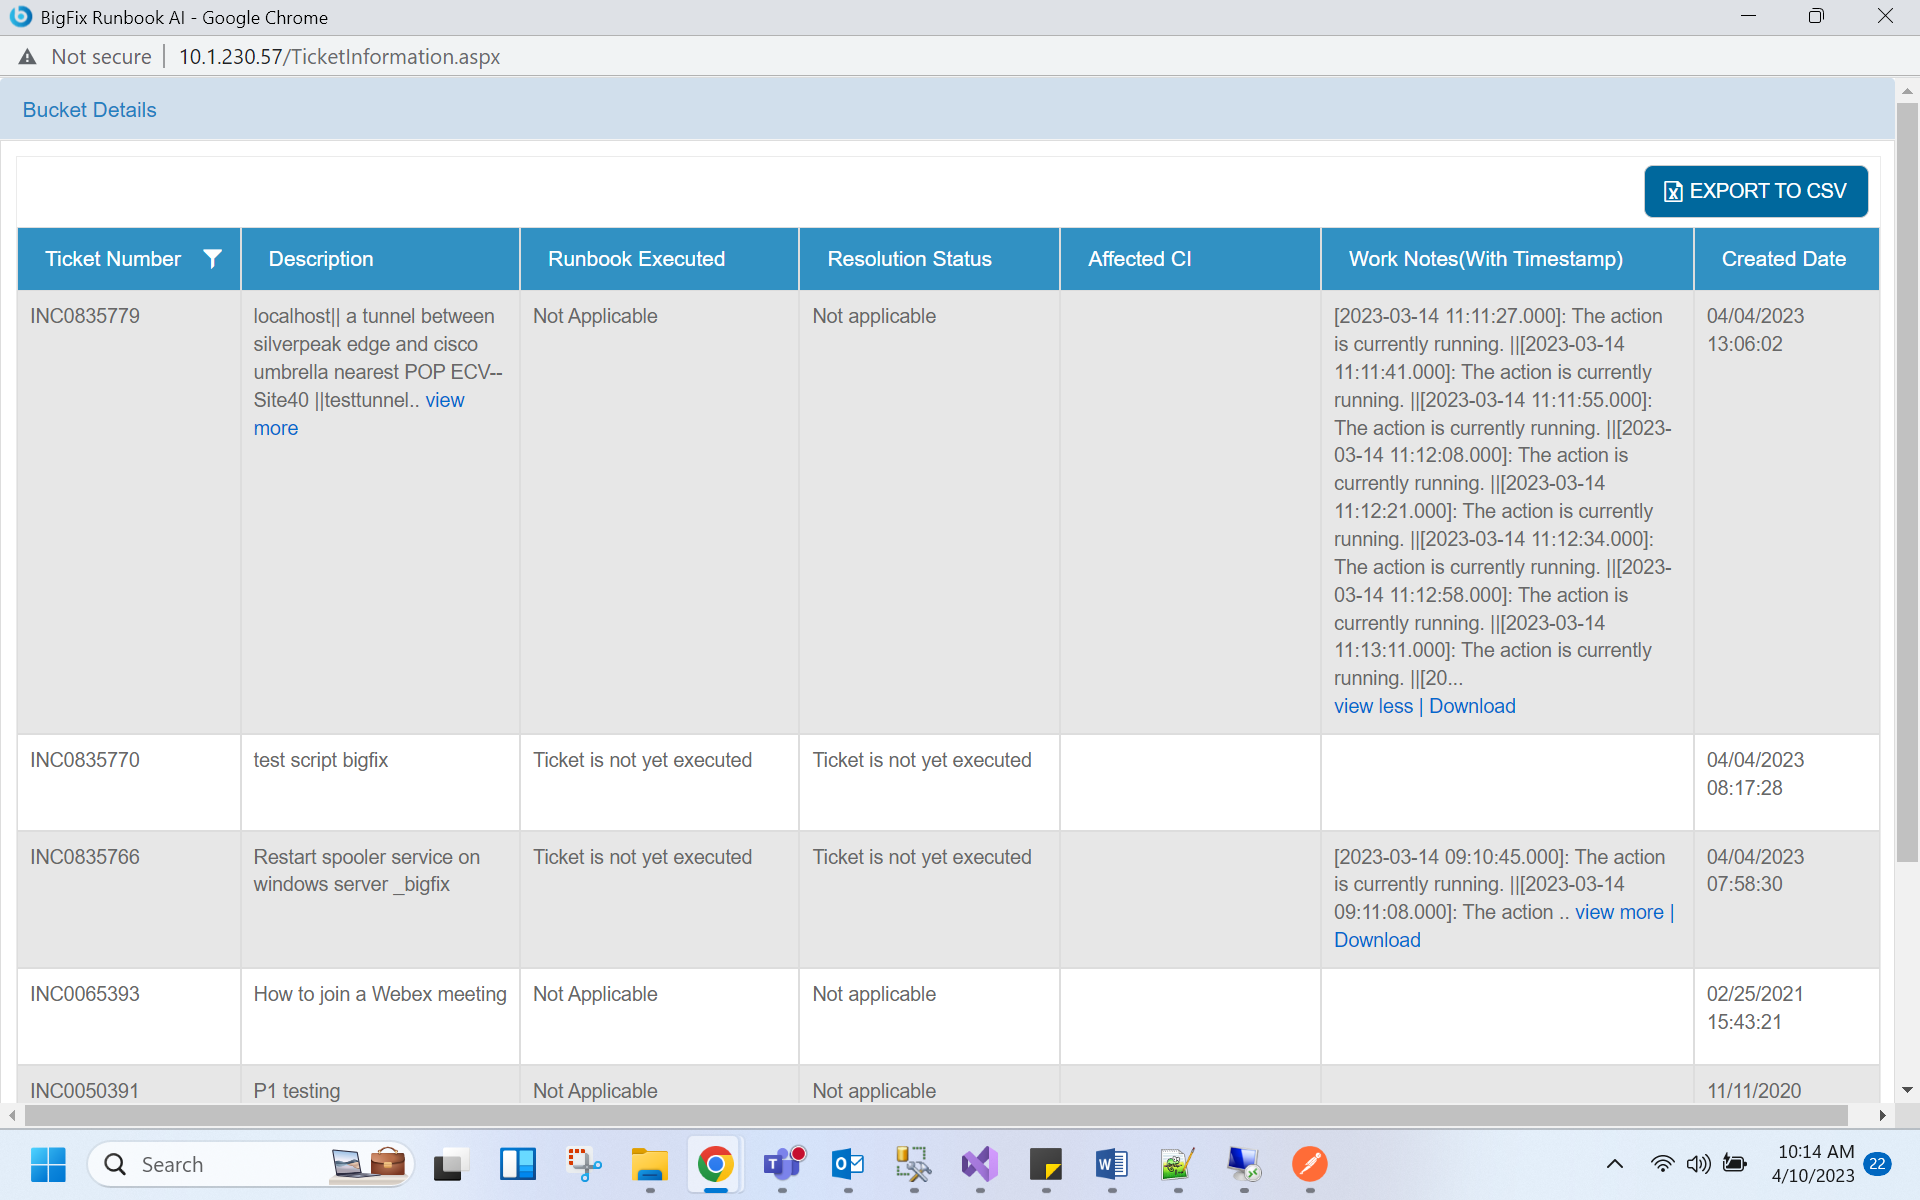
- User can view all the tickets available in the selected bucket, including their description and the associated runbook details.
- Click EXPORT TO CSV to download the bucket details.
My Ticket
This section describes how to manage the tickets assigned to the current user and available in the BigFix Runbook AI queue.
To view and use the My Ticket tab, perform the following steps:
- Select an Organization from the drop-down list and then select a Module .
- The organization and module-specific ticket assigned to the current user appears in a tabular view.
The My Tickets tab is categorized into the following tabs:
| Tab | Description |
|---|---|
| Tickets |
|
| In-Process |
|
| Failed |
|
After successful execution, tickets are automatically moved from the BigFix Runbook AI queue. The tickets are marked either as resolved or assigned to another group in the ITSM tool based on how the runbook workflow execution is configured in your environment.
- Each tab includes columns with the following values:
- Ticket Details: Provides information about a request, including the ticket description, summary, identification number, and the creation date. Selecting a ticket’s Incident ID displays the ticket detail in the Logs tab.
- Information: Includes a Guide link that retrieves the most relevant knowledge for a ticket from across different sources in a single view, enabling you to resolve the ticket.
- Runbook: Displays the runbook being selected and executed.
- If the ticket execution is In-Process, the Runbook button is disabled.
- For Failed ticket execution, the Runbook button is enabled. Clicking the Release button displays a window and lists all the relevant runbooks by their confidence score. Users can perform any of the following steps:
- View the last executed runbook with the parameters and run the same runbook again.
- Select a new runbook to execute.
- For more details, see Runbook Execution.
- Action: This column is available in the Tickets and Failed tabs. The Release button is displayed for the tickets with Failed execution, allowing the user to release the tickets from the queue.
The Action column remains unavailable in the Assigned Tickets tab.
- The colored bar on the left of the Tickets tab displays the current ticket execution status. An orange bar indicates an In-Process execution and a red bar indicates a Failed execution.
Clicking Release either releases the ticket to the All Tickets queue (keeping it in the BigFix Runbook AI queue but removing the allocation of the current user) or to some other group in the ITSM tool based on configured rules. In either case, the allocation of the current user will be removed.
- In the Ticket or In-Process tabs, clicking an incident number displays the ticket-specific log in the Logs tab, which provides a runtime update for the selected ticket with the following details:
- Parameter used for execution
- Start date of execution
- End date of execution
- Execution status
- Interaction ID provided by the underlying RBA tool
The logs displayed are ordered by date and time. The most recent update appears on the top of the grid.
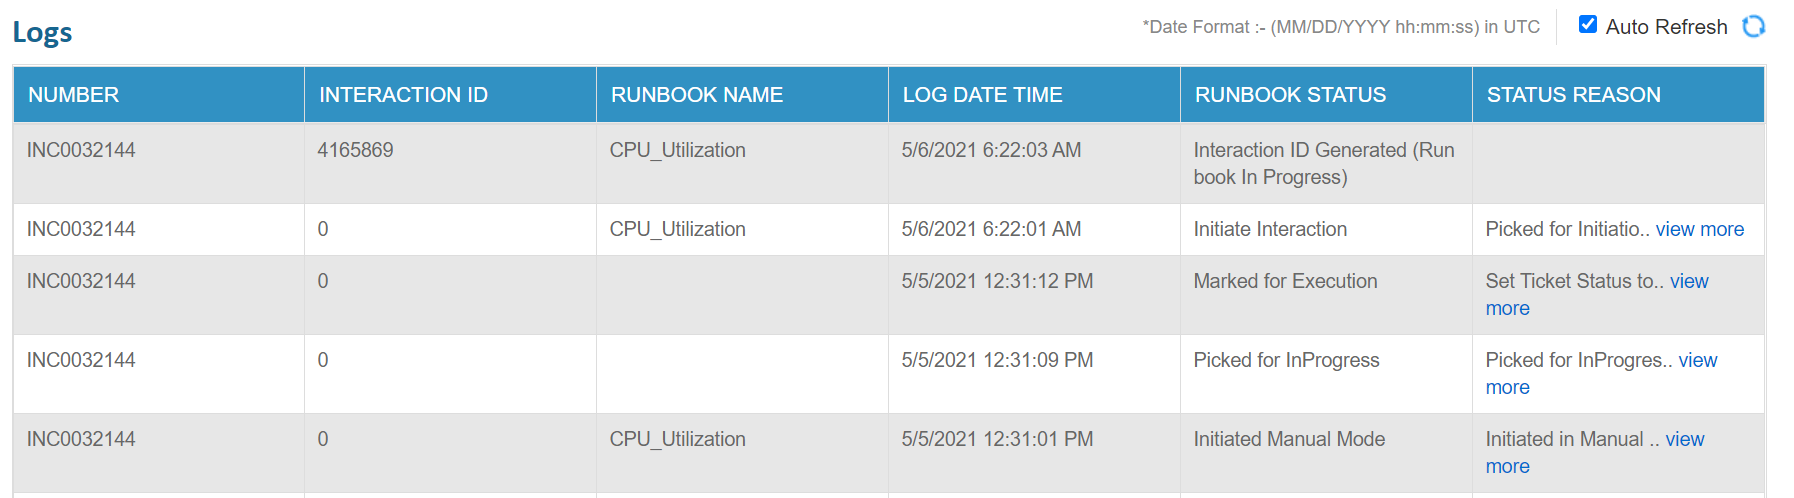
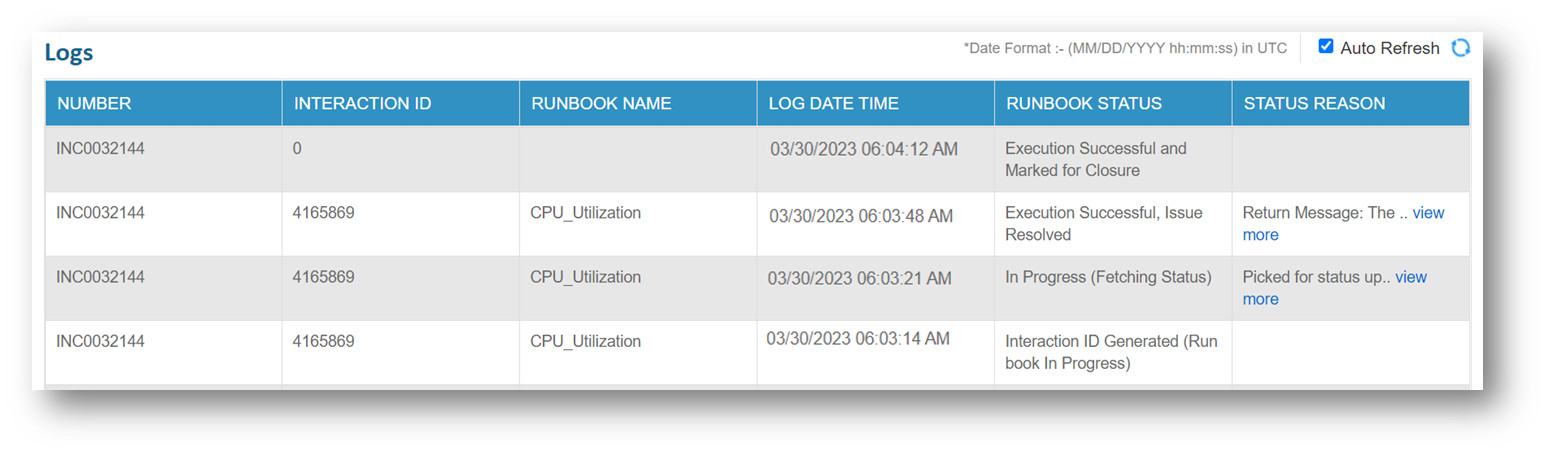
Logs
This section describes near real-time status updates of ticket execution initiated by the user.
To view a ticket log, navigate to the Log tab appearing below the All Tickets and My Tickets tabs. This displays the activity log for all tickets being executed with the following details:
| Name of the log values | Description of the log values |
| Incident Number | This is a unique, auto-generated number for the incident ticket. It is preceded with an INC prefix (e.g.INC0000001) of the logged ticket. |
| Interaction ID | Unique ID generated by the underlying RBA tool. |
| Runbook Name | Name of the runbook executed for the logged ticket. |
| Log Date Time | Date and time of the logged ticket. |
| Runbook Status | Status of the runbook selected for the ticket. |
| Status Reason | Displays the ticket specific logs including the field values. Value wrapped to multiple lines within the column. To access the related record, click View More. |
| Attachment | Displays any relevant attachment for the ticket. |
The logs displayed are listed by their date and time. The most recent update is available on the top of the grid.
Auto Execution View
This section describes the auto-execution process for unresolved, open tickets in the BigFix Runbook AI queue. It displays the summary and status of all automatically executed tickets including in process or failed tickets.
To view tickets in auto-execution view, perform the following steps:
- On the main menu bar, click Actions->Tickets, and then click Auto Execution View.
- Select an Organization from the drop-down list and then select the Module for organization and module-specific tickets.
- The Auto Execution View screen is displayed listing the selected organization and module-specific tickets under the My Tickets tab.
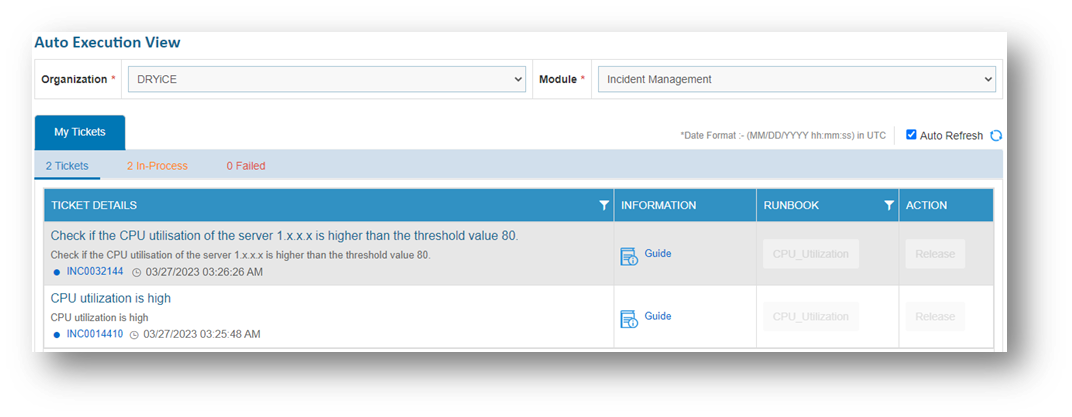
- The My Tickets tab is categorized into the following tabs:
| Tab | Description |
|---|---|
| Tickets |
|
| In-Process |
|
| Failed |
|
Ticket Log
Users can view the comprehensive log of all the activities for a ticket, including updates and notifications, whether it is by a user or by BigFix Runbook AI.
To view the ticket logs, perform the following steps:
- On the main menu bar, click Actions->Tickets and then click Ticket Logs .
- The Ticket Logs screen appears.

- Select an Organization from the drop-down list and then select the Module .
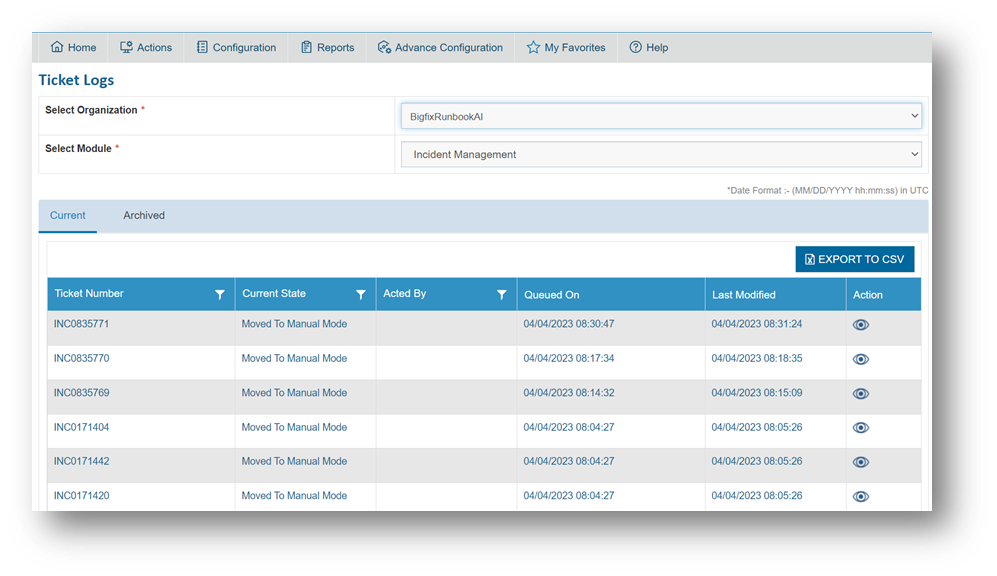
This lists the ticket log for organization and module-specific tickets in the following tabs.
- Current: Lists the log details of the tickets available for execution in the selected organization, including the ticket number, current state, acted by, queued on, and last modified information.
- Selecting a Ticket Number displays the detailed log information including logged on and logged by details, action was taken on the ticket, the reason for the action taken, and remarks.
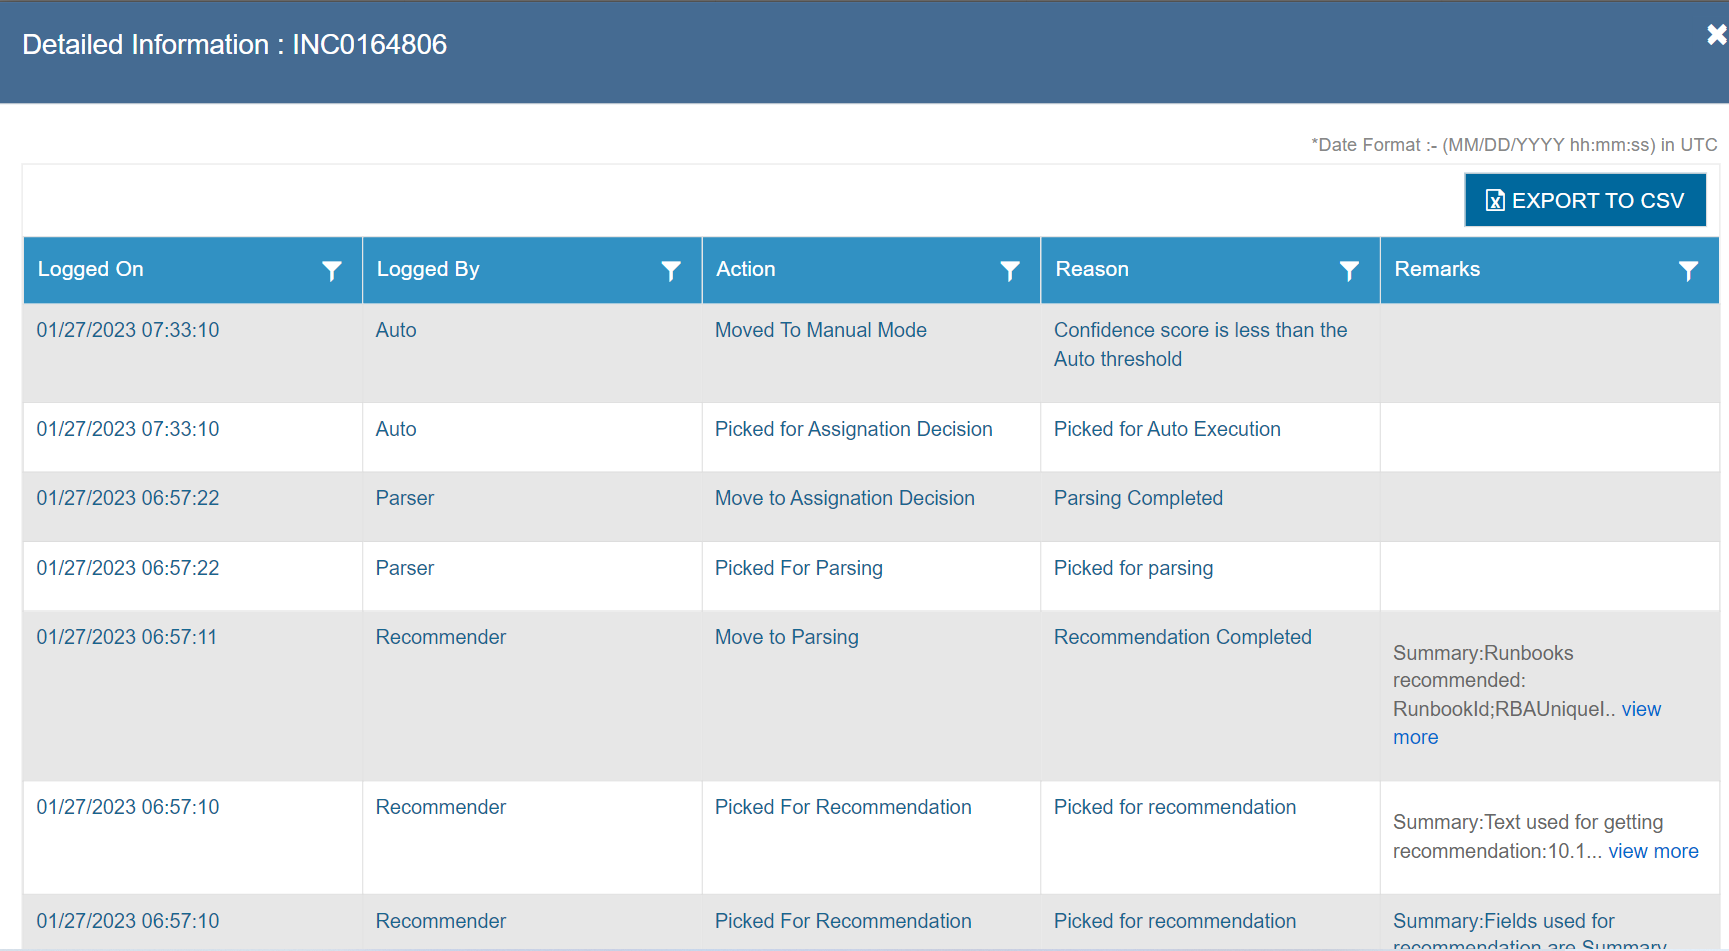
- Archived: Lists the log details of the ticket that are marked as closed in the selected organization, including the ticket number, current state, acted by, queued on, and last modified information.
- Selecting a Ticket Number displays the detailed log information including logged on and logged by details, action that was taken on the ticket, the reason for the action taken, and remarks
- Users can export the log details using the Export to Excel button above the Log Details view.
All fields marked with an asterisk (*) are mandatory.
Knowledge
This module allows users to search across the organization’s internal repositories such as SNOW and external domains such as Stack Overflow and Ubuntu.org. You can also perform an advanced search by applying conditions followed by the search term and Boolean condition (OR, AND, and so on) for more refined results.
Knowledge Search
This section describes how to use the advanced, organization-specific configuration to retrieve results from the knowledge repository.
To use Knowledge Search, perform the following steps:
- On the main menu bar, click Advance Configuration->Knowledge, and then click Knowledge Search.
- The Knowledge Search screen appears.

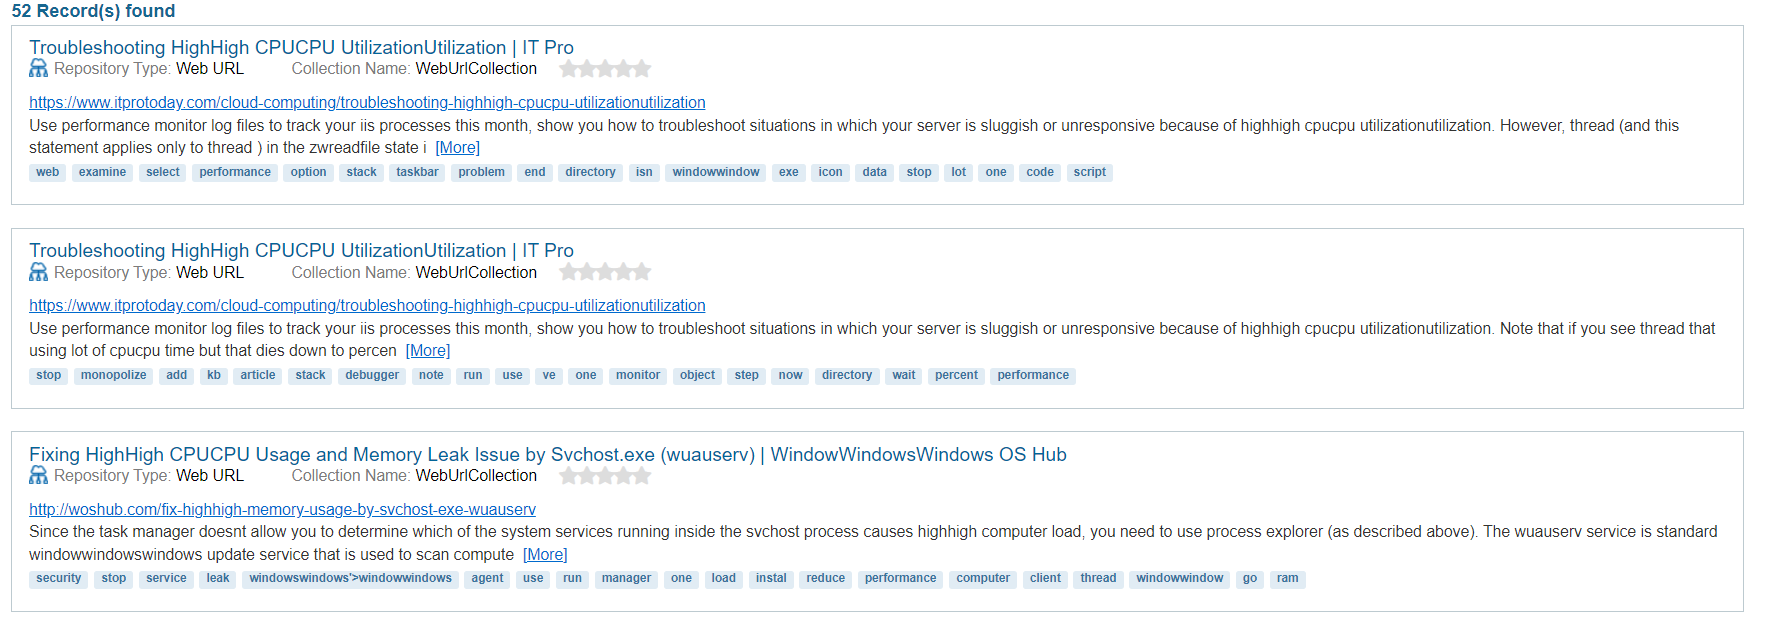
- Select the Organization from the drop-down list, then type the search string
in the Search box, and then click
 . The search
results are displayed in a grid below.
. The search
results are displayed in a grid below.

- For more advanced search , instead of clicking
.png) , click the Advance Search button.
, click the Advance Search button.
An Advance Search window is displayed for users to fill in the information and retrieve results.
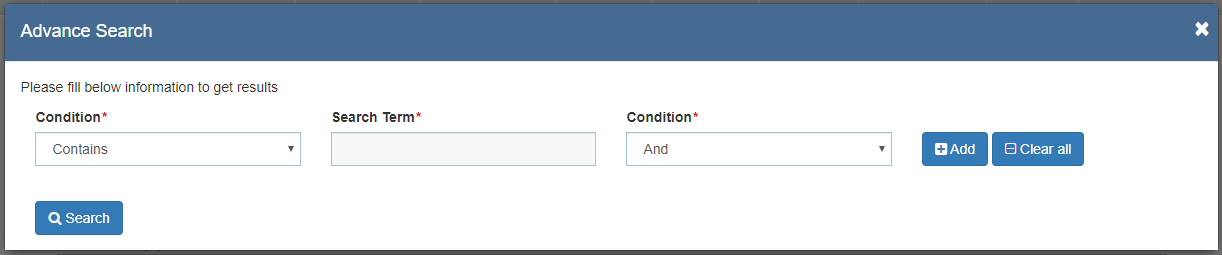
- Advance Search allows users to restrict search results by applying conditional filters or define the order of the search results.
User can add any number of custom conditions to refine their search for more relevant results.
- Click
 to start a search. After
the search filter is applied, any results that appear will align
with the conditions specified in the Advance
Search box.
to start a search. After
the search filter is applied, any results that appear will align
with the conditions specified in the Advance
Search box.
All fields marked with an asterisk (*) are mandatory.
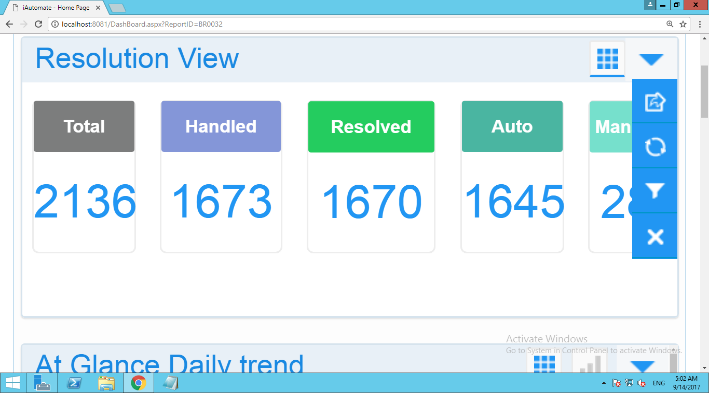
Dashboard
The dashboard provides a complete view of the system in your environment and helps spot trends in real-time. Each dashboard User Interface (UI) element can instantly provide additional data insights, including a platform to create reports using the preconfigured widgets available on the dashboard.
To manage the dashboard, perform the following steps:
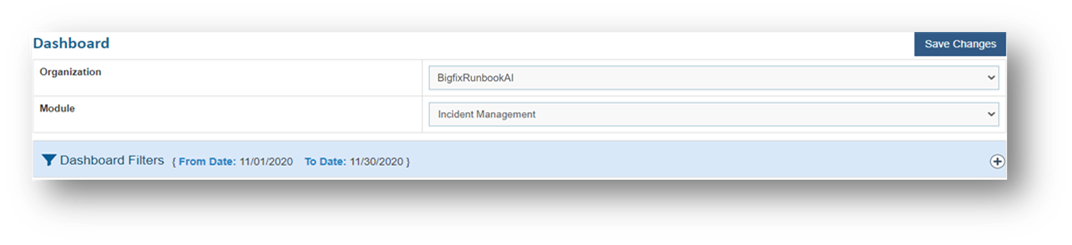
- On the main menu bar, click Reports->Dashboard. The Dashboard screen appears.
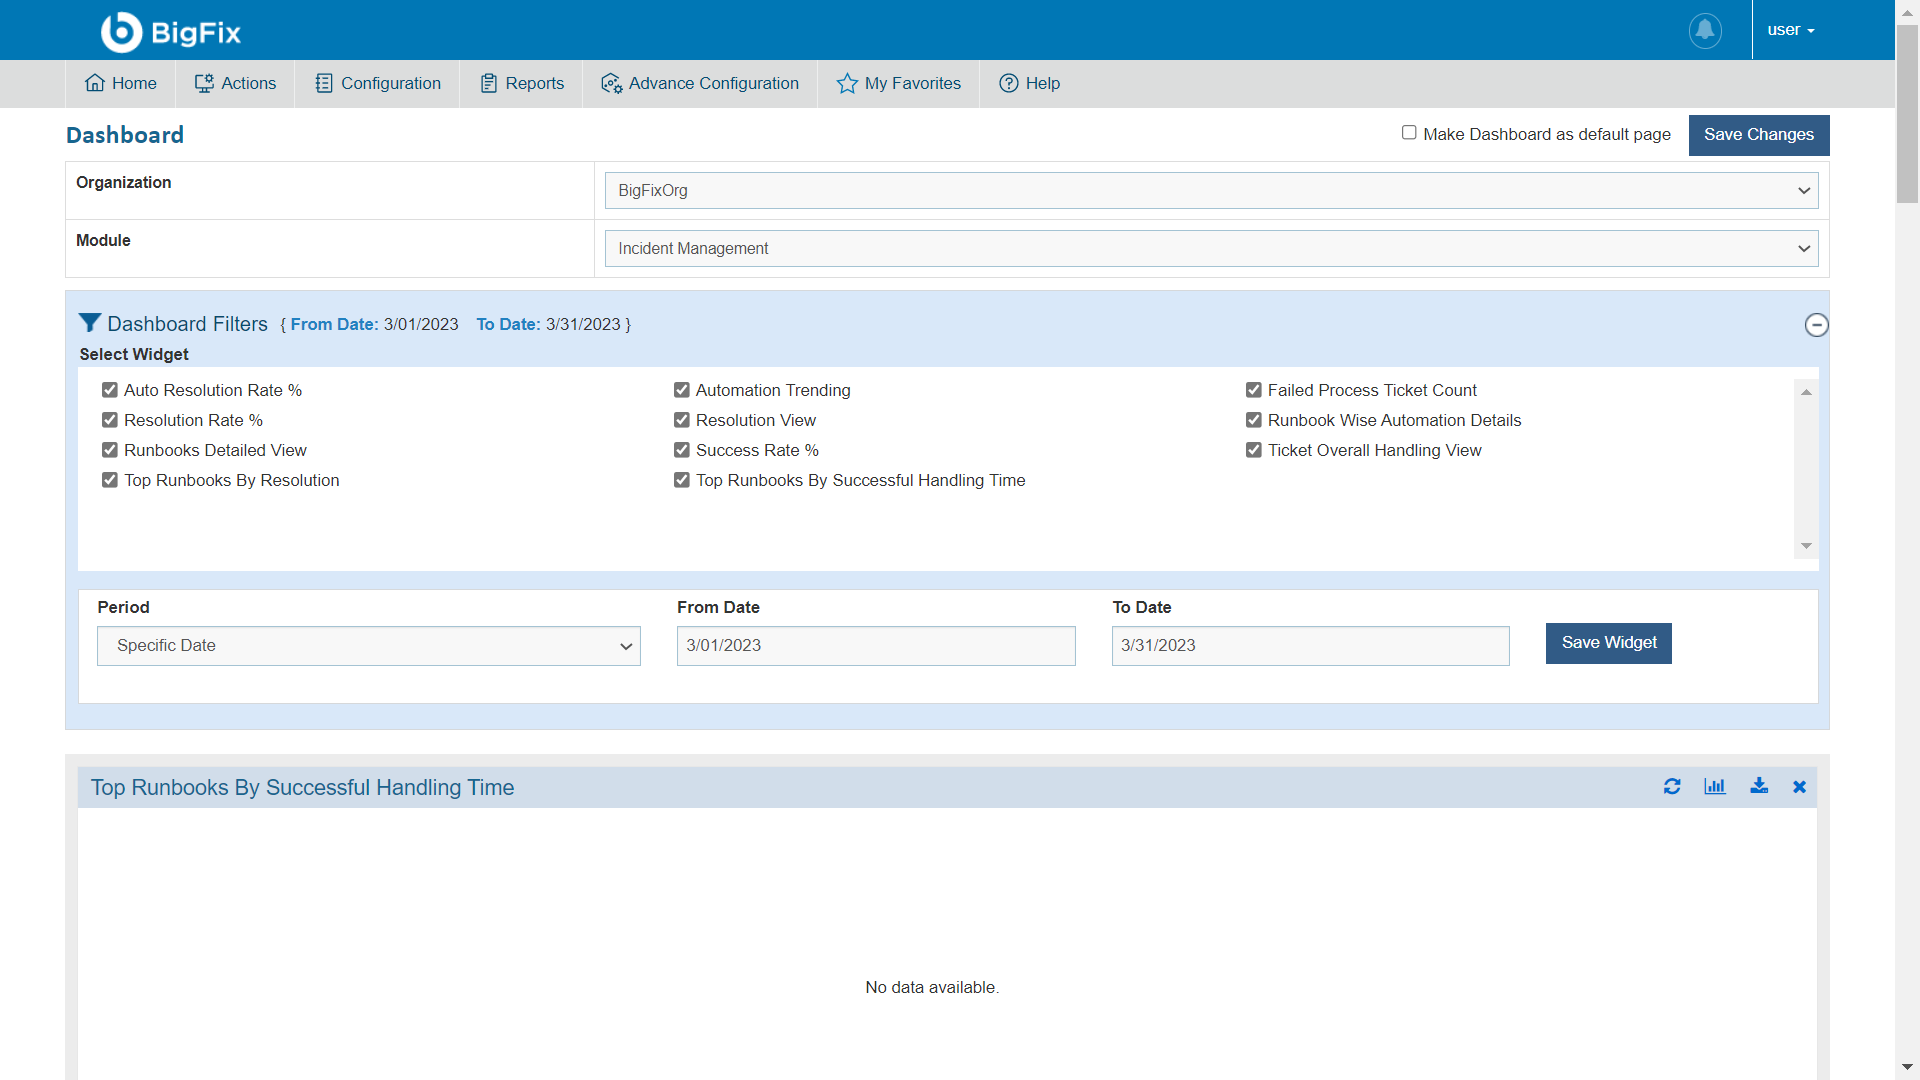
- Dashboard filters allow users to narrow the range of one or more reports on the active Dashboard tab. This filter lets you select a specific time frame, such as last month, this month, last quarter, or a range of dates.
- To configure a specific report, select the Organization from the drop-down list, then select the time frame from the drop-down list of the Period, and then select the date range in the From Date and To Date fields.
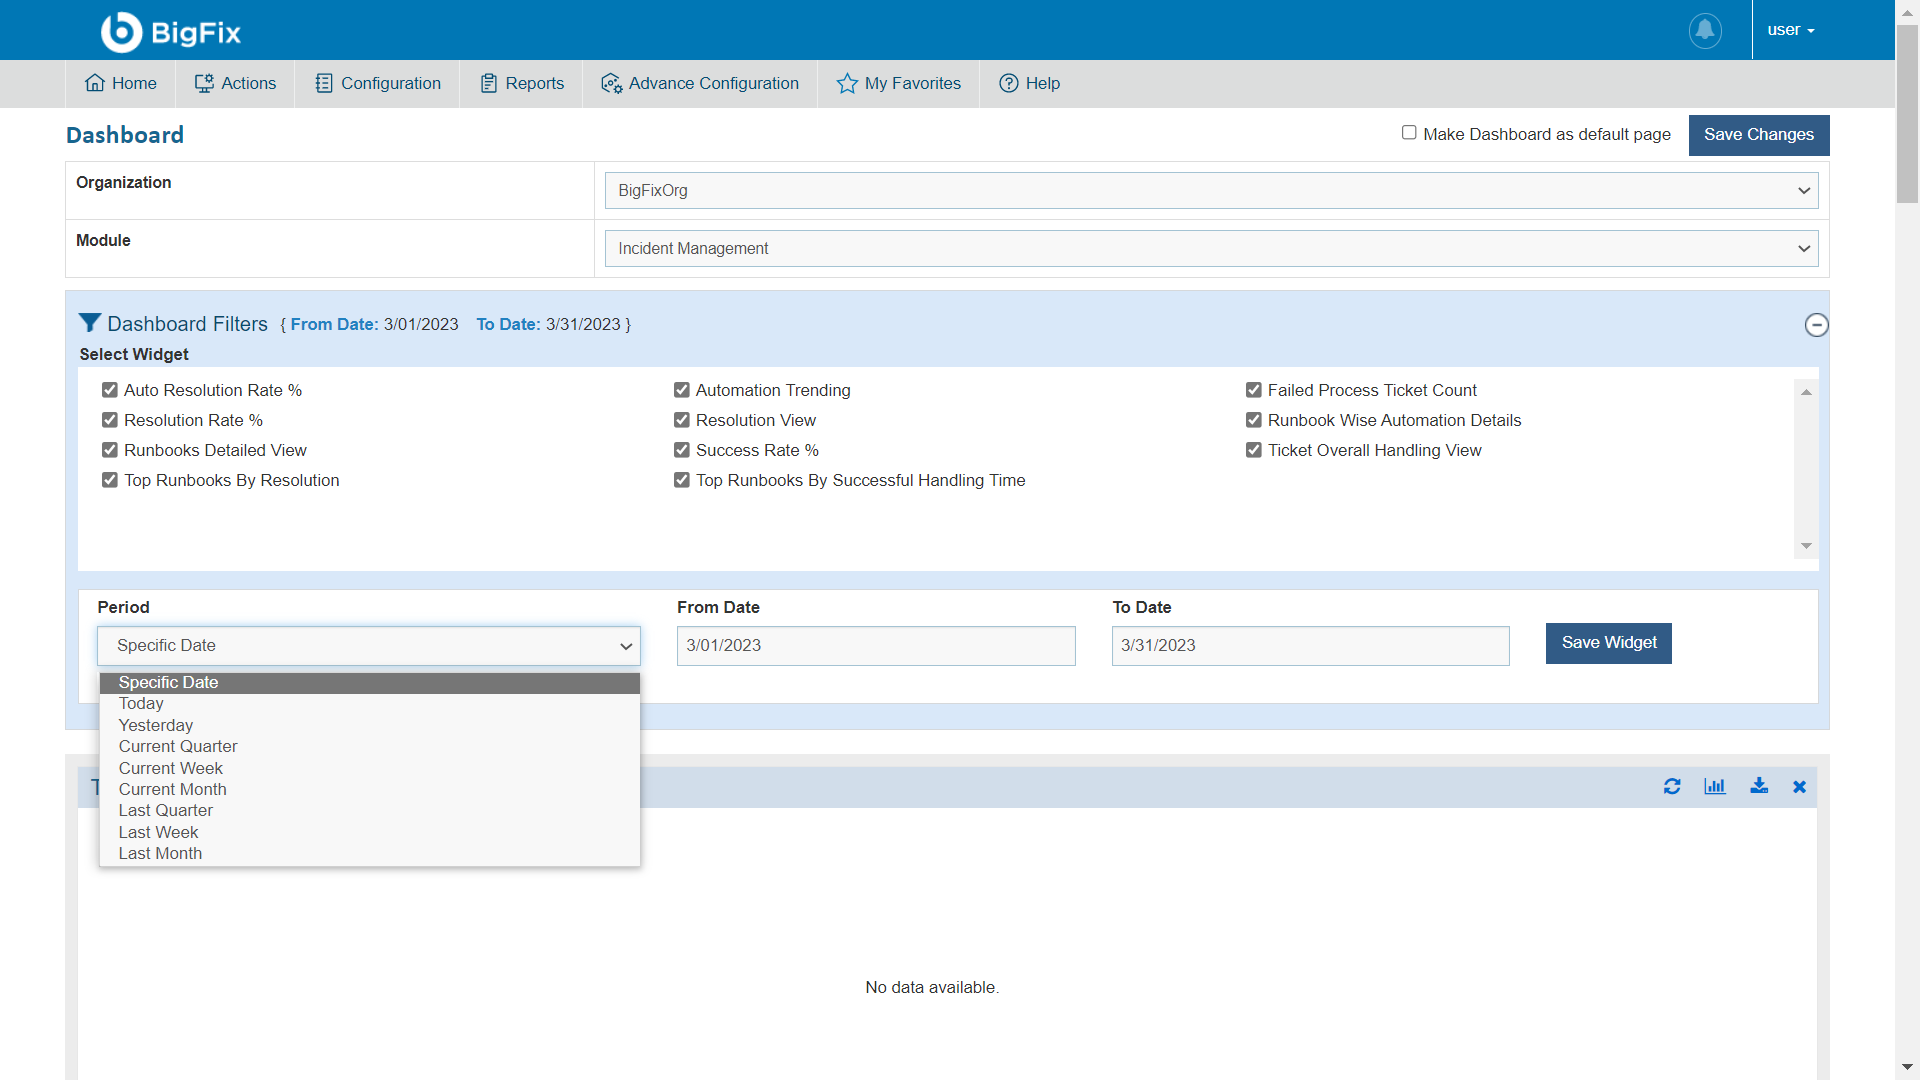
- Click Save Widget. These selections will recompile the data that appears in any report that is associated with the date filter. All data beyond the selected range is excluded.
- You can use predefined widgets under the Dashboard Filters tab to add new widgets and modify or remove existing widgets from the organization.
Configure Widgets
Dashboard customization is available for users with the appropriate privileges, such as Organization Admin. The dashboard customization can be configured for different user roles as required by the administrator. To add more reports or data in a dashboard, you can define multiple widgets for a selected organization.
To add a widget to an organization, perform the following steps:
- On the Dashboard screen, select an Organization from the drop-down list.
- If there are any configured widgets in the selected organization, it appears below the Dashboard Filters tab.
- Click
 on the Dashboard Filters tab to list
the predefined widgets.
on the Dashboard Filters tab to list
the predefined widgets.
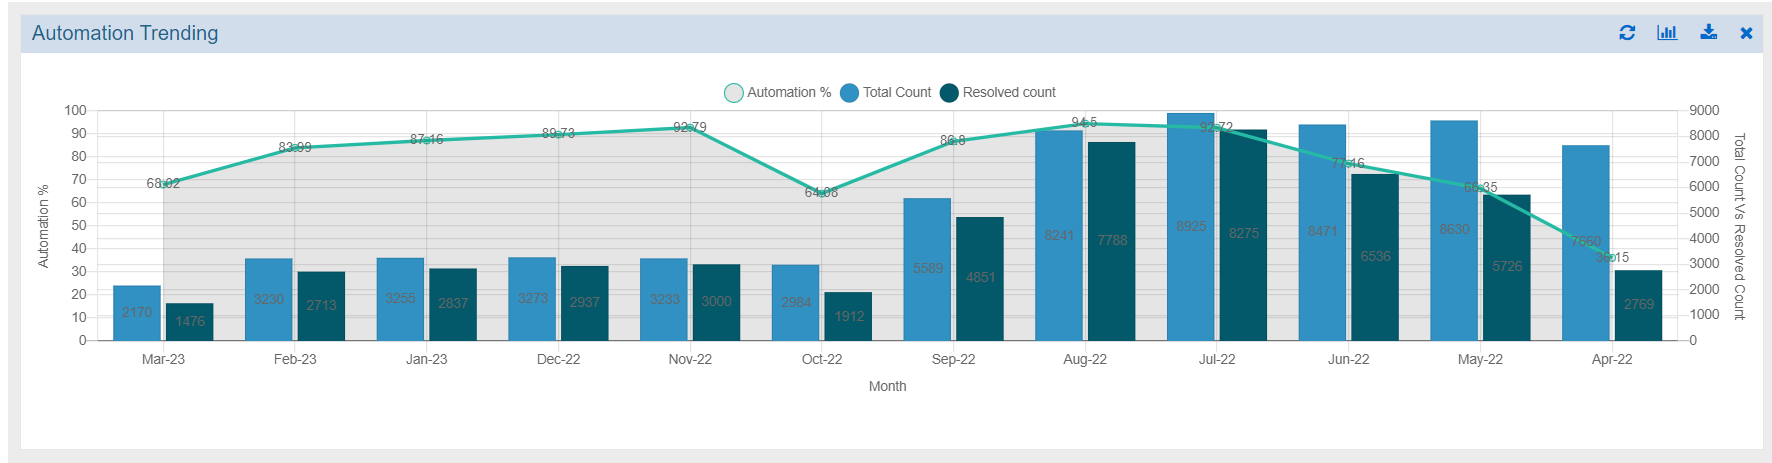
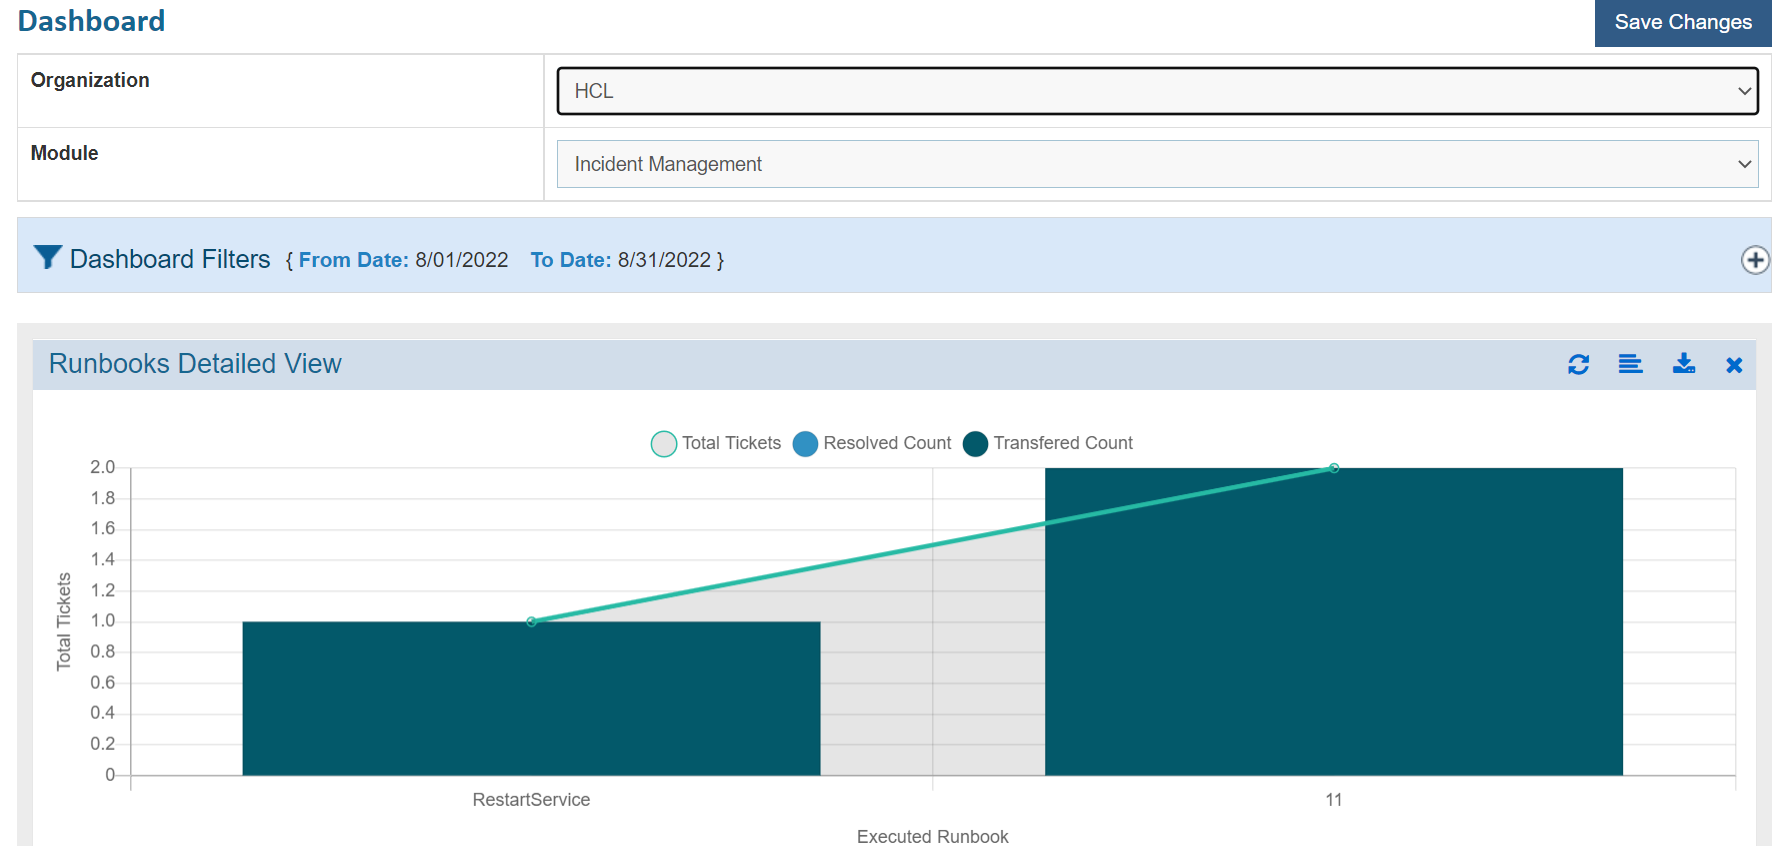
Preconfigured widgets list all the KPIs so that users can customize their view.
- Select the checkboxes next to the widgets you want to include, then select the time frame from the drop-down list of the Period, and then select the date range in the From Date and To Date fields and then click Save Widget.
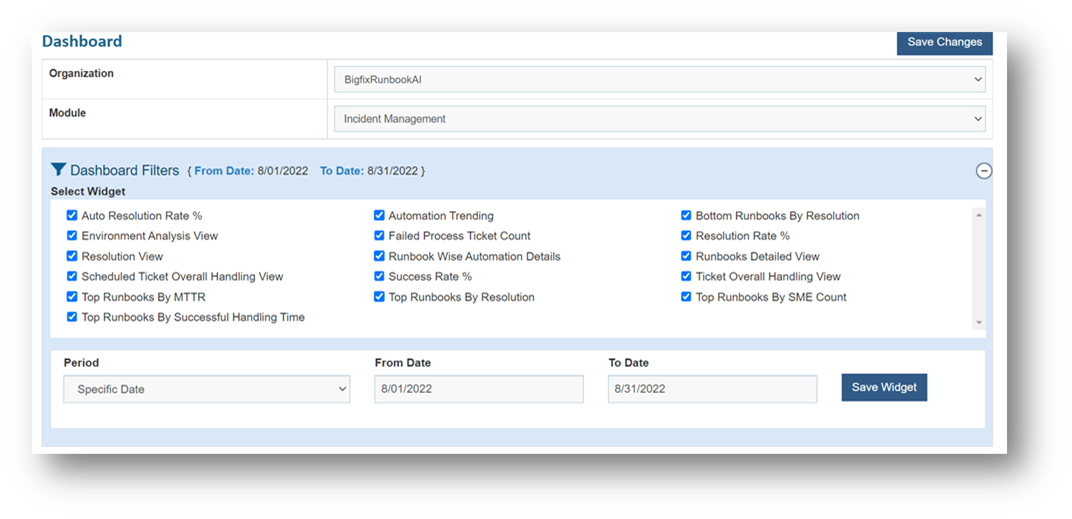
To delete a widget from the selected organization, clear the widget checkbox selection, and then click Save Widget to save the changes.
The added widgets are displayed on the dashboard.
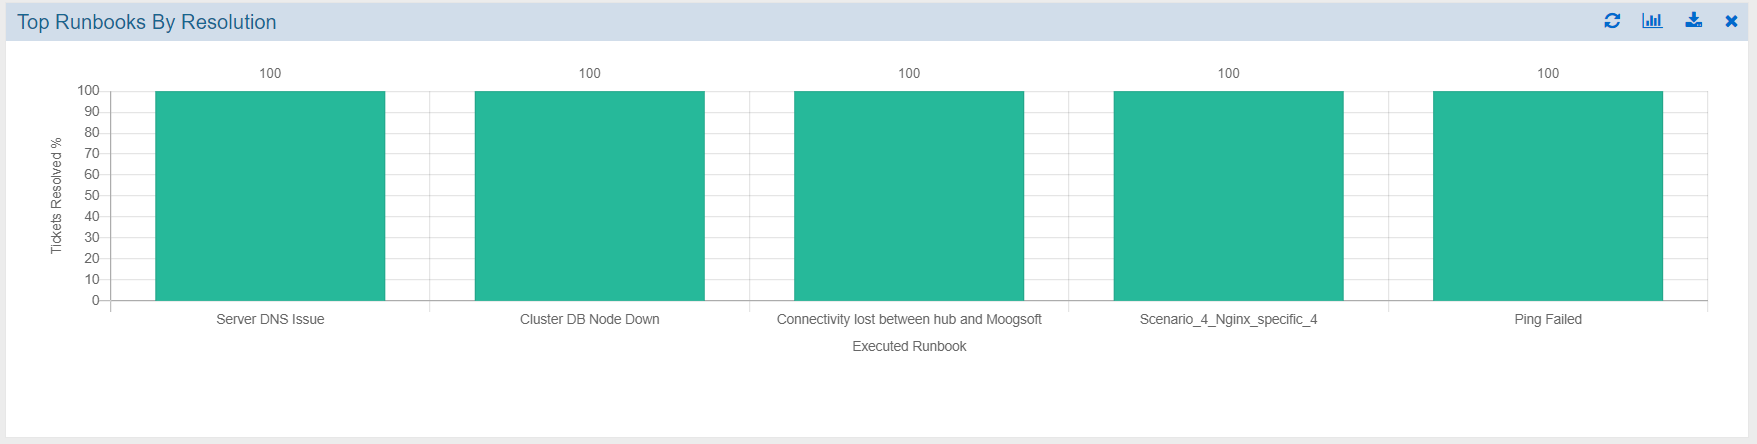
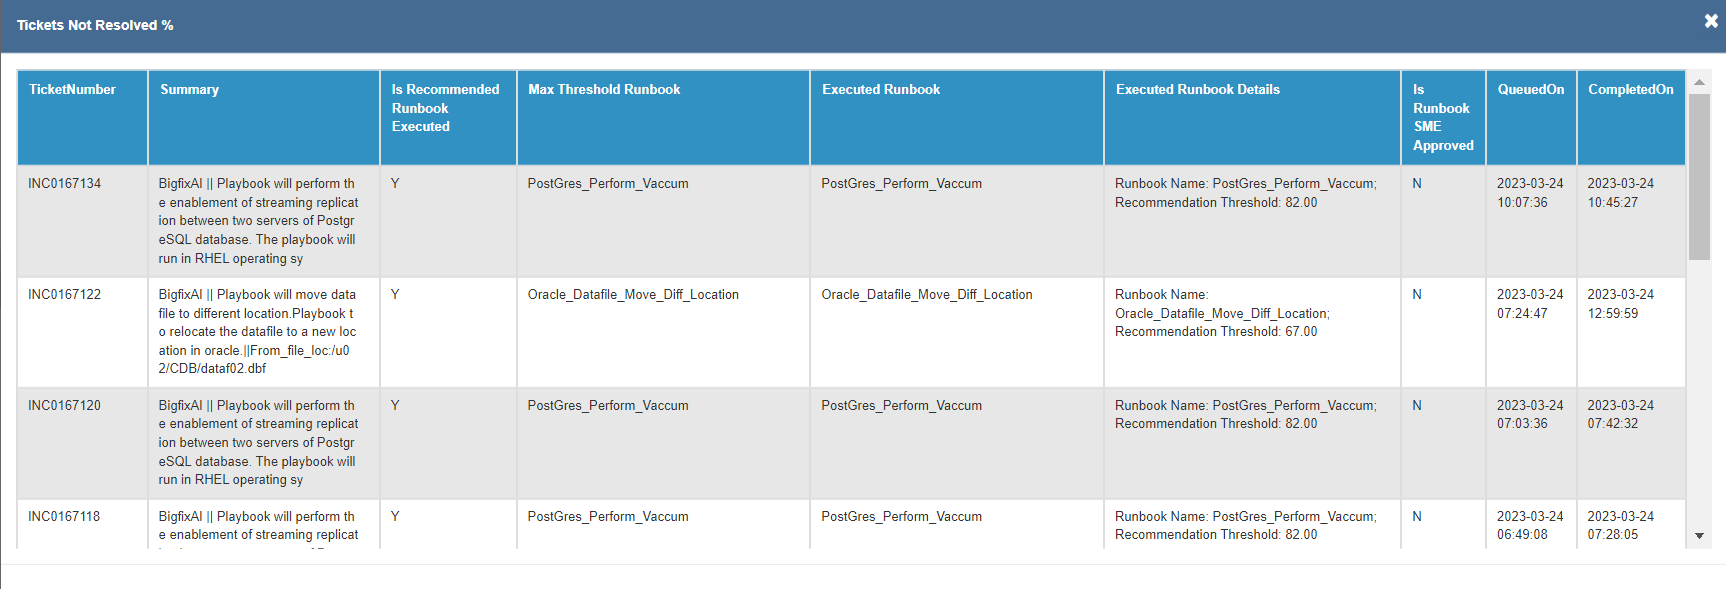
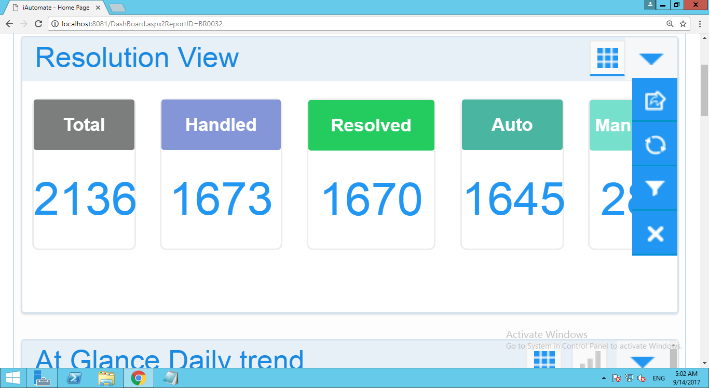
Users can view drill-down details of any report appearing on the widget
To view the drill-down report, perform the following steps:
- Click any visualization to view the drill-down report.
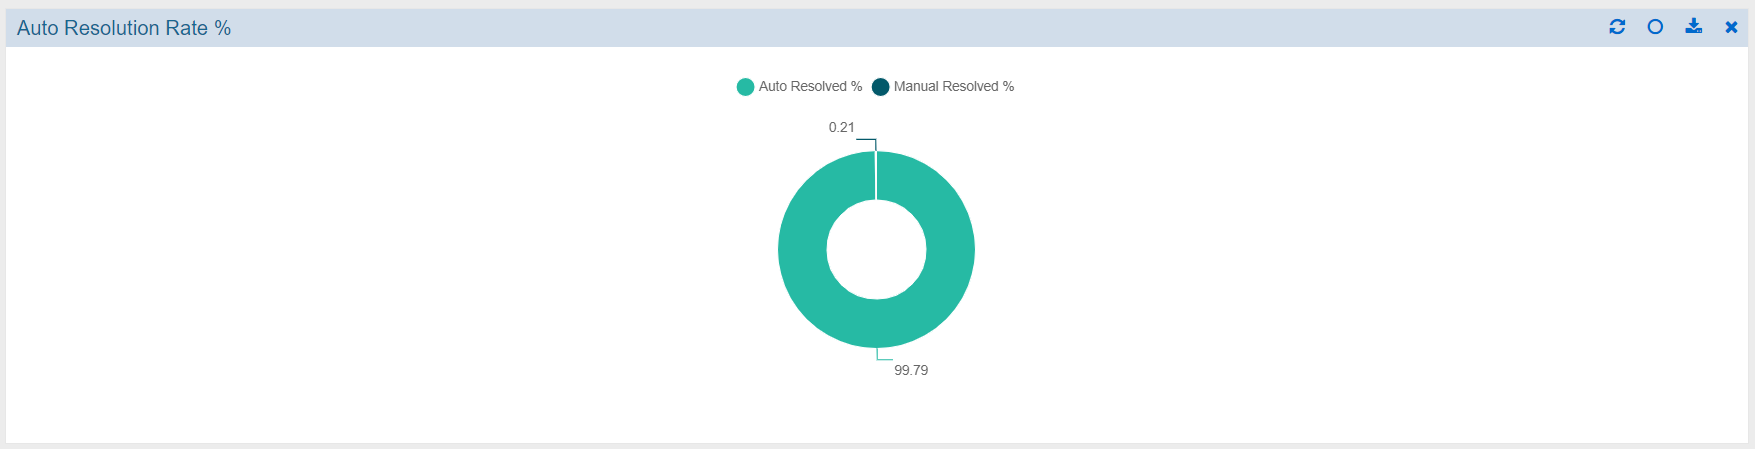
The detailed drill-down report is displayed.
Each widget can be resized using the following steps:
- Point at any corner of the selected tab with the mouse pointer. When the pointer changes into a double-headed arrow, hold down the primary mouse button and drag the corner in or out to resize the window. Release the mouse button to stop resizing the window.
- Click Save Changes to save the changes.
Each widget can be moved using the following steps:
- Click a blank portion on the navigation bar of the selected tab.
- Hold down the primary mouse button and then drag the mouse pointer to the place on the screen where you want the tab. After you move the mouse pointer to the position on your screen where you want the taskbar, release the mouse button.
- Click Save Changes to save the changes.
The navigation bar on each widget contains the following menus.
| Tabs | Name and Function |
|---|---|
 / /  / /  / / 
|
Change the view of widget to bar/grid/pie/doughnut. |
|
Refresh the data in a widget. |
|
Remove a widget from the selected organization’s dashboard. |

|
Export the data in a widget to PDF or CSV format. |
Help
This page helps the user to locate the necessary documents for better understanding of the tool as well as get the details of the components being running in BigFix Runbook AI.
- On main menu bar, click on Help. The below page appears:
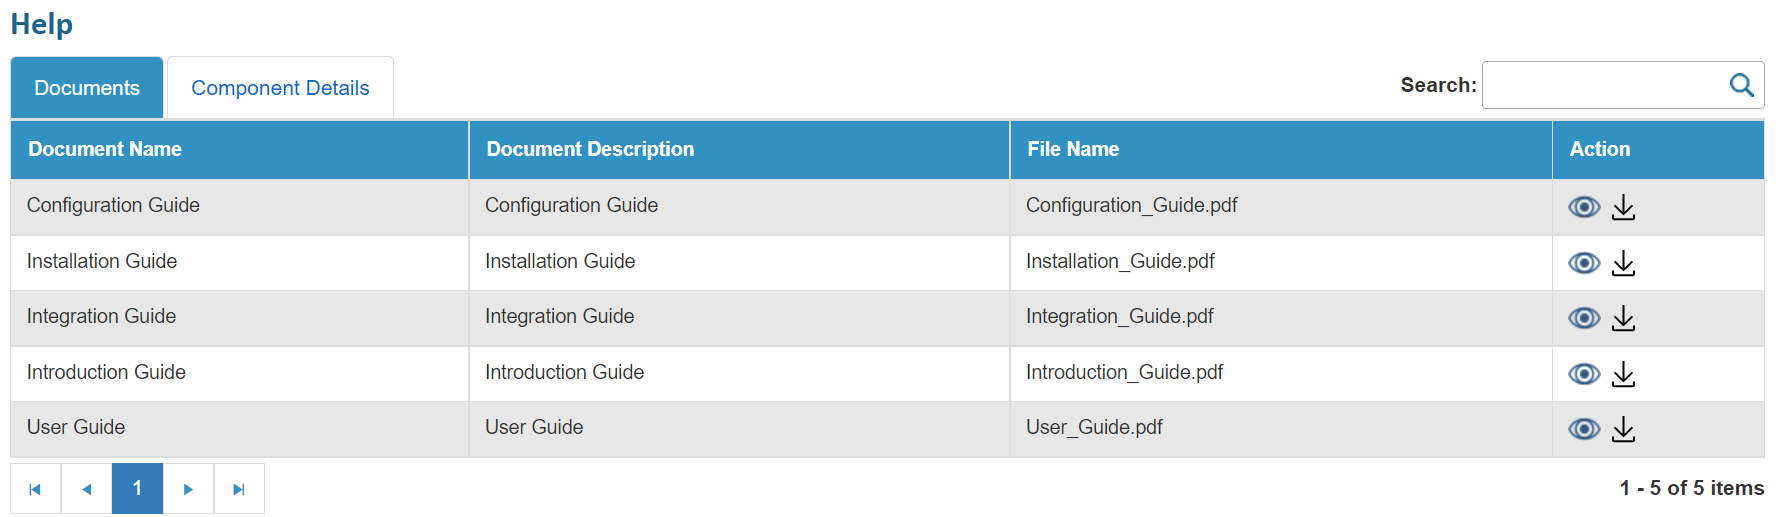
It has two tabs:
- Documents
- On Documents tab, it shows all the required
documents needed for better understanding of BigFix Runbook AI:
- Configuration Guide
- Installation Guide
- Integration Guide
- Introduction Guide
- User Guide
- To view any document, click on icon
 . It will open the document in new
tab.
. It will open the document in new
tab. - To download any document, click on icon
 .
.
- Component Details
- This tab displays all the components running on BigFix Runbook AI along with the server Host/IP on which component is running, the name of the component, component code, the version of BigFix Runbook AI currently running, the service name with which component is installed, the actual URL along with port on which component is running and the LB URL, if exists, for the component.
