Changing scan configuration from the BigFix Inventory user interface
![]() Available from 9.2.3. The Scan
Configurations panel allows for basic scan management directly from the BigFix Inventory user interface. Use the panel if you
enabled the default scan configuration or as an alternative to scheduling scans from the BigFix console.
Available from 9.2.3. The Scan
Configurations panel allows for basic scan management directly from the BigFix Inventory user interface. Use the panel if you
enabled the default scan configuration or as an alternative to scheduling scans from the BigFix console.
Before you begin
The panel is used for configuring the time, frequency, and types of software scans that are run on the endpoints. If you enabled the default scan configuration, all prerequisites are fulfilled and you can manage scans without any further setup. In other cases, ensure that the required analyses are activated, the scanner is installed on the endpoints, uploads of software scan results are scheduled, and capacity scans and uploads of their results are scheduled. You must complete these actions manually from the BigFix console before you can schedule scans from the BigFix Inventory user interface. For more information, see: Manual scan configuration.
- It has the All Computers group as its parent. It is not a subgroup of another computer group.
- Definition of this group uses a single Data Source Groups filter as the only condition based on
which computers are assigned to this group. Data source groups represent computer groups that were
earlier created in the BigFix
console.

About this task
 You must be an Administrator or an Infrastructure
Administrator to perform this task.
You must be an Administrator or an Infrastructure
Administrator to perform this task.
When you create scan configuration for a computer group in the BigFix Inventory user interface, the Initiate® Software Scan action is created and sent to the BigFix server. Each time you change scan configuration on the Scan Configurations panel, the related action is updated on the BigFix server. When you delete the scan configuration, the related action is by default removed from the BigFix server.
If you configure scans on the Scan Configurations panel and then change scan configuration in the BigFix console, information about the change is not reflected on the BigFix Inventory user interface. To avoid duplicated scans or unexpected scan behavior, avoid configuring scans in both places and choose your preferred method instead.
Procedure
- Create computer groups and enable scans for these groups.
- To edit scan configuration, click , and select
the computer group for which you want to change the scan settings.
Note: Each row represents the schedule and status of the software scan for a particular computer group. The row All computers from Data source name represents all computers that report to one BigFix server. The row is created automatically. You can edit or disable the scan schedule for this group.

- Choose the scan frequency and requested start date.
Due to any network latency, the time when the scan actually starts might be several minutes different from the requested start time. The requested start date represents the time and date when the action is started in accordance to the time zone of the BigFix server.
- Choose the types of software scan to run.For more information about each type of software scan, see: Types of software scans.
If the computer group for which you are configuring scans consists entirely of computers that run on Mac OS, run only the package data scan on these computers as other types of software scans are not applicable to Mac OS. If the group consists of computers that run on Mac OS and computers that run on other operating systems, select all types of scans that you want to run. Only the package data scan is run on the Mac OS computers. The remaining types of scans are skipped as not applicable.
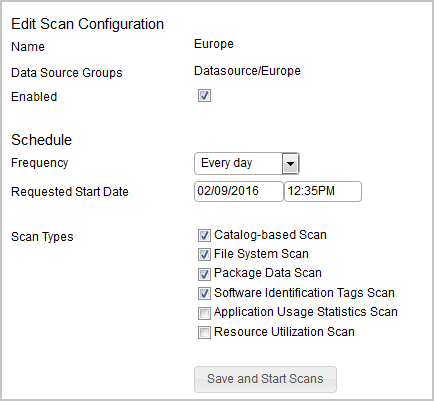
- To save the changes, click Save and Start Scans.
Then, click OK to confirm that you want to
restart the scan action that is running on the BigFix server.
Important: When you change a single scan configuration, all scans that were configured from the BigFix Inventory user interface are restarted on the BigFix server.
Results
- Active - The Initiate® Software Scan action was started on the BigFix server. The software scan runs according to the schedule defined on the Scan Configurations panel.
- Stopped - The Initiate® Software Scan action was stopped on the BigFix server. The software scan is not running. You can re-enable the scan on the Scan Configurations panel or configure the scan from the BigFix console.
- Server unavailable - The scan schedule cannot be displayed and set because the BigFix server or the Web Reports server is not responding. Follow the troubleshooting steps to resolve the issue.