Adding a new Java or JavaServer Page (JSP) project

When you add a new Java project to the application, you specify the project name, browse to the working directory, and then specify the source roots and project dependencies.

About this task

The steps in this topic direct you to complete all pages in the New Project Wizard (or New Application Wizard, if you are creating the project in it). However, some of the pages in the wizard are optional (required settings are complete when the Finish button is activated). Settings made in the wizard can be modified after project creation in the Properties view for a selected project. If you complete the New Project Wizard without completing optional pages, you can change the settings from those pages later on in the Properties view.

Procedure

  1. In the Explorer view, select the application that you want to add the project to (if you have not already added an application, see Configuring applications).
  2. Complete one of these actions to open the New Project Wizard:
    1. Select File > Add Project > New Project from the main workbench menu.
    2. Right-click the selected application and choose Add Project > New Project from the context menu.
  3. In the Select Project Type page of the wizard, select Java/JSP as the project type and then click Next to advance to the next wizard page.
  4. In the Project Sources wizard page:
    1. Identify the project sources, which consist of the directories in which you find the project files and any additional individual files to include in the project.

      Name the project and specify the working directory. The Working Directory is the location of the AppScan® Source project file (.ppf) and the base for all relative paths.

    2. Add the source roots manually or allow AppScan® Source for Analysis to find all valid source roots automatically.
      Important:
      • To analyze Java class files, they must be compiled with javac using the -g option. The AppScan® Source analysis relies on the debugging information generated by this option.
      • If your project contains Java source files that contain national language characters and you are running in a locale other than the native locale (for example, UTF-8), the scan will fail with errors and/or warnings in the console.
      • To find the source roots automatically:
        1. Click Find Source Roots and browse to the root directory of the source code.
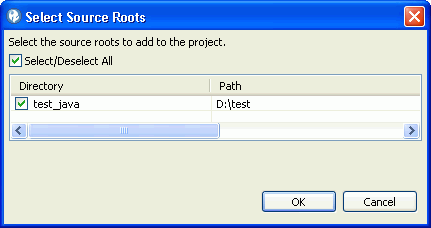
        2. From the list of all found source roots, select the source roots to add to the project.
          Select Source Roots dialog box
        3. Click OK. The sources to include in the scan appear in the Project Sources dialog box.
      • To find the source roots manually:
        1. Click Add Source Root.
        2. Select the source code root directory or file.
        3. Click OK. After adding the source root, you can exclude certain directories or files from it. To do this, select the directory or file (or multiselect these items), right-click the selection, and then choose Exclude from the menu. If you include or exclude files, the icon to the left of the file name changes.

      Click Finish to add the project without setting project dependencies - or click Next to identify project dependencies.

  5. In the JSP Project Dependencies page:
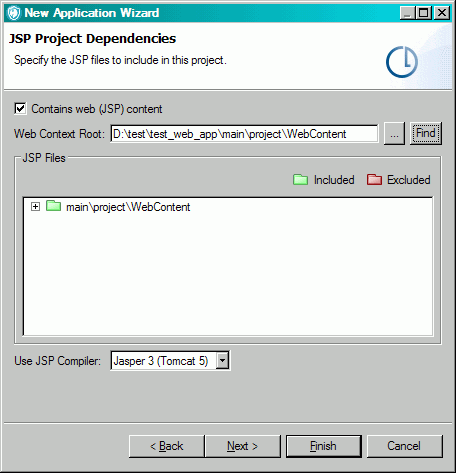
    1. Identify JavaServer Page (JSP) project dependencies: For Java projects that contain JavaServer Pages, identify the JSP project dependencies. Select the Contains web (JSP) content check box if the project is a web application that contains JavaServer Pages.
      JSP Project Dependencies
    2. Manually select the Web Context Root, or click Find to locate it. The Web Context Root is a WAR file or a directory that contains the WEB-INF directory. The web context root must be the root of a valid web application.
    3. Select the JSP Compiler for the project. Out-of-the-box, Tomcat 7 is the default JSP compiler setting (the default JSP compiler can be changed in the Java and JSP preference page). To learn about the compilers that are supported by AppScan® Source, see System requirements and installation prerequisites.

      Apache Tomcat Versions 7 and 8 are included in the installation of AppScan® Source. If the Tomcat 7 and Tomcat 8 preference pages are not configured, AppScan® Source will compile JSP files using the supplied Tomcat JSP compiler that is currently marked as default. If you want to employ an external supported Tomcat compiler, use the Tomcat preference pages to point to your local Tomcat installation.

      If you are using Oracle WebLogic Server or WebSphere® Application Server, you must configure the applicable preference page to point to your local installation of the application server so that it can be used for JSP compilation during analysis. If you have not already completed this configuration, you will be prompted by a message to do so when you select the JSP compiler. If you click Yes in the message, you will be taken to the appropriate preference page. If you click No, a warning link will display next to the JSP compiler selection (following the link will open the preference page).

    Click Finish to add the project with JSP project dependencies - or click Next to identify Java project dependencies.
  6. In the Java Project Dependencies page, identify the dependencies required to build this Java project:
    1. Add the JAR files manually or click Find for AppScan® Source for Analysis to search the directories that contain the dependent JAR and class files.

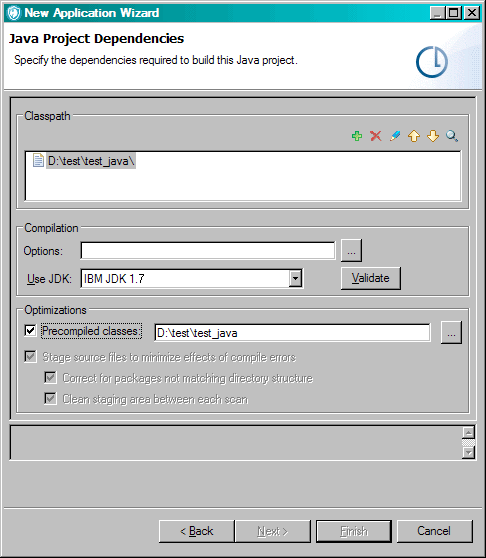
      The Class Path list displays the relative path to the project. The class path must specify the required JAR files and the directories containing class files that the project requires.


      Java Project Dependencies
      • Add, Remove, Move Up, and Move Down: Add or remove files from the class path, or move them up or down in order.
      • Find: Find JAR and class path entries based on the source files in the project.
      Important: If the Java project contains JavaServer Pages, you must also add JSP Project Dependencies.
      • To find project dependencies manually:
        1. Click Add in the Class Path section toolbar and then select the JAR and class file directories necessary to compile the Java project.
        2. Click OK. The JAR files and directories appear in the class path. Change the order as necessary.
      • To find dependencies automatically:
        1. Click Find in the Class Path section toolbar.
        2. Specify the directories in which to look for the JAR and class files necessary to compile the Java project.
        3. Select the Look inside the source and JAR files check box if you want AppScan® Source for Analysis to find the required project dependencies based on sources and by using the provided search path.
        4. Click Next to find the project dependencies and identify conflicts.
      • To resolve conflicts:
        1. If conflicts exist, in the Resolve Conflicts dialog box, select the entry to resolve and click Resolve (or click Next to auto-resolve conflicts). A conflict occurs when AppScan® Source for Analysis finds more than one JAR or class in a directory that satisfies the dependency.

          A red icon appears to the left of unresolved conflicts. Once resolved, the red icon changes to green and the item is Resolved. You may also Remove a conflict.

        2. After you resolve or remove a conflict, you may want to verify, reorder, or remove the class path entries. Note the list of imports that could not be found. Any unresolved imports result in compilation errors when AppScan® Source for Analysis scans.
    2. Options: Specify any additional required compiler parameters for the project.

      Compilation options are the options that are passed to the compiler so that source files can compile. For example, -source 1.5 specifies the source level of the project.

    3. Use JDK: Specify the Java Development Kit (JDK) to use when scanning this code. By default, AdoptOpenJDK 11 is used. AppScan® Source also provides JDK 1.8 (64-bit) for selection. To define additional JDKs, or to set a different default JDK, use the Java and JSP Preferences. If an alternate JDK is specified, it must be 64-bit.
      Note: Out-of-the-box, the default compiler for JSP projects is Tomcat 7, which requires Java Version 1.6 or higher. If Tomcat 7 is kept as default, using an earlier JDK will result in compilation errors during scans.
    4. The Validate action assures that project dependencies are correctly configured. It checks Java projects for configuration conflicts between sources and the class path, and it also checks for compilation errors. A conflict exists if a class in the class path is duplicated in the source root.

      If a conflict exists, the validation text area displays the JAR or location where the class is defined on the class path and whether the duplicate exists in the sources. Remove the conflict from the class path, and rerun the check.

      After checking for conflicts, Validate determines if the project compiles and reports any compilation errors.

    5. Precompiled classes: This field allows you to use precompiled Java or JSP class files instead of compiling during a scan.
    6. Stage source files to minimize effects of compile errors: Clear the check box if your source code compiles correctly and is arranged accurately in directories, matching the packages.
    7. Correct for packages not matching directory structure: Select if the packages do not match the directory structure.
    8. Clean staging area between each scan: Optimization option.
  7. Click Finish.

Results

Tip:
If you are scanning Java and there are missing dependencies in your Java project, AppScan® Source will create traces by synthesizing the pieces that the dependencies would have provided. This synthesis may not accurately reflect the information in .jar files. To limit synthesis and thereby improve the accuracy of findings, you can specify the missing dependencies, as follows:
  1. After scanning, open <data_dir>\logs\StaticAnalyzer-Errors.log (where <data_dir> is the location of your AppScan® Source program data, as described in Installation and user data file locations) to see if AppScan® Source has reported missing dependencies.
  2. Modify the project properties to include the dependencies. To do this, follow the instructions in Modifying application and project properties and then specify and save the dependencies in the JSP Project Dependencies or Project Dependencies tab.
  3. Re-scan the project.
Note:
By default, AppScan® Source scans Java files and Java byte code with missing dependencies or compilation errors. These settings can be changed as follows:
  1. Open <data_dir>\config\scan.ozsettings in a text editor.
  2. To change the compilation error setting, locate compile_java_sources_with_errors in the file. This setting will look similar to:
    <Setting
      name="compile_java_sources_with_errors"
      value="true"
      default_value="true"
      type="bool"
      hidden="true"
      display_name="compile_java_sources_with_errors"
      description="Attempt to scan java code with compilation errors."
    />
  3. To change the missing dependency setting, locate scan_without_dependency_jar in the file. This setting will look similar to:
    <Setting
      name="scan_without_dependency_jar"
      value="true"
      default_value="true"
      type="bool"
      hidden="true"
      display_name="scan_without_dependency_jar"
      description="Scans Java bytecode even when some of 
        the dependencies are missing by artificially 
        synthesizing the unresolved symbols."
    />
  4. In the setting, modify the value attribute. If the attribute is set to true, this setting will be on. If the compilation error setting is set to false, AppScan® Source will skip Java code with compilation errors during scans. If the missing dependency setting is set to false, AppScan® Source will not scan Java bytecode if there are missing dependencies.
  5. Save the file after you have modified this setting and start or restart AppScan® Source.