Explorer view

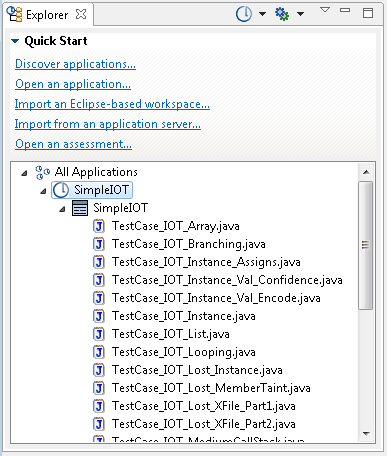
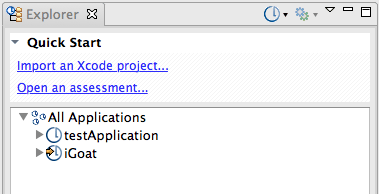
The Explorer view contains a Quick Start section at the top - and an explorer section at the bottom which contains one node, All Applications. The Quick Start section contains several useful links that launch common actions. The explorer section consists of a tree pane that provides a hierarchical view of your resources: applications, projects, directories, and project files, with All Applications as its root. You navigate these resources much like a file browser. As you navigate the view, the selection state of the tree determines the available tabs in the Properties view.

General information


Explorer view

Explorer view

In the Explorer view, you add applications and projects and scan code using toolbar buttons, links in the Quick Start section, or right-click menu commands in the explorer section. Once you have added applications, the explorer section provides visual indicators of your applications and projects and the status of each.

Tip: In the Explorer view, hover help is available to indicate the file name and path of applications, projects, and files. Hover help also indicates if an application or project is registered.

Quick Start section

The Quick Start section offers these links for launching common tasks:

  • Discover applications: This launches the Application Discovery Assistant, which allows to you to quickly create and configure applications and projects for Java and Microsoft Visual Studio source code.
  • Open an application: This launches an Open dialog box, which allows you to browse for and add an existing application to the set of applications. File or directory types that can be added include .paf, .sln, .dsw, and .ewf.
  • Import an Eclipse-based workspace: This launches the Add Workspace dialog box, which allows you to add an existing Eclipse or IBM® Rational® Application Developer for WebSphere® Software (RAD) workspace that contains Java projects. After the workspace has been imported, you will be able to scan any Java projects that it contains.
    Note: Before importing a workspace, be certain that you have installed and updated the development environment as described in Configuring your development environment for Eclipse and Rational Application Developer for WebSphere Software (RAD) projects.
  • Import from an application server: Import an existing Java applications from an Apache Tomcat or WebSphere® Application Server Liberty application server.
  • Open an assessment: This launches an Open dialog box, which allows you to browse for an AppScan® Source assessment file. File types that can be opened include .ozasmt and .xml.

Toolbar buttons

Table 1. Toolbar buttons
Action Icon Description
Add Application Menu
Add Application Menu button
Clicking the down-arrow on the Add Application Menu button allows you to select actions for creating a new application, opening an existing application, importing a workspace, or launching the Application Discovery Assistant.
Scan Selection
Scan Selection button
The Scan Selection button allows you to scan the object that is selected in the explorer section. The default scan configuration will be used for the scan. To choose a different scan configuration to use for the scan, click the down-arrow on the Scan Selection button. Select the scan configuration that you want to use - or choose the Edit Configurations action to set a different scan configuration as default (in the Scan Configuration view, select the configuration that you want to set as default, and then click Select as Default).
View Menu The View Menu button opens a menu that allows you to refresh the explorer section and hide registered items.

Right-click menu options

The availability of right-click menu options is determined by the item that is selected in the explorer section.

  • When All Applications is selected in the explorer section, these right-click menu options are available:
    • Scan All Applications: Scan all applications. The scan will run with the default scan configuration.
    • Scan All Applications With: Select the scan configuration that you want to use - or choose the Edit Configurations action to set a different scan configuration as default (in the Scan Configuration view, select the configuration that you want to set as default, and then click Select as Default).
    • Add Application
      • Create a new application: Add a new application to the set of applications. This action launches the New Application Wizard.
      • Open an existing application: This launches an Open dialog box, which allows you to browse for and add an existing application to the set of applications. File or directory types that can be added include .paf, .sln, .dsw, and .ewf.
      • Import an existing Eclipse-based workspace: This launches the Add Workspace dialog box, which allows you to add an existing Eclipse or IBM® Rational® Application Developer for WebSphere® Software (RAD) workspace that contains Java projects. After the workspace has been imported, you will be able to scan any Java projects that it contains.
        Note: Before importing a workspace, be certain that you have installed and updated the development environment as described in Configuring your development environment for Eclipse and Rational Application Developer for WebSphere Software (RAD) projects.
      • Discover applications: This launches the Application Discovery Assistant, which allows to you to quickly create and configure applications and projects for Java and Microsoft Visual Studio source code.
    • Expand All
    • Collapse All
    • Properties: Selecting this opens the Properties view for the selected item.
  • When an application is selected in the explorer section, these right-click menu options are available:
    • Scan Application: Scan the selected application, project, or file. The scan will run with the default scan configuration.
    • Scan Application With: Select the scan configuration that you want to use - or choose the Edit Configurations action to set a different scan configuration as default (in the Scan Configuration view, select the configuration that you want to set as default, and then click Select as Default).
    • Add Project
      • New Project: If an application is selected in the Explorer view, this action is available and choosing it allows you to add a new project to the application. This action launches the New Project Wizard.
      • Existing Project: If an application is selected in the Explorer view, this action is available and choosing it allows you to add an existing project to the application. This action launches a dialog box that allows you to browse for a .ppf , .vcproj, .vcxproj, .csproj, .vbproj, .dsp, or .epf file - or .xcodeproj directory - to open.
      • Multiple Projects: Add multiple projects to the application that is selected in the Explorer view. This action launches a dialog box that allows you to complete one of these tasks:
        • Specify a directory in which to search for projects.
        • Specify a workspace in which to search for projects.
        • Specify a Microsoft Solution file in which to search for projects.

        In the search results, you can select one or more projects to add.

    • Remove Application: If an application is selected in the Explorer view, this action is available and choosing it removes the selected application.
    • Add Custom Finding: This action launches the Create Custom Finding dialog box, allowing you to create a custom finding for the selected application.
    • Refresh: Refresh the contents of a selected application, project, or view.
    • Register/unregister:
      • Register Application: Register the selected application or project with AppScan® Source. You must register applications and projects before they can be published to the AppScan® Source Database.
      • Register Application As...: Select this to reregister an application with a new name.
      • Unregister Application: Unregister the selected application or project.
      • Locate: Select this to associate a local application or project with one that has been registered by another AppScan® Source user.
    • Expand All
    • Collapse All
    • Properties: Selecting this opens the Properties view for the selected item.
  • When a project is selected in the explorer section, these right-click menu options are available:
    • Scan Project: Scan the selected application, project, or file. The scan will run with the default scan configuration.
    • Scan Project With: Select the scan configuration that you want to use - or choose the Edit Configurations action to set a different scan configuration as default (in the Scan Configuration view, select the configuration that you want to set as default, and then click Select as Default).
    • Copy Project: If a project is selected in the Explorer view, this action is available and choosing it opens a dialog box that allows you to copy the project to another application - or create a copy of the project in the application that currently contains the project.
    • Remove Project: Remove the selected object.
    • Register/unregister:
      • Register Project: Register the selected application or project with AppScan® Source. You must register applications and projects before they can be published to the AppScan® Source Database.
      • Unregister Project: Unregister the selected application or project.
      • Locate: Select this to associate a local application or project with one that has been registered by another AppScan® Source user.
    • Expand All
    • Collapse All
    • Properties: Selecting this opens the Properties view for the selected item.
  • When a file is selected in the explorer section, these right-click menu options are available:
    • Scan File: Scan the selected application, project, or file. The scan will run with the default scan configuration.
    • Scan File With: Select the scan configuration that you want to use - or choose the Edit Configurations action to set a different scan configuration as default (in the Scan Configuration view, select the configuration that you want to set as default, and then click Select as Default).
    • Exclude from Scans: Remove the selected file from scans.
    • Open in Internal Editor: Open the selected file in the AppScan® Source editor (in the Analysis perspective).
    • Open in External Editor: Choose an external editor in which to open the selected file.
    • Properties: Selecting this opens the Properties view for the selected item.

Application and project indicators

This table identifies the application and project icons in the Explorer view.

Table 2. Application and Project Icons
Application or project type Not registered Registered Missing/Not Found
Imported application Icon for an imported application that is not registered Icon for a registered imported application Icon for a missing/not found imported application
Application that is created manually or created using the Application Discovery Assistant Icon for a created/discovered application that is not registered Icon for a created/discovered application that is registered Icon for a created/discovered application that is missing/not found
Imported project Icon for an imported project that is not registered Icon for a registered imported project Icon for a missing/not found imported project
Project that is created manually or created using the Application Discovery Assistant Icon for a created/discovered project that is not registered Icon for a created/discovered project that is registered Icon for a created/discovered project that is missing/not found

The Explorer view displays local applications and projects as well as those registered on the server (those that are registered on the server but not saved locally - for example, applications and projects registered by other users - appear greyed out). If you click the toolbar View Menu button and toggle the Hide items registered on the server menu item so it is not selected, you can view existing server applications and projects. If a project is greyed out, you can right-click and choose Locate in the menu.