Downloading and installing the IBM Java 2 plug-in for the Microsoft Windows platform
This panel contains instructions for downloading and installing the IBM Java 2 plug-in for the Microsoft Windows platform.
Introduction
This Java 2 plug-in will run on the following Windows platforms: Windows XP, Windows 2000, Windows NT, Windows 98.
This plug-in will function with any Windows browser that can use a Java 2 plug-in, including:
- Internet Explorer
- Netscape Version 6 and 7
Downloading and installing the IBM Java 2 plug-in for Microsoft Windows
Follow these steps:
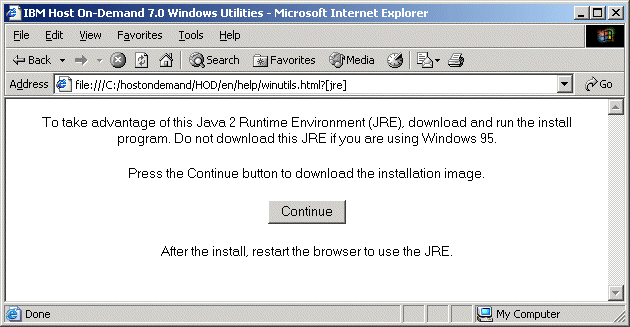
- Is your browser displaying the panel shown below?
- If so then go to step 3 below.
- If not then go to step 2 below.

- Is Z and I Emulator for Web displaying an informational popup window that prompts you to click OK in order to download the
Java 2 plug-in?
- If so then click OK on the popup window. The panel shown in step 1 above should be displayed. Then go to step 3 below.
- If not then follow these steps:
- Use your Web browser to connect to the file dashboard.html in the publish directory of your Z and I Emulator for Web
server. An example URL is:
http:\\myZIEWebServer\ZIEWeb\dashboard.html - Under Java 2 Runtime Environment Installation Image, click
IBM 32-bit Runtime Environment for Java 2 - Your browser should display the panel shown in step 1 above.
- Go to step 3 below.
- Use your Web browser to connect to the file dashboard.html in the publish directory of your Z and I Emulator for Web
server. An example URL is:
- If you reach this step then your browser should now be displaying the panel shown in step 1.
- If so then continue to the next step.
- If not then start with step 1 again. If you still do not see the panel shown in step 1 then please contact your system administrator.
- Click Continue.
- A file download panel should be displayed. Click Save.
- The Save As panel should be displayed. Select a temporary directory in which to save the file IBM-Win32-JRE.exe and click Save to save it.
- Use Windows Explorer to display the file IBM-Win32-JRE.exe. Click the file to run it.
- A setup language panel is displayed. Select a language and click OK.
- A welcome panel is displayed. Click Next.
- A software license agreement panel is displayed. Click Yes.
- A choose destination panel is displayed. Select the directory in which you want to install the Java 2 plug-in and click Next.
- A question panel is displayed, ask whether to install this Java Runtime Environment as the system JVM. Click No.
- A start copying files panel is displayed. Click Next.
- A completion panel is displayed. Click Finish.
- Restart the browser.