LDAP directory with custom Notes Application
For retrieving business card information, you can set up a dual repository of an LDAP directory and a custom HCL Notes application.
About this task
- Domino and Sametime Community Server have already been installed and configured to run properly.
- Sametime authentication is configured to use an LDAP directory.
- The LDAP server is running and accessible by the Sametime Community Server.
- Business card information can be retrieved from your Sametime directory.
- A custom Notes application based upon any template has been created and contains user records for each corresponding person document defined in the Sametime directory. (In our example, this custom application is named bcardstorage.nsf).
- To use a custom Notes application as a secondary repository, each user record in the custom application must have a common field whose unique value matches the value of the same field for the person in the Sametime directory. By default, the common field that is used is the internet email address).
- The view you use in this database must have at least one column sorted for every key. A sorted column must exist for the database field used as the common field.
- Photos must be less than 45 KB (recommended: 10 KB) and must be in the .jpg or .gif file type.
Copy the Custom Notes Application to the Data folder
Copy your custom Notes Application to the Domino\data directory (Default on Windows is c:\Program Files\HCL\Domino\Data).
Configure the userinfoconfig.xml file
- Remote into the OS of the Sametime Community server.
- Make a backup copy of the userinfoconfig.xml file and save to a temporary location. Userinfoconfig.xml is located inside the Domino program directory.
- Open the userinfoconfig.xml file using a text or XML editor, and place in edit mode.
- If you are using LDAP for your primary repository, ensure it is configured properly. See the topic titled Configuring business cards using an LDAP directory. Once the configuration is complete, continue with the below steps.
Disable updates from stconfig.nsf:
By default the business cards are configured in both stconfig.nsf and in the userinfoconfig.xml file. This can be simplified by adding a setting to the userinfoconfig.xml file to ignore the stconfig.nsf settings.
- Locate the <UserInformation> tag.
- Add a new line under this tag and paste the below setting:
<ReadStConfigUpdates value="false"/>
Configure the Primary Directory Mapping of Fields / Attributes to the id names
The userinfoconfig.nsf has a section for the primary directory that comes with the server. In the <Details> section, remove any field mappings that you do not wish to display from the LDAP server, because they will be mapped to the secondary repository.
For example,For example if the phone number will be in the secondary directory, you would remove the <Details> line completely for the Id=”Telephone, starting with <Detail Type= and ending in /> .
Configure the Secondary Directory Mapping of Fields / Attributes to the id names
Add a section for the Custom Notes Application using the sample. Inside the userinfoconfig.xml locate the </Storage> tag and paste the below sample text between the </Storage> and </Resources> tags.
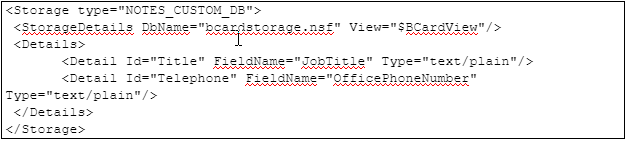
- DbName = database_path Filename of the custom Notes application (relative path to the Domino data directory)
- View = view_name the name of the Notes view that displays the documents containing the user records.
- The <Details> section defines the attributes that will be retrieved by Sametime from the corresponding storage repository. In this example, we are pulling the telephone attribute from the custom Notes application database
| Description | Id name (do not change) |
|---|---|
| The name of the field that holds the email address | MailAddress |
| The name of the field that has the user’s Common Name. | Name |
| The name of the field that contains the user’s title. | Title |
| The name of the field that contains the user’s physical address.
Note: The default value is not a valid field name for Domino |
Location |
| The name of the field that contains the user’s phone number. | Telephone |
| The name of the field that has the Company, organization or department name. | Company |
| The field or URL containing the photo. | Photo |
Adding additional detail
If you would like to map additional detail to these fields it is possible with additional configuration. For example, suppose there is both a desk phone number (fieldname “telephoneNumber”) and a mobile phone number (field “mobile”) that you wish to include in the business card. This will be separated by a forward slash (you can choose other characters as a separator).
Locate the <Detail Type = Line that you wish to modify, in this example it is the one for Telephone. In the field name, between the quotes, add the second attribute there, separated by a comma. FieldName=”telephoneNumber,mobile”. Then before the closing tag, and a space and a new setting: DisplaySeparator=" / ".
The updated example line:
<Detail Type="text/plain" Id="Telephone" FieldName="telephoneNumber,mobile" DisplaySeparator=” / “/>
Selecting the Fields to Display
In the Set params settings, select the Id names that you are including as part of the business card. Remove any Ids you do not want to include.
For example,if you do not want to include the company name, remove “Company” from the list of attributes.
There are two lines that begin with <Set params=, each one has a unique SetID=. The one listed for SetId=”0” is for anonymous users. The one for SetId=”1” is for authenticated users.
Configure the Blackboxes
- Locate the section titled <BlackBoxConfiguration>.
- Add a new line below the existing <Blackbox> line and paste the below text to enable the custom Notes Application blackbox:
<BlackBox type="NOTES_CUSTOM_DB" name="com.ibm.sametime.userinfo.userinfobb.UserInfoNotesCustomBB" MaxInstances="4"/>
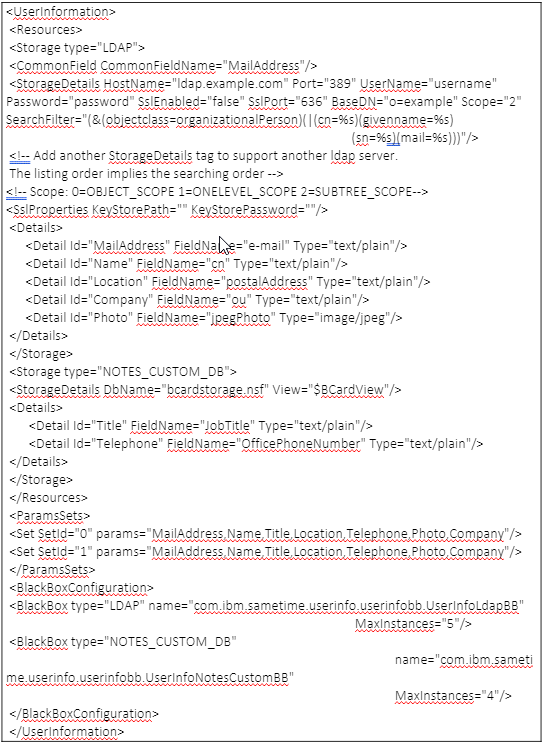
Example completed userinfoconfig.xml
Save and Test the File
When all updates are complete, save and close the userinfoconfig.xml file. It is a best practice to open the file with a browser to check for any formatting mistakes. If no mistakes are found, restart the Community Server for these settings to take effect.