Creating physical web server resources
After you create logical HTTP connections, you must create physical web server resources and bind the logical HTTP connections to the physical resources so that you can use those resources to create tests and virtual services (stubs).
Before you begin
About this task
- You can use topology discovery to model the components of your system under test.
- You can synchronize with an external application or file.
Procedure
-
Open the Physical View of the Architecture
School perspective, and from the toolbar click .
Alternatively, open the Logical View, right-click an existing HTTP connection and click .
- Enter a name in the Name field for the HTTP transport to distinguish this transport from other possible HTTP transports.
-
Click Settings to configure the basic settings of the
transport.
These settings define which HTTP traffic to record:
Table 1. Web server wizard Settings page fields Field Description Host The hostname or IP address of the computer that hosts the web server to which to connect.
Port The port number through which to connect. - Optional:
Configure the Client settings based on the details in the following table, if applicable to the transport.
Table 2. Web server wizard Client page fields Field Description Virtual Client Address The client equivalent of a bind address. This address refers to the network that is used to make the outbound connection. This address is also known as the local address. Max connections per host The maximum number of connections that HCL OneTest™ API can maintain with the host. The default value is 100. Proxy Server Proxy Host The hostname or IP address of the computer that hosts the proxy server that is used in place of the web server. Proxy Port The number of the port through which to connect with the proxy server. Username The user name used to log on to the Proxy Host. Password The password associated with the user name of the proxy server. NTLM Domain The domain name used by NT LAN Manager as part of Microsoft Integrated Windows™ Authentication specifications. - Optional:
Click Server to configure client socket settings and socket overrides, by using the details in the following table:
Note: These settings configure the behavior of the transport when it is used in a stub. Client socket settings define the response that is sent when this transport is used as a server as part of a stub and a request is received that is not matched to a running stub.
Table 3. Web server wizard Server page fields Field Description Client Socket Settings Response Timeout (ms) The number of milliseconds a stub is given to respond before the default response is sent. Default Response code The default code to be returned by the stub if no match is found for the request. The default value is 503. Default Reason Phrase The default message to be returned by the stub if no match is found. The default value is "No Stub available that matches the request". Server Socket Overrides Port By default, the stub listens on the port specified in the Settings tab. If that port is in use by another program or process, the stub must listen on a different port. If no alternate port is specified in this field, one is chosen at random, which is not a problem as long as the proxy server is routing traffic. However, if the real client needs to address the stub directly, enter an alternate port number in this field. Bind Address You can enter a bind address to force the HTTP transport to listen to the incoming connections on a specific network interface. This bind address is then used in the routing rules when the HTTP traffic has to be redirected to stubs.
If you do not enter a value in this field, the HTTP transport listens to the incoming traffic on all available network interfaces. The address of the first network interface that is available is used in the routing rule. This address can be overridden with the value that is specified in the Recording Bind Address field of Library Manager.
Authentication Select an authentication that you want to use for the connection from the following options: - Basic
- Digest
- NTLM
- All
After you select the authentication type, some or all the fields are enabled and you can enter the details as described in the following table:Field Description Realm Enabled when you select Basic, Digest, and ALL.
You can specify a realm name to be prefixed, with a slash (/), to a user name, in the form realmName/personalName@domainName.
The following fields are enabled when you select the Digest or All authentication type.
Domain You can specify a domain name to be appended, with an at-sign (@), to a user name, in the form realmName/personalName@domainName. Send Nonce You have the option to send an arbitrary number to be used in digest access authentication. Opaque You can specify a string of data to be returned unchanged by the server. This field is used to send state information around a network. State You can save the current state between authentication requests. Algorithm Specify the algorithm to be used for digest authentication. QOP options Specify the quality of protection (QOP) for authentication. The following values can be used to indicate to the client how the digest value should be calculated: - auth
- auth-int
Auth Params Specify any additional authorization parameters required as name-value pairs. - Optional:
Click Header to add name-value pairs to the header properties.
These headers are sent with every message action such as Send Request or Send Reply. You can use fixed values or environment tags. Also, you can override the values by manually adding the same header to the messaging action.
Note: You can use these headers to automatically differentiate stub replies from the system replies. Proxied traffic routed to the system under test by way of the stub pass-through mechanism also contains these headers. - Optional:
Click Authentication to configure the authentication type.
-
Perform the actions for the authentication type that you selected as described in the following table:
Authentication type Actions None There are no credentials that are required to authenticate the connection. Basic Perform the actions as described in the following table:Field Action Username
Enter the user name.
Password
Enter the password that is used to authenticate the connection.
Use preemptive Basic authentication
Select the check box to enable pre-emptive authentication or clear the check box to disable pre-emptive authentication. With pre-emptive authentication, the client sends the authorization header with all requests rather than only when it is requested by the server.
Note: Basic authentication and pre-emptive authentication are not secure authentication methods as the user name and password are sent over the network in plain text. For more information, refer to the RFC 2617 documentation in Related information.Digest Perform the actions as described in the following table:Field Action Username
Enter the user name.
Password
Enter the password that is used to authenticate the connection.
Note: A hash function is applied to the password before it is sent.NTLM Perform the actions as described in the following table:Field Action Username
Enter the user name.
Password
Enter the password that is used to authenticate the connection.
Domain
Enter the domain name of the NT LAN Manager.
Basic, Digest and NTLM Perform the actions as described in the following table:Field Action Username
Enter the user name.
Password
Enter the password that is used to authenticate the connection.
Domain
Enter the domain name of the NT LAN Manager.
Use preemptive Basic authentication
Select the check box to enable pre-emptive authentication or clear the check box to disable pre-emptive authentication. With pre-emptive authentication, the client sends the authorization header with all requests rather than only when it is requested by the server.
Kerberos Perform the actions desribed in the following table:
Specify the settings for SSO or the Kerberos principal and password for HTTP authentication. In case of a Kerberos principal and password, configure authentication to the HTTP server by using the following:- A Kerberos Realm and Key Distribution Center (KDC)
- An external krb5 configuration file
The following table describes the authentication settings:Field Action Use SSO (Run with current user credentials) Select your action from the following options:- Select the Use SSO (Run with current user credentials) check box, if you want to run HTTP transport tests without a user name and password. However, the following limitations apply:
- SSO is available only on the Windows platform.
- When running a test from HCL OneTest™ API as a Windows user, you must be authorized to access the configured HTTP server.
- When running a test from a HCL OneTest™ API Agent, the agent must have been started as a Windows user that is authorized to access the configured HTTP server.
- The computer on which the test is running must have a Windows registry setting as follows:
HKEY_LOCAL_MACHINE\System\CurrentControlSet\Control\Lsa\Kerberos\Parameters
Value Name: allowtgtsessionkey
Value Type: REG_DWORD
Value: 0x000000001 (default is 0)
- Clear or do not select the Use SSO (Run with current user credentials) check box, to use the Kerberos credentials.
Principal A Kerberos principal represents a unique identity to which Kerberos can assign tickets to access Kerberos-aware services. Enter the alias of the principal that you want to use for authentication.
Password The password of the principal that you want to use for authentication.
Kerberos Realm A set of managed nodes that share the same Kerberos database. Typically, this is the fully qualified domain name. For example, MYDOMAIN.ABC.COM.
KDC The fully qualified hostname of the computer that contains the KDC service. This might also be the domain controller or Active Directory host. For example, DC.MYDOMAIN.ABC.COM. External krb5 config file Perform the following steps: - Select the External krb5 config file option, if you are using a krb5 configuration file.
When selected, the Config Path field is enabled.
- Enter the path or click Browse to locate the folder that contains the krb5 configuration file.
OAuth2 Perform the actions as described in the following table:Field Action Token endpoint
Enter the URL of the authorization server that is used by the client to obtain an access token by presenting its refresh token.
Client id
Enter the identity provided to the client by the authorization server.
Client secret
Enter the secret or password that corresponds to the client ID to authenticate the client with the authorization server.
Client assertion
Optionally and for additional security, you can use a client assertion instead of a client secret. With client assertion, the client uses an X.509 certificate to prove the token request came from the client.
Scopes
Enter the scopes for which access is requested.
Generate - Click Generate to obtain the refresh token.Note: You must have entered the values in the previous fields.
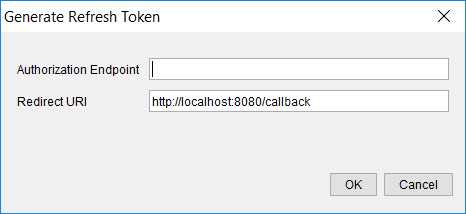
- Enter the URL of the authorization server in the Authorization Endpoint field.
- Use the default redirect URI or enter the URI to which the authorization server sends the generated refresh token and is used to extract the refresh token received in the Redirect URI.Note: The URL must match the URL that you provided during the registration process. You can change the port in the URL if the default port is used by some other process. HCL OneTest™ API starts the endpoint that is in this URL to receive the refresh token.
The refresh token is received at the location specified.
Refresh token
When you generate the refresh token by using HCL OneTest™ API this field is automatically populated by Integration Tester when it receives the refresh token.
-
Perform the actions for the authentication type that you selected as described in the following table:
- Optional:
Optionally, click SSL to configure the secure socket layer settings
for the transport.
Click SSL to configure the secure socket layer (SSL) settings for the transport. The SSL settings are described in the following table:
Field Description Use SSL Select this check box to enable security for the transport. Selecting the check box makes the other controls on the SSL tab available. You can enable security for Testing (Client) or Virtualization (Server) or both.
Server certificates to trust All available identity stores are displayed in the drop-down list. Select one of the following menu items: Field Description Trust All To accept any certificate presented by the server, regardless of its validity. This option is the default and assumes you are focused on testing an application rather than the security of the server.
New To define a new identity store.
Identity store To specify an identity store, that contains certificates that the client is to trust. Client identities to give to the server All available identity stores are displayed in the drop-down list. If you use mutual authentication, a suitable identity is selected from the chosen identity store. Select one of the following menu items: Field Description None If the server does not request an identity.
New To define a new identity store.
Identity store To use an existing identity store. Specify an alias in the Identity field.
Certificate source All available identity stores are displayed in the drop-down list. You can select one of the following menu items: Field Description Generated To use a certificate that HCL OneTest™ API generates for you. The source for that certificate is displayed in the Signed by field.
New To define a new identity store.
Identity store To use a certificate from an identity store.
Signed by If you chose Generated in the Certificate source field, this field holds the location of a certificate within the HCL OneTest™ API installation directory that is used to generate the new certificate. This is a read-only field. Identity If you specified an identity store in the Certificate source field, use this field to specify the alias of a key in that identity store. Certificate Authorities a stub will trust All available identity stores are displayed in the drop-down list. You can select one of the following menu items: Field Description Trust All To accept any certificate presented by the client.
New To define a new identity store.
Identity store To specify an identity store that contains certificates that the stub is to trust.
Override default protocols If you are required to use a specific version of the secure sockets protocol, such as SSLv2 or TLSv1.2, enter that algorithm name here. - Optional:
Click Recording to configure the recording settings for the transport.
- Click Test Transport to verify that
the connection works.
Restriction: While you are configuring the transport for Istio, the Test Transport action is not able to complete the test as the Web Server configured in the settings tab is a service within the Kubernetes cluster and the host and port configured are not reachable to HCL OneTest™ API.
- Click OK.
Results
A new physical web server resource is added to your project. In the Physical view of the Architecture School perspective, the web server is displayed with the port number included in the name.