Running a test from a command line
You can run a test without opening the product by using the command-line interface.
Procedure
-
Navigate to the directory that contains the cmdline.bat
and cmdline.sh files.
On Windows™ operating systems, this directory is located at productInstallationDirectory\cmdline. For example, C:\Program Files\HCL\HCLOneTest\cmdline.
-
Issue the following command:
cmdline -workspace workspace_full_path -project proj_rel_path -eclipsehome eclipse_full_path -plugins plugin_full_path -suite suite_rel_path -importzip full_path.zip -varfile variable_file_full_path -configfile file_full_path -results result_file -overwrite {"true" | "false"} -quiet -vmargs JVM_args -publish serverURL#project.name=projectName -publish_for {ALL,PASS,FAIL,ERROR, INCONCLUSIVE} -labels labelname1, labelname2 -exportlog log_full_path -exportstats local_dir_path -exportstatshtml local_dir_path-exportstatsformat name of the file format -compare "result_path1, result_path2" -exportstatreportlist stats_list -execsummary local_dir_path -execsummaryreport reportID -usercomments "any user comment" -publishreports "FT, FUNCTIONAL, STATS, TESTLOG" -stdout -swapdatsets existing_dataset_file_path:new_dataset_file-path
Notes:- The workspace is locked after you issue the command. To check the progress of the test during the run, invoke another workspace and open the project through that workspace.
- On Linux operating system, the command must start with cmdline.sh.
If a value contains spaces, enclose the value in quotation marks. To see the online help for this command while you are in the directory that contains the .bat file, typecmdline -help.The following table explains each options:-workspace Required. The complete path to the Eclipse workspace. -project Required. The path, including the file name of the project relative to the workspace. -eclipsehome Optional. The complete path to the directory that contains eclipse.exe.
For example, C:\Program Files\HCL\HCLOneTest
-plugins Optional. The complete path to the folder that contains the plugins. Typically, on Windows operating systems, this folder is located at C:\Program Files\HCL\HCLIMShared\plugins. Required. This option is required only if the folder is at a different location.
-suite Optional. However, in a command, it is mandatory to use one of the following options: - -suite
- -aftsuite
You must not use the -suite option along with the other options. The path includes the file name of the suite to run relative to the project.
Starting from 9.2.1.1, you can execute multiple tests simultaneously.
For example, -suite test1:test2:test3.
-aftsuite Optional. However, in a command, it is mandatory to use one of the following options: You must not use the -aftsuite option along with the other options. The -aftsuite option accepts aft XML as the parameter value. It supports only one aft XML as input.- -suite
- -aftsuite
For example, -aftsuite aftinput
-importzip Optional. To import the project as test assets with dependencies into your workspace, use the -importzip option. This command is available from 9.2.1.1 and later. For example, C:\User\Desktop\test1.zip
-varfile Optional. You can use this option to specify the complete path to the XML file that contains the variable name and value pairs. To run a Web UI test on a different browser than that was used for the recording, specify the predefined variable. For more information, see Defining a variable to run a test with a selected browser.
-configfile Optional. You can use this option to specify the complete path to a file that contains the parameters for a test run. Each parameter must be on a single line. To create a configuration file, you must use an editor that does not wrap lines. Any parameters, whether required or optional, can be set in the configuration file. The command line parameters override the values in this file. Notes:-
If you are creating a config file manually, the file must be in the UTF-8 format. You must not use quotation marks in this file even for values that contain spaces.
-
You can create command line config file from the product, which you can use while running tests from the command-line interface or Maven. For more information about how to create a command line config file from the product, see related links. This option is available only for Web UI and compound tests.
-results Optional. You can use this option to specify the name of the results file. The default result file name is the test name with a time stamp appended. You must specify a folder name that is relative to the project to store the test results. For example, -results folder/resultname
-overwrite Optional. Determines whether a result file with the same name is overwritten. The default value, false, indicates that the new result file is created. If the value is true, the file is overwritten and retains the same file name. You must use double quotes for values true or false.
-quiet Optional. Turns off any message output from the launcher and returns to the command shell when the run or the attempt is complete. -vmargs Optional. To specify the Java™ maximum heap size for the Java™ process that controls the command line playback, use the -vmargs option with the -Xmx argument. For example, when you use-vmargs -Xmx4096m, specify a maximum heap size of 4096m. This method is similar to specifying -Xmx4096m in the eclipse.ini file for the workbench when playing back the test from the user interface.
To capture resource monitoring data, use -vmargs "-Drm.collect=true -Drm.collect.interval= numeric value more than 1000".
To collect the response time data for the app itself and for the server and network and display them in different bar charts, use -vmargs "-De2e.collect=true". For desktop-based web applications, the response time data is captured and displayed by default.
To execute tests in parallel on all mobile devices, which are in passive mode, connected to the workbench and ready for playback, use -vmargs "-Dall.available.targets.in.parallel=true".
To execute tests in parallel on all supported desktop browsers and connected mobile devices, use -vmargs "-Dall.available.targets.in.parallel=all".
To execute tests in parallel on selected desktop browsers and connected mobile devices, use -vmargs "-Dall.available.targets.in.parallel=browser1,browswer2,browser3". You must separate browser names with a comma. For example, firefox, ff, chrome, ie, ie64, safari, "-Dall.available.targets.in.parallel=browser1,browser2,browser3".
- protocolinput - Optional. You can use this parameter to run a
Web UI test in parallel on different browsers.
-protocolinput "all.available.targets.in.parallel=all"
-protocolinput "all.available.targets.in.parallel=chrome,ff,ie"
-
You can also specify the Web UI preferences in this argument.
For example, -protocolinput "webui.highlight=<value>;webui.report.screenshots=<value>" where webui.highlight specifies whether the page element must be highlighted and webui.report specifies whether the screenshots must be captured while playing back the test in the browser.
-
You can use this parameter to run only the failed tests from a previous playback in an Accelerated Functional Test suite.
cmdline -workspace workspacename -project projectname -aftsuite aftsuitname -exportlog exportlogpath -results autoresults -protocolinput "runfailedtests=true"
In the preceding example, runfailedtests=true specifies whether the failed test from a previous playback must be rerun in Accelerated Functional Test suite.
-
You can use this parameter to automatically resolve the browser and driver incompatibility, while you play back the Web UI tests.
-protocolinput "webui.browser.driver.autoupdate=true"
Note: If you use the -protocolinput argument, you must not use the following equivalent -vmargs arguments:-vmargs "-Dall.available.targets.in.parallel=all" -vmargs "-Dall.available.targets.in.parallel=browser1,browswer2,browser3"-publish Optional. You can use -publish parameter to publish test results to Rational® Test Automation Server. You can use the following options along with the -publish parameter: -
no
You can use the no option if you do not want to publish test results after the run. This option is useful if the product preferences are set to publish the results, but you do not want to publish them.
-
You can use any of the following options to specify the project name:
-
serverURL #project.name=projectName&teamspace.name=name_of_the _teamspace
-
serverURL #project.name=projectName&teamspace.alias=name_of_the _teamspace_alias
You must consider the following points while providing the project name:-
If the project name is not specified, then the value of the -project parameter is used.
-
If you have a project with the same name in different team spaces, then you can append either the &teamspace.name=name_of_the _teamspace or &teamspace.alias==name_of_the_teamspace_alias options along with the -publish parameter.
For example: -publish “https://localhost:5443/#project.name=test&teamspace.name=ts1”
Where:-
https://localhost:5443 is the URL of the server.
-
test is the name of the project.
-
ts1 is the name of the team space.
-
-
Note: If the name of the project or team space contains a space character, then you must replace it with %20.For example, if the name of the team space is Initial Team Space, then you must provide it as Intial%20Team%20Space.
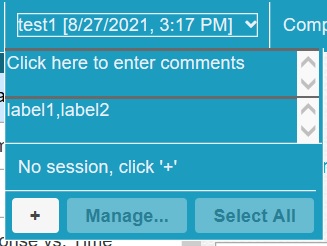
Remember: If you provide the server and the project details under in the product and if you use serverURL#project.name=projectName along with the -publish parameter, the server details in the command-line interface take precedence over the product preferences.Important: You must provide the offline user token for the server by using the HCL_ONETEST_OFFLINE_TOKEN environment variable before you use the -publish parameter in the command-line interface.-labels Optional. You can use the -labels option to add labels to test results when you run test assets from the command-line interface. You can add multiple labels to a test result separated by a comma.
For example, -labels
label1, label2
Note: If the name of the label contains a space character, then you must enclose it with quotes ().For example, if the name of the label is test environment, then you must provide it as "test environment".
You can also use the -labels option along with the -publish option to add labels to a test result when you want to publish test results to Rational® Test Automation Server.
When you run test assets from the command-line interface by using the -labels option, then the same labels are displayed on the UI Test Statistical Report in Rational® Functional Tester.
Similarly, when you use the -labels option with the -publish option from the command-line interface, then the Results page of Rational® Test Automation Server displays the same label for the specific test asset.

-publish_for Optional. You can use this option to publish the test results based on the completion status of the tests: - ALL - This is the default option. You can use this option to publish test results for any text execution verdict.
- PASS - You can use this option to publish test results for the tests that have passed.
- FAIL - You can use this option to publish test results for the tests that have failed.
- ERROR - You can use this option to publish test results for the tests that included errors.
- INCONCLUSIVE - You can use this option to publish test results for the tests that were inconclusive.
-exportlog Optional. You can use this parameter to specify the file directory path to store the exported HTTP test log, UI Test report, and Unified report. Starting from 10.0.1, by using the -exportlog parameter, you can provide multiple parameter entries when running multiple tests. You must use a colon to separate the parameter entries.
For example: -exportlog c:/logexport.txt:c:/secondlogexport.txt
If there are multiple -suite parameter entries with a single -exportlog parameter entry, then the -exportlog parameter generates the appropriate number of test logs by appending 0, 1, 2, and so on to the -exportlog parameter entry name.
For example: -suite "sampletest1:sampletest2:sampletest3" -exportlog c:/logexport.txt The command generates the following test logs:
- logexport_0.txt
- logexport_1.txt
- logexport.txt
The last test log generated has the same name as that of the initial -exportlog entry.
Note: If there are multiple -suite and -exportlog parameter entries, the number of -suite entries must match with the number of -exportlog entries. Otherwise, the following error message is displayed:Error, number of -suite and -exportlog entries do not match.
-exportReport You can use this parameter to export the Unified report that is generated for UI tests to any of the following formats: - PDF: You can specify this option to export the Unified report to the PDF format.
- XML: You can specify this option to export the Unified report to the JUnit format.
- HTML: You can specify this option to export the Unified report to the HTML format.
exportReport "type=<reporttype>;format=<file type>;folder<destination folder path>;filename=<name of the exported file>
For example, exportReport "type=unified;format=pdf;folder=Exportedreport102;filename=testreport
Note: You must not use this parameter along with the -exportlog parameter.-exportstats Optional. You can use this option to export reports in comma-separated values (CSV) format, with the file name derived from the report name. This directory can be relative to the project or a directory on your file system. If the -exportstatreportlist option is not specified, the reports specified on the Export Reports page of the Performance Test Report preferences are exported. -exportstatsformat Optional. You can use this option to specify a format for the result that you want to export along with the -exportstats option. You must use at least one of the following parameters with the -exportstatsformat option: -
simple.csv
-
full.csv
-
simple.json
-
full.json
-
csv
-
json
For example, -exportstats <local_dir_path> -exportstatsformat simple.json
You can add multiple arguments separated by a comma.
For example, -exportstats <local_dir_path> -exportstatsformat simple.json, full.csv
When you want to export both simple and full type of test results in a json or csv format, you can specify json or csv as the arguments in the command. When the test run completes, the test result exports to simple.json and full.json files.
For example, -exportstats <local_dir_path> -exportstatsformat json
You can select the Command Line check box from the product preferences () when you want to export test results to one of the selected formats after the test run completes.
Remember: When you run the test from the command line, and if you use the -exportstats parameter, then the command line preferences take precedence over the preferences set in the product. Therefore, by default, the test result exports to a CSV format.For example, when you select the Command Line option and Report format to json in the product preferences, and run the test from the command-line interface without using the -exportstats option. The result is exported to a json file after the test run is complete.
-exportstatshtml Optional. When you want to export web analytic results, you can use this option. The results are exported in the specified directory. You can then analyze the results on a web browser without using the test workbench. -compare You can use this argument along with -exportstatshtml and -execsummary to export the result in compare mode. The value can be paths to the runs and are relative to the workspace. You must separate the paths by a comma. -exportstatreportlist Optional. You can use this option to specify a comma-separated list of report IDs along with -exportstats or -exportstatshtml to list the reports that you want to export in place of the default reports, or the reports selected under Preferences. To view this setting, navigate to . To copy the report IDs list into your command line, navigate to . Under Select reports to export, select the required reports, and click Copy ID to clipboard. You can then paste the clipboard content on to your command line editor
-execsummary Optional. You can use this option to export all of the reports for the test run in a printable format, also known as an executive summary, to the local computer. You must specify the path to store the executive summary. -execsummaryreport Optional. You can use this option to export a specific report as an executive summary for the test run to the local computer. You must specify the ID of the report to export. For example, to export an HTTP performance report, specify http. You must use this option along with -execsummary.
To copy the report IDs list into your command line, navigate to . Under Select reports to export, select the required reports, and click Copy ID to clipboard. You can then paste the clipboard content on to your command line editor
-usercomments Optional. You can add text within double quotation mark () to display it in the User Comments row of the report. Note: You can use the file CommandLine.exe to run the command to add comments in a language that might not support Unicode characters on Windows operating system.-publishreports Optional. You can use this option to publish test results in Rational® Test Automation Server. The parameters that you can use with it are the following: - FT
- FUNCTIONAL
- STATS
- TESTLOG
You must prefix with
!
to publish all the reports except the specified one.For example, -publishreports "! TESTLOG"
All the reports except the TESTLOG report is published to Rational® Test Automation Server after executing the command.
-stdout Optional. You can use this option to display the information about the test on the command line. After you run a test from the command line, the following outputs are displayed to give you the overall information of the test :
- --VERDICT: The verdict of the test .
- --REMOTE_RESULT: The URL of the result published to Rational® Test Automation Server.
- --REMOTE_RESULT_UI: The URL of the result published to Rational® Test Automation Server and can be opened in a browser to analyze the result.
- --LOCAL_RESULT: The path of the result saved locally.
For example, -workspace workspace_full_path -project proj_rel_path -publishpublish_url -stdout
-swapdatasets Optional. Use this option to replace dataset values during a test . If a test is associated with a dataset, you can replace the dataset at run time while initiating the run from the command line. You must ensure that both original and new datasets are in the same workspace and have the same column names. You must also include the path to the dataset when you run the -swapdatasets command.
For example, -swapdatsets /project_name/ds_path/ds_filename.csv:/project_name/ds_path/new_ds_filename.csv
You can swap multiple datasets that are saved in a different project by adding multiple paths to the dataset separated by a semicolon.
For example, -swapdatsets /project_name1/ds_path/ds_filename.csv:/project_name1/ds_path/new_ds_filename.csv;/project_name2/ds_path/ds_filename.csv:/project_name2/ds_path/new_ds_filename.csv
-history Use this command when you want to view a record of all events that occurred during a test run. However, you must use the command suffixed with any of the following options: - jaeger: To send test logs to the Jaeger UI during the test run.
- testlog: To send test logs as traditional test logs in Rational® Functional Tester during the test run.
- null: To send no test logs either to the Jaeger UI or Rational® Functional Tester during the test run.
For example:-workspace workspace_full_path -project proj_rel_path -suite suite_rel_path -stdout -history comma delimited list of modes-workspace C:/Users/HCL/hclonetest/test_ws -project Project1 -suite test1.testsuite -stdout -history jaegerNote: You can add multiple options separated by a comma to send test logs during the test run to Rational® Functional Tester and the Jaeger UI.For example:-workspace C:/Users/HCL/hclonetest/test_ws -project Project1 -suite test1.testsuite -stdout -history jaeger, testlogFor more information about how to view test logs in the Jaeger UI and Rational® Functional Tester, see related links.
To stop the test run, you can open another command prompt window and use one of the following options with the cmdline option:Command Description -stoprun Optional. Stops the test run after the specified number of seconds. The block is executed, and the test log is transferred before stopping the run. You must use the -workspace command and specify the location of the workspace. -abandonrun Optional. Stops the test run immediately. You must use the -workspace command and specify the location of the workspace. Note: Messages are displayed to indicate when the test is launched and when it is completed unless you include the -quiet option.
Examples of the commands for running tests from the command line
You can run tests from the command line either by using a configuration file or by directly specifying the path of the test in the command. Each command-line option must be followed by an appropriate value.
The contents of a sample configuration file, config_file1 are as follows:
workspace=D:\My Workspace
eclipsehome=C:\Program Files\HCL\HCLOneTest
plugins=C:\Program Files\HCL\HCLIMShared\plugins
project=myProject
suite=mytestsuite
To run tests from the command line by using the sample config file config_file1 you must use the following command:
cmdline –configfile <config file path>For example:
cmdline –configfile E:\Workspace1\Project1\Tests\config_file1.txtTo run the tests from the command line without using a configuration file, you must specify the path of the tests along with the command as follows:
cmdline <path of the test>For example:
cmdline -workspace “D:\My Workspace” -eclipsehome "C:\Program Files\HCL\HCLOneTest" -plugins "C:\Program Files\HCL\HCLOneTest\plugins" -project myProject -suite mytestsuiteThe -workspace command-line option is followed by a value that contains a space. If the value contains space, then you must enclose the value, D:\My Workspace within quotes. Otherwise, you can provide the value without quotes.
What to do next
After you run the test, you may want to export the results for further analysis.