Testing with Rational® Integration Tester
Starting from 9.5.0, you can use Rational® Integration Tester extension to execute API tests. In Rational® Functional Tester, you can either import the projects from Rational® Integration Tester or manage them from Rational® Functional Tester by establishing the connection between the products. In Rational® Functional Tester, you can create a compound test to run the IntegrationAPI tests by using the Agents.
Before you begin
To be able to work with API tests, you must install Rational® Functional Tester Extension for Rational® Integration Tester.
You also need a Rational® Performance Tester agent or a Rational® Integration Tester agent to execute the tests remotely. When installing Rational® Integration Tester agent, it is recommended to choose This Agent will only run probes option.
Moreover, if you update API tests in Rational® Functional Tester and want to apply the updates back to Rational® Integration Tester, you must install Rational® Integration Tester and define the path to its installation directory to set the connection.
- Both the products are installed and you connect to the API project, or you open the API resource directly from Test Navigator view and you work directly with the sources files.
- Rational® Integration Tester is not installed and you import the projects in the
Rational® Functional Tester workspace. Note: The imported tests must be edited in Rational® Integration Tester. Similarly, the compounds tests must be edited in Rational® Functional Tester.
- To execute imported API tests, the Rational® Integration Tester agent must be installed. The environment variable INTEGRATION_TESTER_AGENT_HOME must be defined on each location where the agent is installed, and must point to the root directory of the Rational® Integration Tester agent installation.
Connecting to an existing API project
- In
Rational® Functional Tester, right-click on the Test Navigator, select and click Next.
- In the wizard page, click Browse and select the root folder that contains
the project.
If the path contains a project, its name should automatically appear in Project Name and the Finish button should be enabled.
- In When project is connected, you have to perform one of the following actions:
Setting Rational® Integration Tester preferences
- In Rational® Functional Tester, click .
- Click Browse and set the installation path to Rational® Integration Tester execution file. On Windows, the default location would be C:\Program Files\HCL\IntegrationTester.exe.
- Click Apply and OK.


Opening Rational® Integration Tester resources from the Test Navigator
- Once the preferences are set, you can open an Rational® Integration Tester project.
- In the Test Navigator, open the project root node and children nodes, and
at any level, right-click and select Open in Rational® Integration Tester
Workbench.
If Rational® Integration Tester is automatically detected, the workspace opens for the selected resources.
If Rational® Integration Tester is not detected, a dialog opens on a Preference page where you need to verify the path to the execution file.
- Warning: Rational® Integration Tester cannot open more than one project at a time. If you have another project open, you will get an error. In that case, close Rational® Integration Tester and try to open the project again.
Importing Rational® Integration Tester project
If both the products are not installed on the same machine, you can import an Rational® Integration Tester project in your workspace. Another reason for the import is when you have Rational® Integration Tester installed but you do not want to connect to the Rational® Integration Tester project. In that case, the project is duplicated, any updates in one product workspace will not be reflected in the other product's workspace.
- To import an Rational® Integration Tester project:
- Right-click on the Test Navigator, choose Import and select Existing project into workspace.
- Choose Select root directory or Select archive
file; select a project to import and click Finish.
The selected project appears in the Test Navigator and the compound test editor automatically opens.
Modifying Rational® Integration Tester environments in UI Test perspective
In the compound test, you can select Rational® Integration Tester tests and change the environment of each test. The environments are set in Rational® Integration Tester, you can only change the selection from the edited compound test.
- Open the compound editor and select a test.
- In the Rational® Integration Tester details,
you can browse and change the properties of the selected test. The Test path,
the Environments and Decription are automatically
updated accordingly.
- To select another environment for the Integration Tester test, use the dropdown menu.
Alternatively, you can change the environment selection for a test for a collection of tests:
- Right-click on the tree at any level under a node in the compound test and select Replace Rational® Integration Tester Environments.
- In the Set Invocation Tester Environments wizard, the first page displays
the list of projects that use the selected environment and the number of tests from project that use
this environment in the compound test.
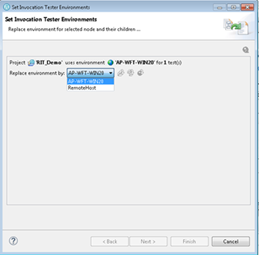
- Select another used environment in the dropdown list. Click Finish. The new choice applies to the selected node and its children.
Next step is to create a compound test in Rational® Functional Tester to run the Integration tests Creating a compound test.
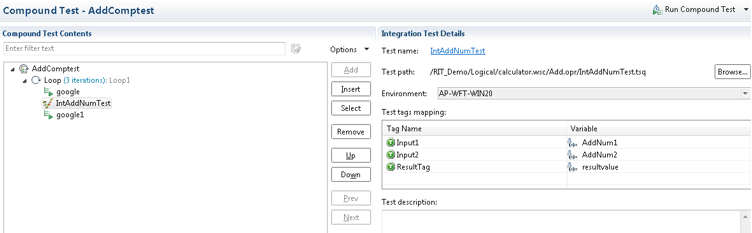
To map the tags in Rational® Integration Tester with variables in Rational® Functional Tester, you must follow these steps:
- Click the Rational® Integration Tester test that contains the tags that you want to map.
The Rational® Integration Tester tags are displayed in the Integration Test Details pane.
- Click the tag that you want to map with the variable in Rational® Functional Tester.
- Click the Ellipses button inline with the tag that you want to map with a
variable.
The Variable Selection dialog box is displayed.
- Select the variable, and then click OK.
The tag is mapped to the selected variable and it is displayed in the Variable column.
You can add a dataset mapper in the compound test for tests that are using multiple tags. See Adding Dataset Mapper to map tags in the Rational® Integration Tester tests with the variable values of Rational® Functional Tester.