Configuring an AFT Suite to run on a mobile device by using variables
After you added the test resources that you created in the desktop client to the project, you can configure an AFT Suite to run on a mobile device from HCL OneTest™ Server. You must specify the variables for the mobile tests to run on mobile devices that are connected to an agent or a device cloud.
Before you begin
- Read Test run considerations for AFT Suites or Functional tests, if you want to configure a run for an AFT Suite that has the agent location configured in the AFT XML file.
- Read Test run considerations for using mobile device clouds, if you want to configure a run on a mobile device cloud.
- Created a variable file if you want to import the variables file. The file must contain the details of the UI Test agent or the device cloud to which the mobile device is connected.
- Read and completed the tasks mentioned in Test run considerations for running tests on remote performance agents, if you want to use a remote agent as the location to run the test.
- Read Considerations for using Jaeger traces in reports, if you want to configure a run and you want Jaeger to report the test results for the test.
- Completed the Xray integration, if you want to export the test results to a Jira issue in your Xray project in Jira. See Integration with Xray test management for Jira.
- Ensured that you are assigned a role as a Member or Project Creator in the team space. See Managing members and their roles in a team space.
- Ensured that you are assigned a role as a Project Owner or Tester in the project. See Managing access to the server projects.
- Created a project in your team space in HCL OneTest™ Server. See Adding a project.
- Added the remote Git repository that contains the test resources to the project. See Adding repositories to a server project.
- Ensured that you are a member of the cloud credential that is configured to connect to the mobile device cloud. See Viewing details of cloud credentials.
About this task
- Remote UI Test agents. Requires the variables at test run time as specified in Variables for the UI Test agent.
- The BitBar Cloud. Requires the variables at test run time as specified in Variables for the BitBar Cloud.
- The BrowserStack Cloud. Requires the variables at test run time as specified in Variables for the BrowserStack Cloud.
- The pCloudy Cloud. Requires the variables at test run time as specified in Variables for the pCloudy Cloud.
- The Perfecto Mobile Cloud. Requires the variables at test run time as specified in Variables for the Perfecto Mobile Cloud.
You must provide the details of the UI Test agent or the mobile cloud to which the mobile devices are connected as variables in Step 10. You can either enter the variables or use the file in which you entered the variables.
| Name of the Variable | Action for the Value field |
|---|---|
|
Mobile_Device_Selection |
Specify the name of the mobile device that is connected to the UI Test agent. For example, Emulator:Pixel_3a_API_33. |
|
appium.server.host |
Specify the hostname or IP address of the UI Test agent. |
|
appium.server.port |
Specify the port on the UI Test agent that is configured to communicate with HCL OneTest™ Server. |
| Name of the Variable | Action for the Value field |
|---|---|
|
Mobile_Device_Selection |
Specify the name of the mobile device that is connected to the BitBar Cloud. For example, BitBar Cloud:Google Pixel 7 Pro. |
|
bitbar.apikey |
Specify the user token generated for your BitBar Cloud account to authenticate your connection with the BitBar Cloud. |
|
bitbar.host |
Specify the hostname of the BitBar Cloud instance. |
|
bitbar.project |
Specify the name of the project that contains the recorded test. |
|
bitbar.testrun |
Specify a name for the test run that must be displayed in the BitBar Cloud dashboard for the test run. |
| Name of the Variable | Action for the Value field |
|---|---|
|
Mobile_Device_Selection |
Specify the name of the mobile device that is connected to the BrowserStack Cloud. For example, BrowserStack Cloud:Google Pixel 7 Pro. |
|
browserstack.host |
Specify the URL of the BrowserStack Cloud instance. |
|
browserstack.username |
Specify the user name of your BrowserStack Cloud account. |
|
browserstack.apikey |
Specify the API key of your BrowserStack Cloud account to authenticate your connection with the BrowserStack Cloud. |
|
browserstack.project |
Specify the name of the project that contains the
recorded test.
Note: This
variable is optional. |
| Name of the Variable | Action for the Value field |
|---|---|
|
Mobile_Device_Selection |
Specify the name of the mobile device that is connected to the pCloudy Cloud. For example, pCloudy Cloud:Google Pixel 7 Pro. |
|
pcloudy.apikey |
Specify the API key that is generated for your pCloudy Cloud account to authenticate your connection with the pCloudy Cloud. |
|
pcloudy.username |
Specify the username with which you can access the pCloudy Cloud instance. |
|
pcloudy.host |
Specify the hostname of the pCloudy Cloud instance. |
| Name of the Variable | Action for the Value field |
|---|---|
|
Mobile_Device_Selection |
Specify the name of the mobile device that is connected to the Perfecto Mobile Cloud. For example, Perfecto Mobile Cloud:Google Pixel 7 Pro. |
|
perfecto.securitytoken |
Specify the user token generated for your Perfecto Mobile Cloud account to authenticate your connection with the Perfecto Mobile Cloud. |
|
perfecto.host |
Specify the hostname of the Perfecto Mobile Cloud instance. |
Procedure
-
Log in to HCL OneTest™ Server.
The team space that contains your project is displayed.
- Open the project that contains the test assets, and then click Execution.
-
Select the branch of the repository that contains the test
assets.
The test assets that are contained in the selected branch of the repository are displayed in the following tabs on the Execution page:
Tab Description SUITES Lists all suites, Compound Tests, JMeter tests, JUnit tests, Postman tests, Rate Schedules, Selenium tests, or VU Schedules that are in the selected branch of the repository. TESTS Lists all API tests, functional tests, or performance tests that are in the selected branch of the repository. ADVANCED Lists all assets that are displayed when custom filters are applied for assets in the selected branch of the repository. - Click the SUITES or the ADVANCED tab.
-
Identify the test asset that you want to run by performing any of the
following actions:
- Scroll through the list.Tip: You can hover over the icon in the Type column to know the type of the test asset.Note: You can also identify the type of the asset from the icon that represents the test type as shown in the following table:
Icon Represents Listed in the SUITES tab Listed in the TESTS tab Listed in the ADVANCED tab 
API test 

Functional test 
Performance test 
AFT Suite 
API Suite 
Compound Test 
HCL AppScan CodeSweep 
JMeter Test 
JUnit Test 
Postman test 
Rate Schedule 
Selenium test 
VU Schedule - Search for the test asset by entering any text contained in the test asset name in the Search field.
- Click the Filter icon
 in the SUITES or
TESTS tab to filter the displayed
assets based on the asset type.
in the SUITES or
TESTS tab to filter the displayed
assets based on the asset type. For example, select API Suite in the SUITES tab to display all API Suites or select Functional Test in the TESTS tab to display all functional tests that are in the selected branch of the repository.
- Click the Filter icon in the ADVANCED tab, and
then create a filter query by using the New
filter option by performing the following
steps:
- Click New filter.
- Enter a name for the filter.
- Select an operator, and then add a rule or a group of rules.
- Add or enter the relevant parameters and either
select or enter the condition and the criteria for
the condition.You can select a parameter from the following list:
- Type
- Test Asset Name
- Test Asset Path
- Last Result
- Next Run
- Components
- Save the filter query to save and apply the filter
query to filter the assets based on the query.
The test assets that match the filter criteria are displayed.
- Retrieve and apply a saved filter query, if you have saved
filter queries previously by performing the following
steps:Note: The filter query applied previously is selected and the assets based on that filter query are displayed. To apply a different filter query, you must have created and saved the filter query.
- Click the Filter icon in the ADVANCED
tab.
The filter queries that you created and saved are displayed.
- Click the filter that you want to apply.
The test assets that match the filter criteria are displayed.
- Click the Filter icon
You have identified the test asset that you want to run.
Clicking the test name displays the Details panel. You can view the details of the test such as the description, the branch in the repository that contains the asset, the Git details, and the details of the commits to the repository. You can also view the history of the test runs for the specific test under the History tab of the Details panel.
- Scroll through the list.
-
Click the Execute icon
 in the row of the identified test asset.
The Execute test asset dialog is displayed.Notes:
in the row of the identified test asset.
The Execute test asset dialog is displayed.Notes:-
If you have configured some or all of the settings for the current test run, and you do not want to continue with those settings, you can reset the settings by clicking Reset.
-
If you want to repeat a test run and do not want to use the saved settings from a previous run, you can reset all the saved settings to their default values by clicking Reset.
-
-
Select the version of the test resources
that you want to run by completing any of the following
actions:
Note: The test resources in the version can contain the test assets, datasets, AFT XML files, API environment tags, and other resources specific to projects that are created in any of the desktop products.
- Expand the list in the Version field,
find the version of the test resources, and then select the
version.Use the following details about the version of the test resources that are displayed to identify the version that you want:
- Commit message.
- Tags labeled by the user for the version committed.
- The user who committed the version to the repository.
- Relative time of the commit. For example, 2 hours ago or 3 days ago.
The list displays the versions of the test resources committed by all users to the branch in the repository. The versions are arranged with the latest version that is committed, and then followed by the versions committed previously.
- Expand the list in the Version field,
and then search for the version that you want to select by
entering a partial or the complete commit message of that
version.
The version that matches the search criteria is displayed and it is selected for the test run.
The default value for the version selected for the run is the latest version in the selected branch of the repository. If you do not select any version, then the latest version is selected for the test run.Notes:- If you selected a version but you do not want to use
that version in the test run, you can remove the
selected version by clicking the
 icon. As a result, the default version is
selected for the test run.
icon. As a result, the default version is
selected for the test run. - If you repeated a test or ran the test again from the
Results page, then the version
of the test resources that you chose for the earlier run
is shown as selected. You can either retain this version
or select any other version from the list. You can also
remove the previous version by clicking the icon.
- Expand the list in the Version field,
find the version of the test resources, and then select the
version.
-
Select the time for scheduling the test run from the following
options:
- No action is required if you want to
initiate the test run immediately after you click
Execute.Important: Click Execute only after you have configured the other settings in this dialog.Note: The default time for scheduling a run is Now.
- Select Schedule and perform the
following actions if you want to schedule a single test run
or configure recurring test runs:
Schedule Actions A single test run Perform the following steps:- Click the Calendar icon
 in the row of the
Start field.
in the row of the
Start field. - Select the date.
- Select the time at which the test run must start.
- Select the Never option in the Repeat every field.
- Click Save.
The test run is scheduled to run at the selected time on the scheduled date.
Recurring test runs Perform the following steps:- Click the Calendar icon
in the row of the
Start field.
- Select the date.
- Select the time at which the test run must start.
- Set the frequency at which the test runs must
run by entering the number in the
Repeat every field, and
then select the period from the list. You can
select from the following options:
- Minute
- Hour
- Day
- Week
- Month
For example, if you want the test run to be run every day at the set time, enter 1 and, then select the Day(s) option.
You can also schedule the test to run at the set time on specific weekdays by selecting the Week(s) option. For example, the following image displays the days selected for the test runs as Monday, Wednesday, and Friday: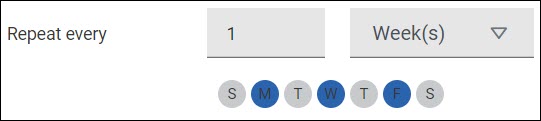
- Set the option to end the recurring test runs
from the following options:
- Select the Never option, if you do not want the recurring test runs to end.
- Select the On option,
and then click the Calendar
icon . You can select the date and time after
which the scheduled test runs do not run.
- Click Save.
The recurring test runs are scheduled to start the first run at the selected time on the scheduled date, and to repeat the run at the frequency that you set.
- Click the Calendar icon
- No action is required if you want to
initiate the test run immediately after you click
Execute.
-
Enter a label for the test run
that helps you to identify the test on the
Results page.
After the test run completes, the label that you entered is displayed for the test under the Labels column on the Results page. After you have created a label, any member of the project can use that label.
The default value for the Label field is null or an empty field.
Important: The configuration that you set for the test run in the Execute test asset dialog is preserved when you run the same test again. Those changes are not visible when another user logs in to HCL OneTest™ Server. For example, if you created new variables on the server, those variables are available only for you when the same test is run again.If you want to run the test immediately or at the scheduled time, click Execute, or continue with the next step.
-
Perform the following steps to provide the variables that specify the
device cloud to which the mobile device is attached. You can either
enter the variables that must be passed to the test at the test run time
or import the file that contains the variables.
-
Choose one of the following methods
to add the variables:
- To add new variables manually, click
the Add Variable icon
 , enter the name, and value of the
variable.
, enter the name, and value of the
variable. - To add new variables from your
local computer or from the Git repository that is
associated with your server project, click the
Upload icon
 and select the Upload from local
system or Browse from
server to select the variable
file.Note: You must have created a file with the variables before you can select the file.
and select the Upload from local
system or Browse from
server to select the variable
file.Note: You must have created a file with the variables before you can select the file.
- To add new variables manually, click
the Add Variable icon
-
Choose one of the following methods
to add the variables:
-
Follow the instructions if you want to export the test results to a
Jira issue in your Xray project in Jira:
- Perform any of the following actions that depend on whether you are using a remote performance agent or a mobile device cloud:
-
Follow the instructions if you want to run the tests on the remote
performance agent that is connected either to the default Kubernetes
cluster or the remote Kubernetes cluster:
-
Click Execute.
The test run is initiated.
Results
What to do next
- Stop the test run at any point after the test run is initiated from the Execution page. See Stopping test runs.
- Cancel a scheduled test run from the Execution page. See Canceling scheduled test runs.
- View all the states of the test asset by
clicking the Show in the Progress page icon
 for the test asset for which you started or scheduled the
run. See Viewing the state of test assets.
for the test asset for which you started or scheduled the
run. See Viewing the state of test assets. - View the progress of the test from the Progress page. See Viewing the progress of running test assets.
- View the results, reports, and logs of the test from the Results page after the test completes the run. See Test results.