LDAP user administration
HCL OneTest™ Server uses Keycloak (https://www.keycloak.org/) to manage and authenticate users.
Existing user databases hold user credentials. Keycloak federates these existing external user databases through the concept of storage providers. By default, Keycloak supports an LDAP and Active Directory storage provider. By adding a storage provider, you can map LDAP user attributes into Keycloak. You can also configure more mappings.
- Set up your LDAP/AD provider as a read-only repository so that HCL OneTest™ Server cannot change it.
- Add and remove users in LDAP/AD and not the Keycloak local user database.
- Import and synchronize your LDAP/AD users to your Keycloak local database.
- Map a login style name, for example,
user1@server.com, by using theUserPrincipalNameattribute in LDAP/AD to ausernamein Keycloak. If you want the full name of the user as your login style, use thecnattribute in LDAP/AD.Note: The LDAP/AD username attribute must match the LDAP/AD provider username attribute (Username LDAP attribute) in Keycloak for the LDAP/AD provider to connect with Keycloak.
The following sections use these best practices to guide you to set up Keycloak to connect to your LDAP/AD HTTP server.
LDAP provider selection in Keycloak
You can use the Keycloak Admin Console to add an LDAP/AD provider.
https://<fully-qualified-dns-nam>auth/admin/master/console/#/testserver.
The default username for the Keycloak administrator is
keycloak. The password is randomly generated when you installed
the HCL OneTest™ Server software. You
can see the password by using the following kubectl command:
kubectl get secret -n test-system {my-ots}-keycloak-postgresql -o jsonpath="{.data.password}" | base64 --decode; echo{my-ots} with the release name that you used during the
installation of the server software.After you log in, you can go to the User Federation page to add your provider.
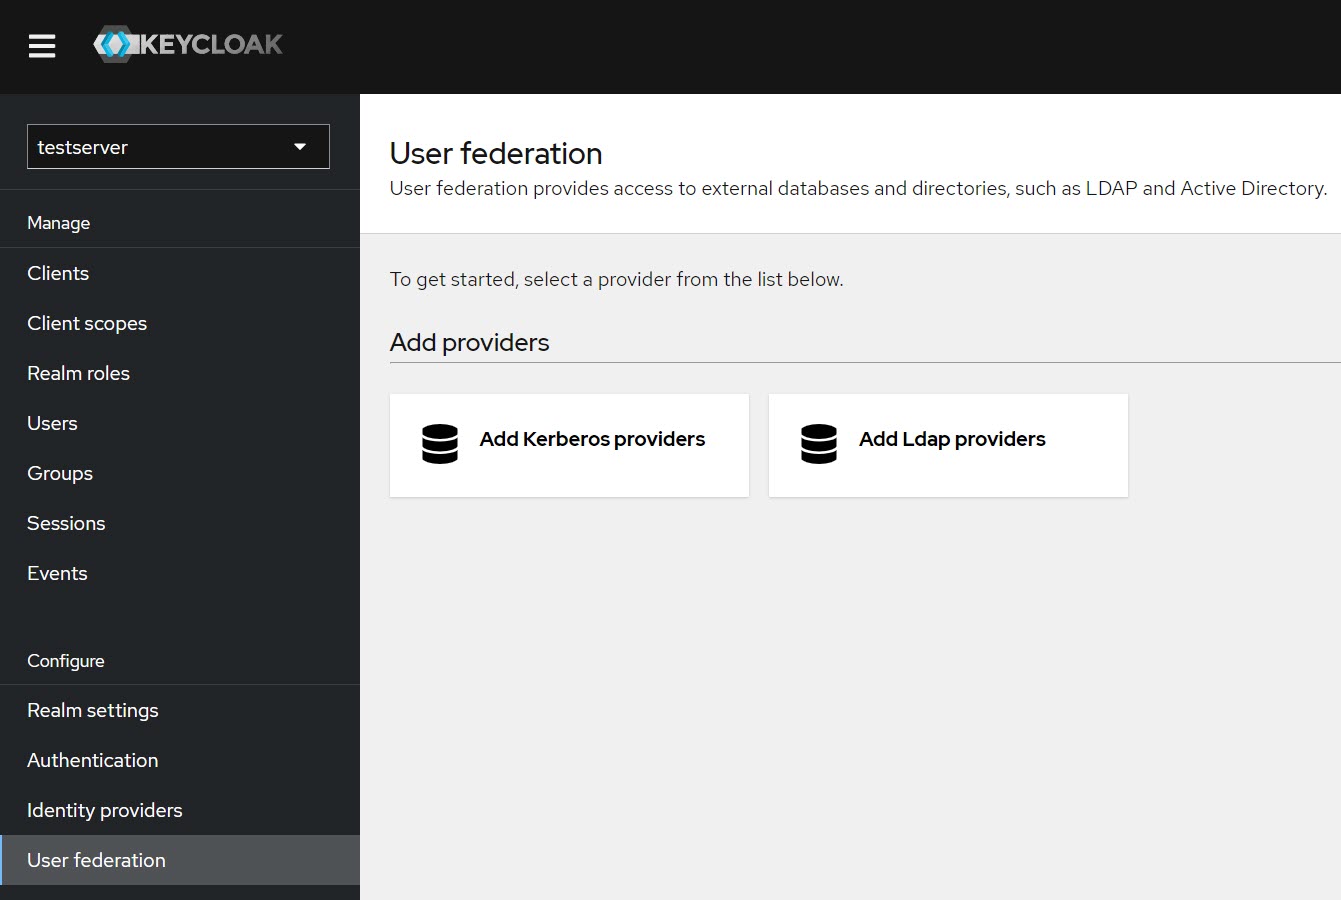
You must select the Add Ldap providers option and complete your LDAP/AD connection parameters.
Required settings for a successful connection to your LDAP/AD provider
In the Add Ldap provider page, you must complete the fields or select the required values from the list in the field to ensure a successful HTTP connection to your LDAP/AD provider.
| Section | Field | Action |
|---|---|---|
| General options | Console Display Name | Enter a name for the LDAP server that you can identify when it is displayed in the Keycloak Admin Console. For example, you can enter the name as LDAP. |
| Vendor | Select the vendor that is providing the LDAP service from the list of providers. For example, you can select Active Directory from the list of vendors. | |
| Connection and authentication settings | Connection URL | Enter the LDAP/AD URL so that
Keycloak can connect to your LDAP/AD user database. For
example,
ldap://<hostname>.<domain>. |
| Enable StartTLS | Set to On, if you want to use a secure connection. | |
| Test connection | Click to test the connection with the LDAP server. | |
| Bind type | Retain the default value set as simple. | |
| Bind DN | Enter the user ID of the
LDAP/AD user database administrator. Make sure that you test the authentication and confirm that the authentication is successful. |
|
| Bind credentials | Enter the password of the user ID of the LDAP/AD user database administrator. | |
| Test authentication | Click to test the authentication with the LDAP server database. | |
| LDAP searching and updating | Edit mode | Select the
READ_ONLY option from the
list. This setting means that your LDAP/AD user
database is read-only. No user data defined through the
mapping of attributes in Keycloak such as the
This read-only setting also means that a new user cannot sign up from HCL OneTest™ Server as no user data can be written to your LDAP/AD user database. |
| Users DN | Enter the directory where the
LDAP users are listed, for example,
cn=Users,dc=OneTest,dc=COM. |
|
| Username LDAP attribute | Retain the default value
cn for the username,
which is a first name, last name, or you can use
userPrincipalName, which is
username@domain. You might want a login that matches your company style. For example, you might prefer joetester@mycompany.com instead of Joe Tester. If
you do make this change the |
|
| User object classes | Enter the User Object Classes as User because LDAP user records are found based on a user object class. | |
| User LDAP filter | Enter the filter so that a
subset of all your LDAP users are imported as users by
Keycloak. For example, you can set up an OTS
user group for your LDAP/AD user database such that only
those users are imported to Keycloak.
|
Mappers
Keycloak uses mappers to map the user attributes defined in the Keycloak user model such as username and email to the corresponding user attributes in the LDAP/AD user database. By default, when you saved your settings and created your LDAP/AD provider, the following mappers were created.
The username attribute that you specified in the Username LDAP attribute must match the username attribute defined in the Keycloak mapper for the LDAP/AD user database to connect with Keycloak.
Because you changed the Username LDAP attribute from the default value cn to userPrincipalName, Keycloak made the same change in the mapper called username to match.
User synchronization
You must import all users from your LDAP/AD user database by using the option to Synchronize all users. Users are imported based on your saved settings when you set up your LDAP/AD provider.
A successful import is followed by a success message with the number of users imported.
You can view all the LDAP/AD database users that were imported and authenticated from the Users page in the Keycloak Admin Console.
Users are listed with Username, Email, Last Name, and First Name. The value of the other attributes is fetched from the LDAP/AD user database by using mappers.
- The User logon name field under the Account tab of that LDAP/AD user is blank.
- The value of the Custom User LDAP Filter field to import only a subset of all LDAP users does not match with the LDAP set of users.
You can check the log file of the Keycloak pod to understand the reason for the failed import.
- Run the following command to view the list of all
pods:
kubectl get pods -n test-system - Identify the Keycloak pod
ssocloak-0. - Run the following command to view the log of the Keycloak
pod:
kubectl logs {my-ots}-ssocloak-0 -n
                                            test-system
Note: Where, {my-ots} is the name of the release that is provided during the installation of the server software.The log file of the Keycloak pod is displayed.
12:49:00,535 ERROR [org.keycloak.storage.ldap.LDAPStorageProviderFactory] (default task-40)
Failed during import user from LDAP: org.keycloak.models.ModelException: User returned from LDAP has null username!
Check configuration of your LDAP mappings.
Mapped username LDAP attribute: userPrincipalName, user DN: CN=DefaultAccount,CN=Users,DC=ONETEST,DC=COM,
attributes from LDAP: {whenChanged=[20190527143130.0Z], whenCreated=[20190527143130.0Z], cn=[DefaultAccount],
userAccountControl=[66082], pwdLastSet=[0]}