Managing an encrypted dataset
You can use encrypted datasets to limit access to confidential information such as account number or passwords. You can arrange data by an appropriate category so that project members can use datasets more effectively in certain tests and protect them.
About this task
- You must grant access and provide an encryption key of an encrypted dataset to other members of the project to work with the encrypted dataset.
- A project member who has been added as a Tester role can work with the encrypted dataset.
Creating a classification
As a project Owner, you can organize encrypted datasets by creating a classification so that project members can use and protect datasets more efficiently.
Before you begin
- Created a project in . See Test assets and a server project.
- Configured the repository that contains the test assets in your project. See Adding repositories to a server project.
- Created at least one dataset and encrypted the dataset with an encryption key. See Dataset encryption.
About this task
Procedure
- Login to , if you are not already logged in.
- Open a project from the team space.
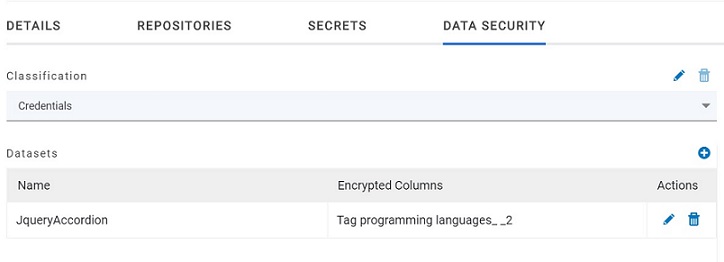
- Click Manage, and then the DATA SECURITY tab.
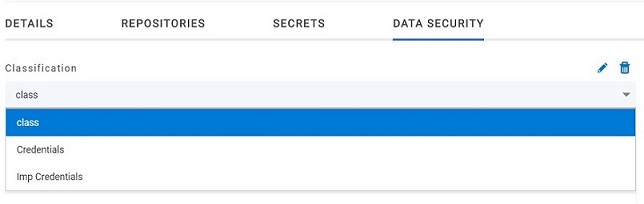
- Click New classification and enter a name for the classification.
- Click Create.
-
Click the Add icon
 to select the encrypted dataset to become part of the new classification.
-
Select a dataset from the list and enter the encryption key in the
Password field for the dataset, and then click
the Add icon.
The encrypted dataset that is added to the classification is displayed.
What to do next
Editing or deleting a classification
After you have created a classification, you can edit the name of the classification. You can also delete a classification when it is not required in your test environment.
Before you begin
- Created at least two classifications. See Creating a classification.
About this task
You can opt to edit or delete a classification for your project any time after you create a classification. For example, you might want to edit the name of the classification or delete the classification if the classification that is created earlier are not required.
Procedure
-
Perform the following steps to edit a classification:
-
Select a classification that you want to edit from the list.
-
Click the Edit icon
 to edit the selected classification.
-
Select a classification that you want to edit from the list.
-
Perform the following steps to delete a classification:
-
Click the Delete icon
 .
.
-
Click the Delete icon
Results
- You have edited the name for a classification in your project.
- You have deleted a classification.
Moving an encrypted dataset to another classification
When you add many encrypted datasets to the same classification, you can move some of them to another classification.
Before you begin
Procedure
-
-
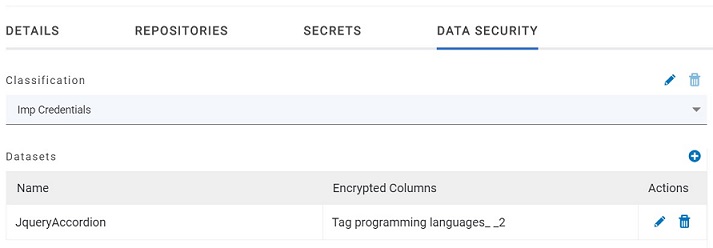
- Select a classification from the list that has the encrypted dataset.
-
Click the Edit icon from the Actions column of a dataset.
- Select a classification from the list and enter the encryption key of the dataset in the Password field.
-
Click Save.
A classification for a dataset is updated successfully.
Results
Removing a dataset from the classification
You can remove a datasets added to a classification when they are no longer required.
Before you begin
- Created a classification and added the encrypted dataset to it. See Creating a classification.
Procedure
-
-
- Select a classification from the list that has an encrypted dataset.
-
Click the Delete icon from the Actions column of a dataset.
-
Click Remove in the Change the
classification for the Dataset window.
Note: Removing dataset from the classification also removes the password stored in for encrypted data. You must enter the password again to gain access to the encrypted columns.
Results
Granting classification access to members or members roles
You can grant or revoke access to the classification in your project to individual members with different roles or the all members with a specific role. Without access to the classification, members cannot view, create, edit, delete, or use the classification.
Before you begin
You must be a project Owner and have completed the following tasks:
- Added one or more users to your project. See Adding users to a project.
- Created at least one classification. See Creating a classification.
Procedure
-
-
- Select the classification from the drop-down list.
-
Choose any of the following methods to grant access to a member:
-
To add all members with a specific role, click the role listed under Grant access to role. For example, if you select Testers then all members in the project with a tester role are granted access to the selected classification. You can select any role or all the roles listed.
-
To select specific members to grant access to the selected classification, enter the name or the email ID of the member in the Grant access to member field and add them from the list that displays.
Note: Members added specifically are listed under Members with access to this classification but the members added for a role are not displayed.Important: Irrespective of the role that the member (Owner, Tester or Viewer) was assigned in the project, the access to the classification has to be specifically granted to the members from the DATA SECURITY tab. -
-
Choose any of the following methods to revoke access from a member:
-
To remove all members with a specific role, click the role listed under Grant access to role to clear the selection. For example, if Testers is selected and you clear it, then all members in the project with a tester role are removed from the access list to the classification.
-
To remove specific member with access to the classification, select the member and click the Delete icon
 .
.
Notes:- Any member with access to the classification can remove access of other members specifically added or of all members with a specific role.
- Members with access to the classification can remove themselves from the access list provided that there is at least one member in the list. After removing themselves, members cannot add themselves back to the access list and must be added by any of the other members in the list.
-