Running HCL OneTest Performance tests in an Azure DevOps Pipeline

After you create the tests in HCL OneTest Performance for the application that you are testing, and after you install the HCL OneTest Studio extension in your organization, you can run the tests in Azure DevOps pipelines.

Before you begin

You must have completed the following tasks:

About this task

After you add the HCL OneTest Studio extension in your Azure DevOps organization, you can use an existing pipeline or create a new one to add HCL OneTest Performance test tasks. You can install an agent or use the one that you installed in your default agent pool. You can add the HCL OneTest Performance tests to your task for the agent job, configure the task, and then run the task in the Azure DevOps pipeline.

Procedure

  1. Open your Organization page in Azure DevOps and perform the following steps:
    1. Click the project you want to use.
    2. Initialize the repository by performing the following steps:
      1. Click Repos from the left pane.
      2. Click Initialize from the Initialize with a README or gitignore section.
        Note: Select the Add a README check box if it is not selected.
    3. Click Pipelines from the left pane.
    4. Click Create Pipeline.
    5. Click Use the classic editor to create a pipeline without YAML.
    6. Verify the project, repository, and branch for manual and scheduled builds, and then click Continue.
    7. Click Empty job.
  2. Select Pipeline and complete the following steps:
    1. Change the name for the build pipeline if required.
    2. Select the Agent pool for your build pipeline.

      You can use the agent from the default agent pool or use the one you have installed.

    3. Select the Agent Specification for the agent if required.
  3. Add a task to the agent job by completing the following steps:
    1. Click the Add Task icon Add Task icon in Azure DevOps pipeline for the agent job.

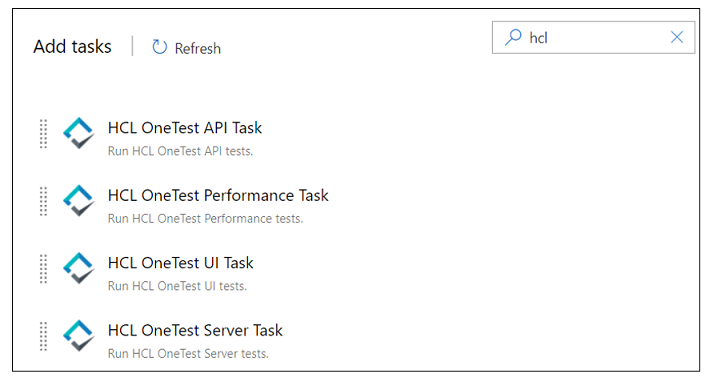
      The Add tasks pane is displayed.

    2. Search for the HCL tasks defined in the HCL OneTest Studio extension.

      The tasks that you can select are displayed.

      HCL Task selection in Azure DevOps

      Depending on the type of test that you have created in HCL OneTest Performance, you can select the type of task. You must use the following table to identify the task you must select:

      Type of test Task to select
      • Compound tests
      • Performance tests
      • Schedules
      HCL OneTest Performance Task
    3. Select the HCL OneTest Performance Task option, and then click Add to add the task to the agent job.

      The selected task is added to the agent job and it is displayed with a warning that some settings require attention. You must configure the settings mentioned in step 4.

      You can also remove the tasks that are not required in your job. Select the tasks in the list that you want to remove. You can then right-click the tasks, and click Remove selected task(s) to remove them.

  4. Configure the settings by performing the following steps:
    1. Select the task version from the list if required.
    2. Follow the action for the performance task by referring to the following table:
      Note: All mandatory fields are marked with an asterisk (*) in the UI.
      Field Action
      Display name Displays the name of the selected task.Enter the name of the task.
      Product Path

      The complete path to the directory that contains eclipse.exe.

      Enter the complete path of the installation directory of the desktop client. For example, C:\Program Files\HCL\HCLOneTest
      IMShared Path The path to the IMShared folder on your local computer.Enter the complete path to the location of the HCLIMShared folder. For example, C:\Program Files\HCL\HCLIMShared
      Workspace Location The complete path to the Eclipse workspace.Enter the complete path of the Eclipse workspace.
      Project Name The name of the project containing the test.Enter the name of the project containing the test.
      VM Arguments Java virtual machine arguments to pass in.
      Enter the Java virtual machine arguments.
      Note: You can add multiple virtual machine arguments files separated by a comma.
      Test Suite Name The name of a test within the project to use. A test can be a performance test, schedule, or compound test.Enter the name of the test that you want to run.
      Var File The complete path to the XML file that contains the variable name and value pairs.Enter the complete path to the location of the variable file.
      Dataset Override For a test or schedule, the default value is the dataset specified in the test editor or schedule editor. Overrides the default dataset value to run if required.Use the Dataset Override option to replace dataset values during a test or schedule run. If a test or schedule is associated with a dataset, you can replace the dataset at run time while initiating the run from the command line.
      Note:

      You must use the Dataset Override option to replace the dataset values during a test or schedule run. You must ensure that both original and new datasets are in the same workspace and have the same column names. You must also include the path to the dataset.

      For example,

      /project_name/ds_path/ds_filename.csv:/project_name/ds_path/new_ds_filename.csv.

      You can swap multiple datasets that are saved in a different project by adding multiple paths to the dataset separated by a semicolon (;).

      For example,

      /project_name1/ds_path/ds_filename.csv:/project_name1/ds_path/new_ds_filename.csv;/project_name2/ds_path/ds_filename.csv:/project_name2/ds_path/new_ds_filename.csv
      Resource Monitoring Labels Override For a schedule (Rate schedule or VU schedule), use Resource Monitoring Labels Override to perform any of the following actions:
      • To enable the Resource Monitoring from Service option for a performance schedule if the Resource Monitoring from Service option is not enabled from the schedule editor in HCL OneTest Performance.
      • To ignore Resource Monitoring sources that were set in the performance schedule and to change for a label matching mode.
      • To replace an existing set of Resource Monitoring labels that were set in the performance schedule and run the schedule with a new set of Resource Monitoring labels.
      Note: You can add multiple Resource Monitoring labels separated by a comma.
      Important: You must add the Resource Monitoring labels to the Resource Monitoring sources on the Resource Monitoring page in your HCL OneTest Server project.
    3. Expand Control Options and configure the settings for your task if required.
    4. Expand Output Variables and configure the settings for your task if required.
  5. Select the following options:
    1. Click Save to save the configured settings for the task.
      Note: The task is not queued for a run.

      You can save the task to a build pipeline and opt to run the build at a later time.

    2. Click Save & queue to save the configurations and queue the run in the pipeline.

      The Run pipeline dialog box is displayed.

  6. Complete the following steps:
    1. Enter a comment for the test in the Save comment field.
    2. Select the agent that you configured for the test from the Agent pool list.
    3. Select the agent specification from the Agent Specification list for the agent if required.
    4. Select the branch from the Branch/tag list.
    5. Add the variables and demands for the task run from the Advanced Options pane if required.
    6. Select the Enable system diagnostics check box for a detailed log view.
    7. Click Save and run.

      The pipeline summary page displays the progress of the job run.

Results

You have run the tests for the application by using the ,HCL OneTest Studio extension in the Azure DevOps pipeline.

What to do next

You can open the job to view the task logs from the pipeline summary page.

You must click the task to open the Task page to view the test results.

In HCL OneTest Performance, if the HCL OneTest Server URL is configured in Window > Preferences > Test > HCL OneTest Server and Publish result after execution is set as Always in Window > Preferences > Test > HCL OneTest Server > Results, then the Reports information section on the Task page displays the names of the report along with its corresponding URLs. The report URLs are the HCL OneTest Server URLs where the reports are stored. You can access the report URLs to view the test execution information at any point of time.