Preparing to record a test for the HTTP/2 service
To test a web service that is based on the HTTP/2 protocol, record a test by using the SOA extension of HCL OneTest™ Performance. Before recording the HTTP/2 service, follow the procedure in this topic to configure your computer.
About this task
Use Mozilla Firefox or Google Chrome when recording on servers that support the HTTP/2 service.
Procedure
- Download the following Application Layer Protocol Negotiation (ALPN) boot jar file https://mvnrepository.com/artifact/org.mortbay.jetty.alpn/alpn-boot/8.1.8.v20160420
- Create or rename the productInstallDir\jdk folder to ..\jdk.ibm. You can rename the folder back to jdk later to test with the IBM JDK.
- Download Oracle Java 1.8.0u92 from http://www.oracle.com/technetwork/java/javase/downloads/jdk8-downloads-2133151.html. You can then either extract the compressed file or install Java at productInstallDir\jdk.
- Copy the ALPN jar file to productInstallDir\majordomo\lib.
-
From productInstallDir, open eclipse.ini and add the
following flags:
-Xbootclasspath/p:<productInstallDir>\majordomo\lib\alpn-boot-8.1.8.v20160420.jarNote: If there are any other flags starting with -X, delete those flags. -
Configure HCL OneTest™ Performance Agent to
use Oracle Java.
-
When you record a service by using a web browser against an HTTP/2 client, the HTTP/2 traffic
is automatically captured. But, to record an HTTP/2 service by using the GSC client, in the HTTP
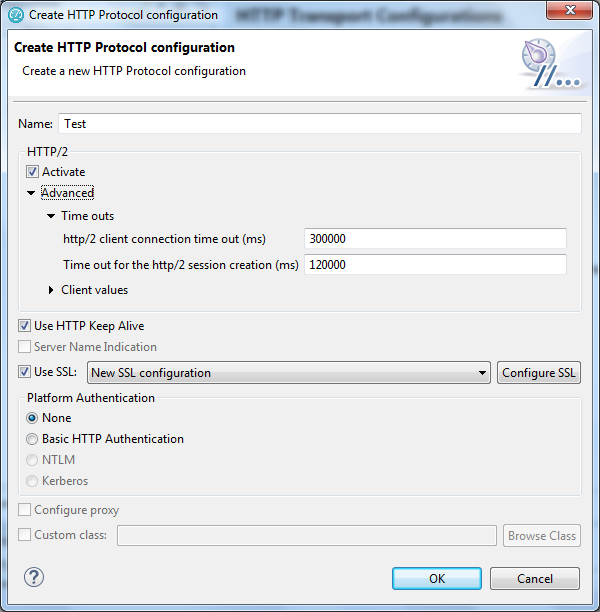
transport protocol configuration dialog box, you must select the Activate
check box.
-
Specify the following configuration options for HTTP/2:
- HTTP/2
- Note: Testing HTTP/2 service is in the Beta mode. For more information, see Preparing to record a HTTP/2 service.To test a service that uses the HTTP/2 protocol, select the Activate check box. This check box is automatically selected when you record a service by using a browser. If you use the Generic Service Client component to create a HTTP/2 test, you have to manually select the check box.
- HTTP/2 client connection timeout
- Specifies the time limit for the HTTP/2 client to connect to the HTTP/2 server.
- Time out for the HTTP/2 session creations
- Specifies the time limit to create the HTTP/2 session. This time starts after the connection is established.
- Enable HTTP/2 Push
- The Push functionality of HTTP/2 automatically identifies and passes the related objects or requests to the client when a request is sent to the server. Clear the check box to not use the functionality.
- Initial session window
- Specifies the buffer size on the sessions.
- Initial stream window
- Specifies the window size for buffer on each stream after the connection is established.
- HTTP/2 Client Input Buffer Size
- Specifies the buffer size that is used to read the network traffic.
- Maximum Quantity of Messages that can be queued
- Specifies the maximum number of messages that can be queued for the HTTP/2 client on a thread.
- Maximum Quantity of HTTP/2 thread pool
- Specifies the maximum number of thread pools that will be used by the HTTP/2 client to distribute the workload.
- Minimum Quantity of HTTP/2 thread pool
- Specifies the minimum number of thread pools that will be used by the HTTP/2 client to distribute the workload.
- HTTP/2 client bytebuffer pool size
- Specifies the buffer size to receive the unciphered values.
- Server Name Indication
- Note: Not applicable for HTTP/2.Clear this check box if you do not want to connect to the host computer by using the Server Name Indication protocol. If the host computer is already configured with Server Name Indication protocol, you should keep this check box selected.
- Use HTTP Keep Alive
- Select this option to keep the HTTP connection open after the request. This option is not available if you are using IBM® Rational® AppScan®.
- Use SSL
- Select this option to use an SSL configuration. Click Configure SSL to create an SSL configuration or select an existing configuration.
- Platform Authentication
- In this section, specify the type of authentication that is required
to access the service. Select None if no authentication
is required.
- Basic HTTP authentication
- Select this option to specify the User Name and Password that are used for basic authentication.
- NTLM authentication
- Note: Not applicable for HTTP/2.Select this option to use the Microsoft™ NT LAN Manager (NTLM) authentication protocol. NTLM uses challenge-response authentication. This view lists what is negotiated (supported by the client and requested of the server) and what is authenticated (the client reply to the challenge from the server).
- Kerberos authentication
- Note: Not applicable for HTTP/2.Select this option to use the Kerberos authentication protocol between the client and server.
- Connect through proxy server
- Note: Not applicable for HTTP/2.If the HTTP connection needs to go through a proxy server or a corporate firewall, specify the Address and Port of the proxy server. If the proxy requires authentication, select either Basic proxy authentication or NTLM proxy authentication.
- Proxy authentication
- In this section, specify the type of authentication that is required to access the proxy. Select
None if no authentication is required.
- Basic proxy authentication
- Select this option to specify the User Name and Password that are used for basic authentication.
- NTLM proxy authentication
- Select this option to use the Microsoft™ NT LAN Manager (NTLM) authentication protocol. NTLM uses challenge-response authentication. This view lists what is negotiated (supported by the client and requested of the server) and what is authenticated (the client reply to the challenge from the server).
- Custom class
- Note: Not applicable for HTTP/2.Select this option if the communication protocol requires complex, low-level processing with a custom Java™ code to transform incoming or outgoing messages. Click Browse to select a Java™ class that uses the corresponding API. This option is not available in IBM® Security AppScan®.
- Click OK. You have configured the workbench to test an HTTP/2 service.