Creating tests with the Publish-Subscribe MEP

You can use the Publish-Subscribe messaging pattern in your tests. You can send a message from HCL OneTest API by using an email account configured for the sender as a publish action to an email account configured as the recipient. With the subscribe action you can pull the messages into HCL OneTest API that are received in an email account to which you have subscribed.

Before you begin

You must have configured the email accounts for the Publish-Subscribe MEP. See Configuring the MEP settings for the email transport.

You must have created an operation and opened the operation in the Test Factory view to perform this task.

Procedure

  1. Create a test that uses MEP by right-clicking the operation and selecting New > Tests > Tests using MEP.
  2. Enter a name for the test and then click OK.

    For example, the name of the test can be Test_Publish-Subscribe.

    The test is created in the operation. Because the MEP for the Publish-Subscribe action was configured, the test is created with the settings configured for the Publish-Subscribe action in the MEP tab for an operation. The transport that was set in the MEP tab for the operation is selected.

    For example, the Publish-Subscribe action is displayed in the Test Factory for the email resource that shows the schema as text and the email as the transport resource for both the Publish and the Subscribe actions.Image of the publish subscribe action in the test.
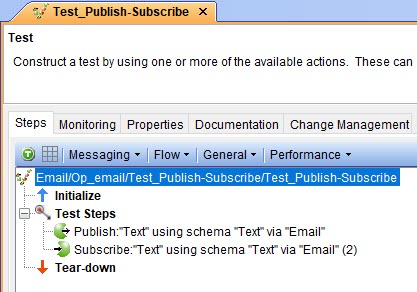
  3. Select your action from the following options:
    • You can run the test with the parameters configured for the MEP. Go to Step 5.
    • You can modify any of the parameters in the test before you run it or if you have duplicated the operation and want to run a different test by modifying the parameters copied, go to Step 4.
  4. Modify any of the settings that you want to specify in the test by completing the following steps:

    The MEP settings that you configured in the MEP tab for the operation are displayed.

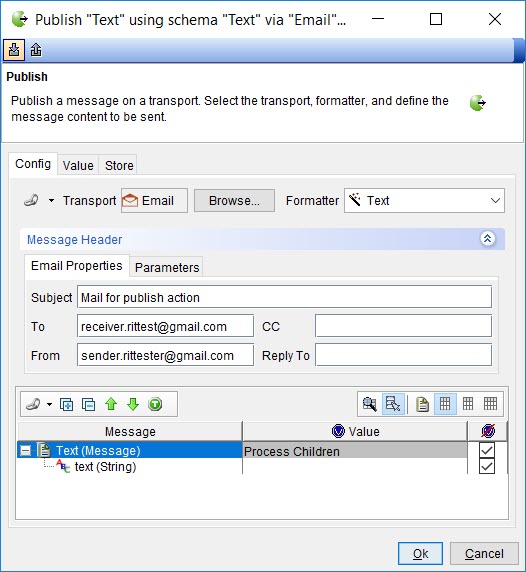
    1. Double-click the Publish test step.
      The Publish window is displayed with the settings that you configured in the MEP tab for the operation.Image of the Publish test step window.
    2. Modify any of the following parameters for the transport or the message headers:
      • The email transport.
      • The text in the Subject field.
      • The email address of the recipients in the To field.
      • The email address of the sender in the From field.
      • The email address of the recipients to whom a reply message is to be sent in the Reply To field.
      • Add or change the email address of recipients to whom a copy of the message is to be delivered in the CC field.
      • Add or change the text to be included in the body of the message.
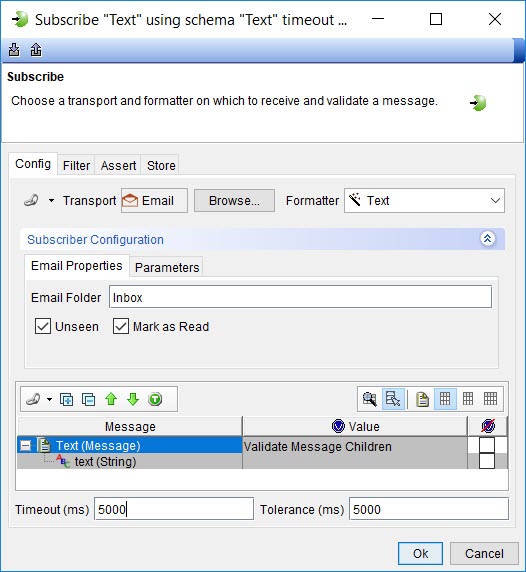
    3. Double-click the Subscribe test step.
      The Subscribe window is displayed with the settings configured in the MEP tab for the operation.Image of the Subscribe test step window.
    4. Modify any of the following parameters for the email properties:
      • Select the email transport.
      • Enter the name of the folder from which the email messages are to be subscribed to in the Email Folder field.
        For example, you can add Inbox as the email folder.
        Note: The email folder you specify here overrides the folder that you configured for the physical transport.
      • Retain or clear the selections for the Unseen or Mark as Read options.
        Note: The Unseen and Mark as Read check boxes are displayed as the default selections and the following default actions are performed when you subscribe to messages in the email folder:
        • The messages that are not yet seen or read by the recipient are subscribed.
        • The subscribed messages are marked as read in that email folder.
      • You can add new properties for the parameters in the Parameters tab by clicking New and entering the Name and Value for each parameter.

      • You might want to change the value in the Timeout field, if the message you subscribe from the email account is not retrieved within the set default value or if an error due to a timeout is displayed when you run the test.
  5. Run the test.

Results

You have created and run a test that uses the Publish-Subscribe messaging pattern.