Creating a project
Before you begin
- You must have closed HCL® Quality Server sessions that are running if any.
- If HCL OneTest™ API is running and you have just completed the tasks in Creating and running a test, you probably have that project open. To create and run a stub with an HTTP/TCP Proxy, you must create a new project. Therefore, you must close the existing project by clicking . This action closes the project and restarts HCL OneTest™ API.
About this task
After you restart HCL OneTest™ API, you must create a new project, provide a name for your project and save it on your local drive. The following instructions are applicable for the Windows™ OS.
Procedure
- In the startup window, select Create Project and click OK.
- Enter a name for the project in the Project Name field.
-
Click Browse and select a location to save the project.
If you do not browse and select a location, the project is saved in the default location, which is your home directory. For example, the default location is C:\Users\USER_ADMIN.
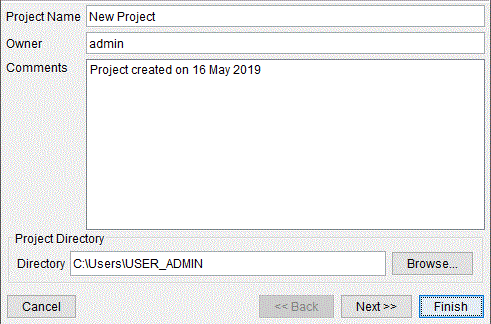
-
Click Finish.
The main function of HCL® Quality Server is to be the communication hub between HCL OneTest™ API and the HTTP Proxy.
Results
What to do next
You must start the Add Numbers server and client. See Starting Add Numbers server and client.
Starting Add Numbers server and client
Before you begin
You must have created a project as described in Creating a project. Your project must be open in HCL OneTest™ API.
About this task
HCL OneTest™ API contains some example APIs. In this example, you use AddNumbers, which has a WSDL document describing the API.
If you want to model a system that does not have a WSDL definition, you can use a Swagger file instead. See Creating and running a test.
Procedure
- In the local drive, go to install_location/HCLProducts/API/examples/addnumbers.
-
Run the startup script.
The Add Numbers server window is displayed.
-
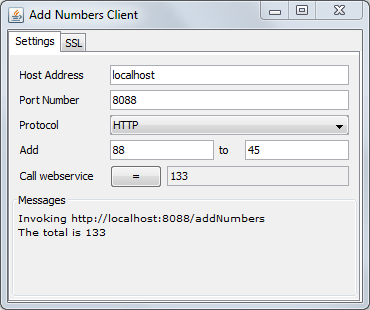
Click Start Service.
This action starts the Add Numbers web service on the host.
Make note of the Host Address and Port Number fields. You need them in the next steps.
- In the local drive, go to install_location/HCLProducts/API/examples/addnumbersclient.
-
Run the startup script.
Note: Ensure that the host and port fields match the values that you noted earlier from the Add Numbers Server window.
-
Click the equal sign.
The client application sends an HTTP SOAP request to the server application, which adds the two numbers and returns the result. The result is displayed on the Add Numbers Client window.
Results
You have successfully tested a web service hosted on your local system by using the sample WSDL.
What to do next
You must configure the client to use the created stub. See Configuring the Add Numbers client to use the stub (virtual service).
Configuring the Add Numbers client to use the stub (virtual service)
Before you begin
You must have completed creating the stub and run it.
About this task
To support HCL OneTest™ API Service Virtualization, you must configure HTTP clients to use the HCL OneTest™ API HTTP/TCP Proxy. You must configure the Add Numbers client application to use the HCL OneTest™ API proxy by using the standard Java proxy settings.
Procedure
- Close the Add Numbers Client window.
- Open the startup script located at install_location/HCLProducts/API/examples/addnumbersclient in a text editor.
-
Edit the script as follows:
- In Windows:
- Comment out the line
%JAVA_HOME%\bin\java %NET_PROPS% %SSL_PROPS% -jar
                      AddNumbersClient.jar
by inserting @rem at the beginning.The edited entry appears as:
@rem %JAVA_HOME%\bin\java %NET_PROPS%
                        %SSL_PROPS% -jar AddNumbersClient.jar
. - Uncomment the line for connecting to a proxy as indicated by the other
comments in the file. Ensure that this line includes the
–Dhttp.proxyHost=localhostand-Dhttp.proxyPort=3128arguments, which direct the application to use the proxy that is started by HCL OneTest™ API, the one that is running locally on port 3128.
- Comment out the line
- In Linux:
- Comment out the line
$_RUNJAVA" "${SSL[@]}" -jar
                      "$_SCRIPTDIR/AddNumbersClient.jar
. - Uncomment the line for connecting to a proxy, as indicated by the other
comments in the file. Ensure that this line includes the arguments
-Dhttp.proxyHost=localhostand-Dhttp.proxyPort=3128, which direct the application to use the proxy that was started by HCL OneTest™ API, the one that is running locally on port 3128.
- Comment out the line
- In Windows:
- Save and close the file.
Results
You have successfully configured the Add Numbers client to use the stub.
What to do next
You must verify if the Add Numbers client application is using the HTTP proxy. See Verifying that the Add Numbers client is sending traffic through the proxy.
Verifying that the Add Numbers client is sending traffic through the proxy
Before you begin
The Add Numbers client must be running. If it is not, go to install_location/HCLProducts/API/examples/addnumbersclient and run the startup script.
Procedure
-
In the Add Numbers client application, click the equal
sign.
The result of the addition operation (133) is returned as in Starting Add Numbers server and client, indicating that the client application can still communicate with the server application.
-
In a web browser, open HCL®
Quality Server
by going to
https://localhost:5443/RTCP.The HCL® Quality Server Home page is displayed.
-
Click the Infrastructure icon on the HCL®
Quality Server Home page to view the
connected agents or proxies.
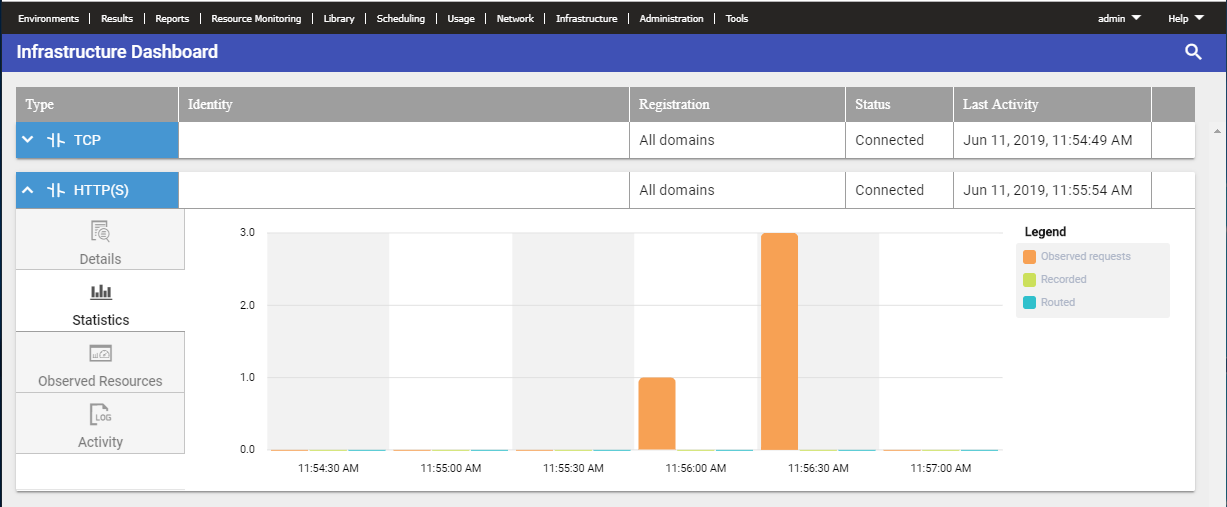
Two entries are listed on the Infrastructure page, one for the HTTP/TCP Proxy’s HTTP and HTTPS proxy capability, and the other for the HTTP/TCP Proxy’s TCP proxy capability. You can view the requests received by the proxy from the Statistics panel. You can also view the activities that were logged from the Activity panel.
Results
You have verified that the Add Numbers client application is using the HTTP proxy.
What to do next
You must discover the endpoints that are in use by the Add Numbers client application. See Using topology discovery to discover the endpoints in use.
Using topology discovery to discover the endpoints in use
You must discover the endpoints that are in use by the Add Numbers client application by selecting the intercepts registered with HCL® Quality Server.
Topology discovery is the process of observing and modeling the components of a system under test by using only real traffic that flows through the system. You can view the resources that the system calls and choose the ones to include in the system model within your project. You then use this model to make detailed recordings of interactions and create tests and virtual services from those recordings. Topology discovery, recording, and service virtualization all require the HTTP proxy. Therefore, if you configure the HTTP proxy for the client for any one of these tasks, you need not do anything separately for the other tasks.
Procedure
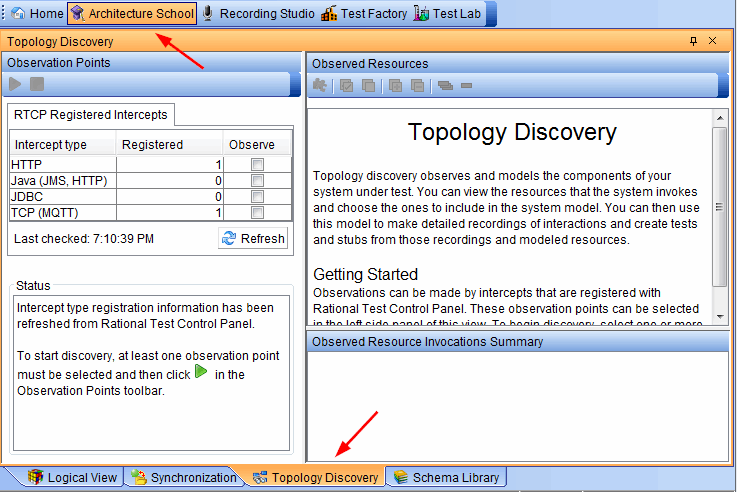
- Return to HCL OneTest™ API Home page, and on the toolbar, click Architecture School.
-
Click the Topology Discovery tab.
-
The Observation Points panel lists the Topology Discovery
intercept types that are registered with HCL®
Quality Server. If the HTTP/TCP proxy has
started you can see 1 against both
HTTP and TCP. To discover the HTTP
endpoints, select the check box next to the intercept type,
HTTP.
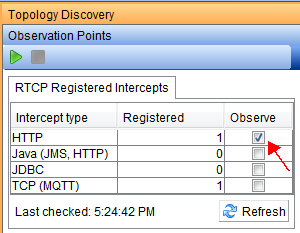
-
Click Start discovery.
This action starts topology discovery by using the selected intercept type. A progress bar titled Starting Discovery in QS is displayed.
- Return to the Add Numbers client application and click the equal sign.
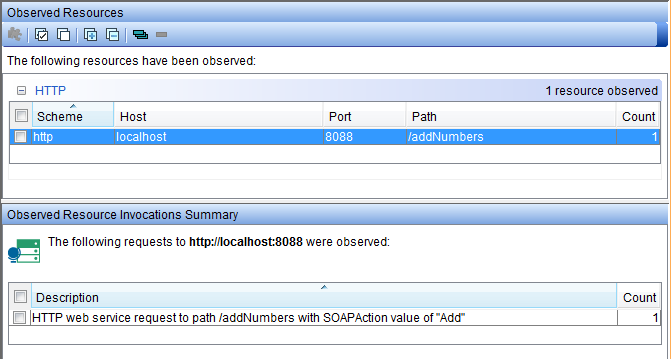
- Return to HCL OneTest™ API. After a few seconds, you can see a new line being displayed in the Observed Resources panel, which describes the Add Numbers server endpoint to which the request was sent.
-
Click the row to see the information about the request that was observed.
In the Observed Resource Invocation Summary panel, the description shows HTTP web service request and that it had a SOAPAction value of Add. This view summarizes large numbers of endpoints and invocations. You can use it to observe all the activities in a large, complex system, and find the endpoints that you are interested in testing or virtualizing.
- Select the check box next to either the endpoint (in the top section) or the description (in the bottom section).
-
On the toolbar in the Observed Resources panel, click
Add selected observations to the system model.
On the Existing resources page, none of the observations are currently represented in your system model. If you observe an already modeled system, with this action you could reuse the existing resources that were involved in any of the observations.
- Click Next.
-
On the Parent assignment page, choose a name for the new
component to contain the observed operations. As the application observed is called
Add Numbers, enter the same name.
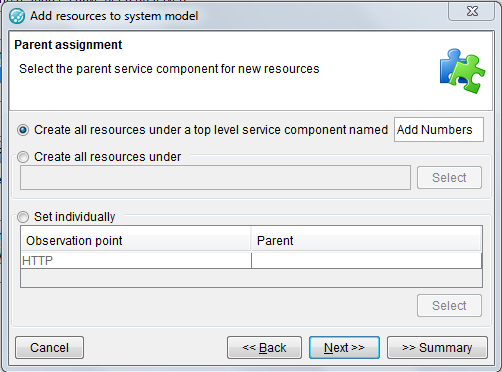
- Click Next.
- On the Documentation page, you must enter the details about the resources that you are creating. The details could include what you were observing and why, and your intention for the resources you are creating. For example, I have observed the Add Numbers server endpoint, and am modelling it to create a stub to support testing of the Add Numbers client application.
- Click Next.
- On the Summary page, select what to do after the resources are created. The default options stop the discovery process because you are done with it and take you to the Logical View of the Architecture School perspective where you see the created resource.
-
Retain the default options selected and click Finish.
A warning message prompts you to edit the resources and configure the end points with details of security, if any of them use security.
This prompt is given because secure information such as passwords and SSL keys cannot be observed. You must ignore the message because in this case, the Add Numbers server did not have any security enabled.
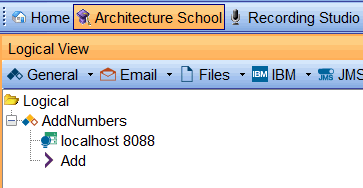
In the Logical View, you can see the component named AddNumbers containing an operation named Add that you observed, along with the localhost 8088 HTTP transport that the operation used.
Results
You have discovered the endpoints used by the HTTP proxy when running the Add Numbers client application.
What to do next
You must record an operation for a message-based stub for the Add Numbers client application. See Recording an operation.
Recording an operation
Before you begin
You must have completed discovering of the HTTP proxy endpoints.
About this task
You can record the traffic that is going through the proxy to and from the Add Numbers server and use the recorded messages to create a stub, which provides a virtual Add Numbers service.
At this stage, the Logical View of the Architecture School perspective shows the component named AddNumbers containing an operation named Add, along with an HTTP transport.
Procedure
- Click the service operation called Add, to select it.
-
Click Add event monitors for the selected items on the
toolbar.
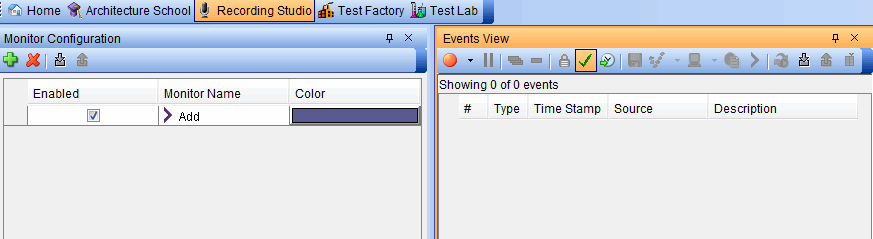
HCL OneTest™ API switches to the Recording Studio perspective and adds an Event monitor for the Add operation, which you can see in the Monitor Configuration panel.
-
To remove other monitors, select them and click the Delete the
selected monitors icon.
The recorded events are displayed in the Events View.
-
To remove other monitors, select them and click the Delete the
selected monitors icon.
-
In the Events View toolbar, click the Start
Recording icon.
You see a progress dialog for a few seconds while the proxy is configured for recording.
-
Return to the Add Numbers client application and click the
equal sign.
The numbers 88 and 45 are added. The response is the same as in Starting Add Numbers server and client.
- Click the equal sign a few more times, entering different numbers to be added each time and note the response.
-
Return to HCL OneTest™ API.
You can see a number of recorded events. Half of these are requests sent to the server, and the other half are responses received from the server.
Click each one to see the contents of the message. In the request messages action, you see the numbers you entered into the client application, and in the response messages action, the result of each addition.
-
Stop the recording by clicking the Pause icon on the
Events View toolbar.
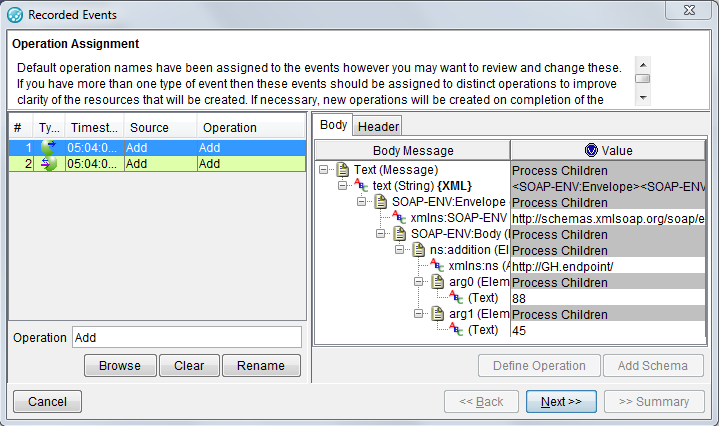
You can find the two events that represent the request for 88+45 and its response of 133. These events are the first two events in the table.
-
Select these two events in the Events View; to do so, click
the first one, hold down the Shift key and click the second one.
The descriptions of the events displayed are: POST /addNumbers and 200 – OK
-
In the Events View toolbar, click the Create Stub
from selected events icon.
This action opens the Recorded Events wizard where you can use the selected events to create a stub. The Operation Assignment page shows the events and that operation they are related to.
-
Click Next.
On the Transaction Assignment page, you control which request is grouped with which reply. In this case, you have only one request and reply, so they are put together into Group# 1.
- Click Summary.
- Enter the stub name as 88 plus 45.
-
Click Finish.
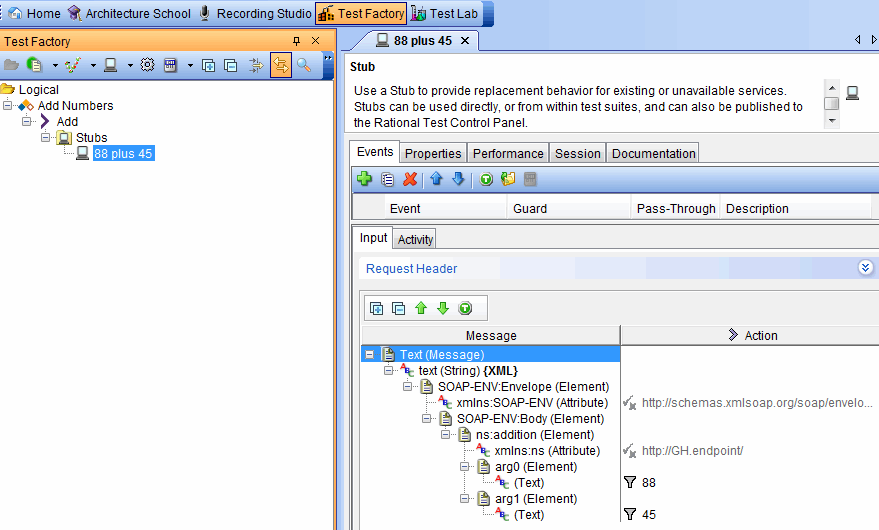
The stub is opened in Test Factory.
Results
You have recorded requests and responses from the Add Numbers server and used them to create a stub that can listen to the request for one of the operations you recorded and returns the result that you recorded from the server for that request.
What to do next
You can verify if the client receives responses from the stub when the server application is disabled. See Disabling the server application and verifying that the client receives response from the stub.
Disabling the server application and verifying that the client receives response from the stub
About this task
Procedure
- Go to the Add Numbers server application and stop the server by clicking Stop Service.
- Go to the Add Numbers client application.
- Change the values in Add to 88 and 45 to match the input expected by the stub.
-
Click the equal sign.
The application displays an error message, because it cannot connect to the server application.
- Click OK.
- Return to HCL OneTest™ API.
- With the Stub editor open, click the Run icon on the toolbar.
-
Return to the Add Numbers client application and click the
equal sign.
The application returns the result as 133, because this is the number that was configured in the stub. Instead of calling the Add Numbers server, the request was responded to by the stub, which can be used to test the client application while the server is unavailable or is still under development.
When virtualizing a real system, you create a more complex stub that either eliminates the need for the real server to be running when testing is in progress, or that simulates a difficult-to-recreate scenario. For example, an error case from the server application to aid testing of how the client application deals with such cases. For references on creating more complex and flexible stubs, see What to do next.
An option is to use a data source from which a stub can look up data based on the message it received. For instructions on how to create a data-driven stub, complete the following steps:
-
Click Select an Interactive Guide.
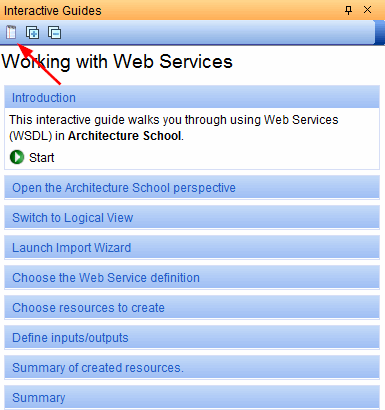
-
Select and click OK.

-
Click Select an Interactive Guide.
Results
You have successfully created, run, and verified a virtual service (message-based stub) that uses an HTTP proxy as a transport for messages.
What to do next
- To control what requests the stub must respond to, you can use the stub editor’s Input tab and The Field Editor. For instructions, see The Input tab.
- To control how the stub constructs responses, you can use the stub editors Activity tab and The Field Editor. For instructions, see The Activity tab.