HCL OneTest™ API projects
When you launch HCL OneTest™ API, a welcome dialog is displayed that you can use to create a new project or open an existing one. All work is organized into individual projects, similar to a development IDE. This organization allows for simpler organization of complex test scenarios.
HCL OneTest™ API projects correspond to an underlying directory structure. For this reason, the projects themselves do not need to be explicitly saved, but the resources they contain do.
- Opening a project
- Opening a resource execution URL
- Project errors
- File locations
- Project permissions
- Configuration management
- Naming conventions
- Cloning a project
Opening a project
- Launch HCL OneTest™ API. The welcome screen is displayed.
- Open the project.
- If the project is listed under Open existing project, select the project name and click OK. The project is opened.
- If the project is not listed under Open existing project, select Browse and click OK. The project Open dialog is displayed. Browse for and select the wanted project file (*.ghp), then click Open.
- If permissions are enabled on the project, do one these tasks:
- Enter a valid domain user and password combination.
- Enable the "Logon as project administrator" option and enter the admin password.
 Click OK. If the login credentials
are accepted, or if permissions are not enabled on the project, the
project resources are loaded and the project is opened
Click OK. If the login credentials
are accepted, or if permissions are not enabled on the project, the
project resources are loaded and the project is opened
Opening a resource execution URL
A resource execution URL is a direct link to the execution results of a test suite or a test within a suite. The URL can be copied from the assets entry in the Test Lab Task Monitor, and used in a browser or on the welcome screen.For any test or test suite that has an entry in the Task Monitor of the Test Lab, to copy the resource execution URL for the asset, right-click the entry and click Copy Link. Save and share this resource execution URL, or use it to open the execution results in the Results Gallery of the specified asset from the welcome screen.
- Launch HCL OneTest™ API. Select Open Link in the welcome screen. Click OK. The HCL OneTest API Link URL dialog is displayed.
- Paste a valid resource execution URL into the URL field and click Open push button. The Open button is enabled only if you enter a valid URL. For example, ghtester://link/?MD0wMDAwMDE0Ny0zZWNmLTUxMTItMDAwMC4MTIzNjg2MzA6LTdjYmUmMz02Nw==#1628645826. You can open the URL only if you have access to the project from where the URL was copied.
- If permissions are enabled on the project, log in when prompted.
- The Results Gallery is opened and the execution report that is specified by the selected URL is displayed.
Project errors
If any errors are encountered when you open a project, they are displayed in the Errors dialog, as shown:
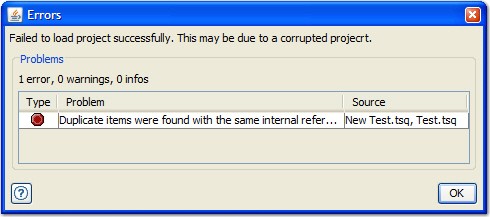
A description of the error is displayed under Problem, and the source of the error is displayed under Source. For more details about an error, double-click its entry.
The Problem Report dialog is displayed, providing more details.

Depending on the error that was encountered, the project can be lost or it can be repaired manually. In the example that is shown, one of the duplicate tests must be deleted manually from the project before it can be opened in HCL OneTest™ API.
File locations
While projects can be stored in any physical location, they would normally reside on a local drive of the machine that is running HCL OneTest™ API.
To ensure portability, internal HCL OneTest™ API artifacts are referenced by a unique ID. When you are working with third-party elements (for example, XSDs, TIBCO AE repositories), a URL, or the system variable PROJECT_ROOT must be used. When set up properly, projects can be accessed in the same way from different machines and even moved (in their entirety) from one machine to another.
Project permissions
HCL OneTest™ API supports project permissions that are based on users in a supported LDAP implementation (currently Active Directory). Permissions can be assigned to users by the project administrator, which can be configured when a project is created or added to an existing project. If an LDAP user creates a project, that user is granted all available permissions by default. Users, however, cannot add new users to the project or modify permissions for existing users.
Configuration management
Individual elements of a HCL OneTest™ API project are persisted as single files. As such, configuration management software can be used to "version" your projects, as wanted.
Naming conventions
While there is no standard for naming the various components in a project, the following guidelines can help you to better organize your projects.
- Tests, suites, and stubs must be named in a consistent and meaningful manner, and must include a description and location within the project hierarchy. You must also include an identifier in the name, which can be correlated with a test plan or a tracking tool.
- The names of system artifacts (for example, components and operations) must be brief yet descriptive. For example, they can include the transport type, subtype, and detail: RV_CM_Pricing, JMS_TOPIC_Pricing, and so on
- Test components (for example, scenarios or data sources) can be named according to their contents or their intended use.
Cloning a project
Cloning creates a copy of an existing project. You can then work with a new project that already contains the resources that you want.
- Launch HCL OneTest™ API. Select Clone Project in
the welcome screen. Click OK. The Clone
Project wizard is displayed.

- Select Recently Used to clone a recently used project, or select Project File to browse for the project (.ghp file) to clone. Click Next. The project details dialog from the Create New Project wizard is displayed.
- Enter a name for the cloned project in the Project
Name field (the project directory changes according to
the projects name). The name must be specific enough to identify
the projects intended purpose. Restriction: If any of the following characters are used in the project name, the field is highlighted in red and you cannot continue with the wizard: @ $ % ^ & * + =
- Modify the Owner and Comments fields.
These fields are saved with the project and can be modified later.
Modify the project Directory by entering the
full path to the directory where the project is to be created. Remember: The selected directory cannot contain an existing project.
- Click Next. A summary of the proposed action
is displayed.
 If the summary is correct, click Finish to
close the wizard and open the new (cloned) project in
HCL OneTest™ API. Otherwise, click Back to save changes
or click Cancel to close the wizard without
cloning any projects.
If the summary is correct, click Finish to
close the wizard and open the new (cloned) project in
HCL OneTest™ API. Otherwise, click Back to save changes
or click Cancel to close the wizard without
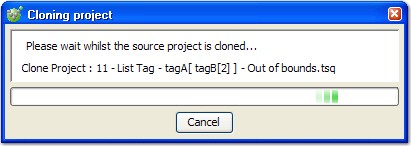
cloning any projects. - Depending on the number of artifacts in the source project, a
progress dialog is displayed while the project is being cloned.
 After the project is cloned/created, it is loaded in
HCL OneTest™ API.
After the project is cloned/created, it is loaded in
HCL OneTest™ API. - If the project was configured to use LDAP for permissions, log
in to the project as a valid domain user or as the project administrator.
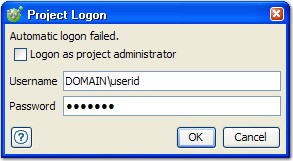 Enter
a valid domain user/password combination, or enable the "Logon as
project administrator" option and enter the admin password, then click OK.
Enter
a valid domain user/password combination, or enable the "Logon as
project administrator" option and enter the admin password, then click OK.