Creating multiple tests by using MEP
An operations Message Exchange Pattern (MEP) defines the pattern, schema, and binding for messages that are exchanged by the operation. Use this information to create multiple tests with the help of the MEP wizard.
Procedure
- Select the operation or folder in which you want to create the test.
- Right-click the operation or folder and
select from the menu,
or click the arrow next to the Test icon in the Test Factory toolbar
and select Test using MEP. Note: If any tests exist, you can right-click the Tests folder or one of the existing tests and select .
If the operation that contains the tests has a WSDL as its parent, the Binding Configuration dialog is displayed.
- Select the binding properties for the request
and reply messages, then click Next.
The Structural Configuration dialog is displayed.

- Set the number of occurrences for each message
element (0 through n) and select the wanted combination option for
generating tests.
- If Minimum number of combinations is selected, at least one unique element is generated in a message for each occurrence, but only enough tests are generated to satisfy the highest single occurrence value (that is, if the greatest number of occurrences for any element is three, then three tests would be generated).
- If Every Combination is selected, a test is created so that every unique combination of occurrences is satisfied (that is, if one element specifies two occurrences and another specifies three, then six tests would be generated).
- When finished, click Next.
The Contents Configuration dialog is displayed.

- For each element, set the value to generate
according to the element type, as follows:
Random Value (Default for all elements, available for all field types) Generates a random value according to the element type. Constant (Available for all field types) Populate the field with the name of the elements parent in reverse. If wanted, this value can be modified. Random Regex (Available for all field types) You can enter a regular expression pattern for the value, and HCL OneTest™ API generates a random value that matches the pattern for every instance of the message field. Boundary (Available for numeric fields) Generates a value that is on the defined boundary of the field. Beyond Boundary (Available for numeric fields) Generates a value that is outside the defined boundary of the field. Iterate Enum (Available for fields with enumerated values) Generate a unique test for each enumeration. - Set the combination options as described in the previous dialog, then click Next.
- The Summary dialog
is displayed, showing the total number of tests to be generated (that
is, the product of the number of structural tests and the number of
content combinations).
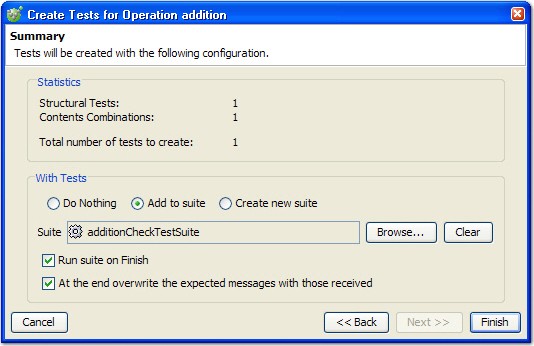
- Under the With Tests panel,
you can perform more actions with the tests to be created, as follows:
- Do Nothing (default) simply creates the applicable tests.
- Add to suite adds the new tests to an existing test suite, which is selected by clicking Browse and selecting the wanted suite.
- Create new suite adds the tests to a new test suite, the name of which can be specified in the Suite field.
- Enable the Run suite on Finish option to execute the new or existing test suite when the MEP wizard closes.
- Enable the At the end...option to overwrite expected messages in the executed tests with the messages that are received.
- Click Finish to create
the tests and return to the Test Factory main view.
What to do next
The new tests are created, named according to the content options that were selected in the wizard. For more information, see Changing the contents of a test about working with the new tests.