File messages
When you publish or subscribe to files as a part of an automated test, the file transport can be used like a message source from a queue, topic, or other endpoint.
A publisher can use HCL OneTest™ API message formatters to write XML, SOAP, File schema, or other formats to a storage disk. A subscriber can follow the same mechanism to validate content and format when reading. The standard field options (filtering, validation, tag storage) are available when you are publishing or subscribing with the file transport. For more information, see HCL OneTest API reference.
You can do the following actions by using the file transport:
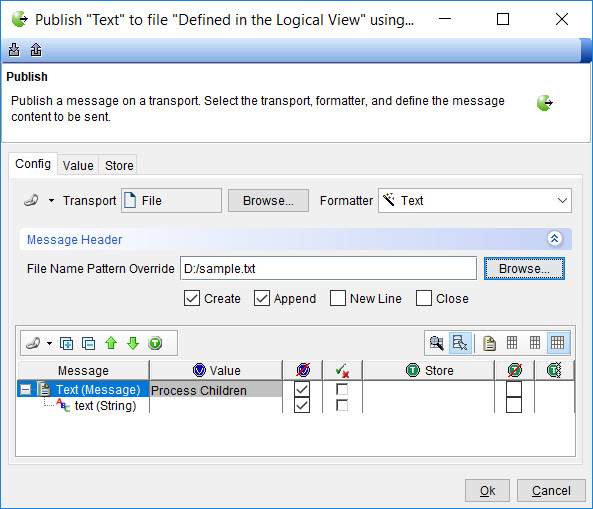
Publish
You can use the file transport in a publish action to write data to a file.
- From the Test Factory view, open the test that contains the publish action.
- Double-click the Publish action to open it for editing.
- Click the Config tab, if it is not already open.
The Transport field and Formatter lists are displayed at the top of the tab.
- Click Browse and perform the following steps:
- Locate and select the transport you created as the File transport in the Select a Resource dialog box.
- Select from the following options for the action you want:
Option Action No If you select No, you can select any transport in the project. Yes If you select Yes, you can select only transports that are referenced (directly or indirectly) by the operation that contains the test. Only Direct If you select Only Direct, you can select only transports that are referenced directly by the operation that contains the test. - Click OK.
- In the Formatter list, select the formatter from the following options:
- Byte Array is used for fields that contain non-encoded strings.
- Text is used for text-based fields.
- Expand the Message Header panel, if not already expanded and perform the following steps:
- Click the Browse option to select the required text file with any associated tags and complete the File Name Pattern Override field.Note: If the override is a simple file name, it is resolved relative to the directory from the transport. If the override contains a directory (or directories), it overrides the entire path, including the directory from the transport.
- Select the following options that can be enabled or disabled when you are writing to a file by using the publish action:
- Create can create the specified file if it does not currently exist.
- Append leaves existing file contents intact and appends new data to the end of the file when you are writing.Note: Appending to a file is only supported for files on the local file system. Attempts to append to a remote file will fail.
- New Line appends new line characters to the end of the file after it is written, by using the New Line option that is specified in the transport.
- Close explicitly closes the file after it is written, releasing the file handle between test iterations. If left unchecked, the file is closed only at the end of the test.
- Click the Browse option to select the required text file with any associated tags and complete the File Name Pattern Override field.
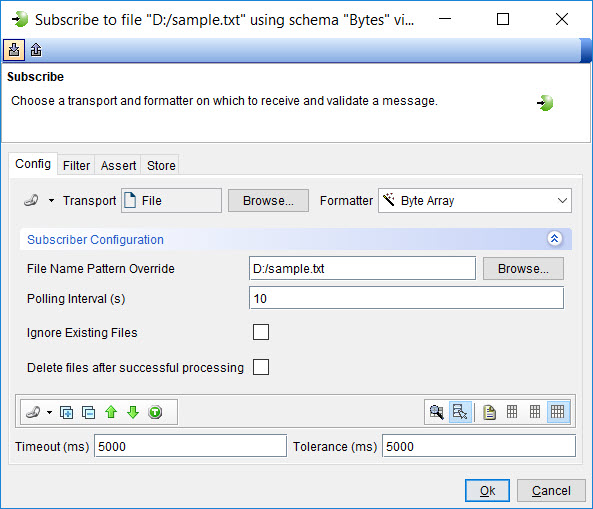
Subscribe
You can use the file transport in a subscribe action to read data from a file.
- From the Test Factory view, open the test that contains the subscribe action.
- Double-click the Subscribe action to open it for editing.
- Click the Config tab, if it is not already open.
The Transport field and Formatter lists are displayed at the top of the tab.
- Click Browse and perform the following steps:
- Locate and select the transport you created as the File transport in the Select a Resource dialog box.
- Select from the following options for the action you want:
Option Action No If you select No, you can select any transport in the project. Yes If you select Yes, you can select only transports that are referenced (directly or indirectly) by the operation that contains the test. Only Direct If you select Only Direct, you can select only transports that are referenced directly by the operation that contains the test. - Click OK.
- In the Formatter list, select the formatter from the following options:
- Byte Array is used for fields that contain non-encoded strings.
- Text is used for text-based fields.
- Expand the Subscriber Configuration panel, if not already expanded and perform the following steps:
- Click the Browse option to select the required text file with any associated tags and complete the File Name Pattern Override field.Note: If the override is a simple file name, it is resolved relative to the directory from the transport. If the override contains a directory (or directories), it overrides the entire path, including the directory from the transport.
- Change the default value in the Polling Interval field, if you want. Polling Interval is the interval, in seconds, that the file system is queried. The default value is 10.
- Select the Ignore Existing Files option, if you want. If Ignore Existing Files is selected, files that exist when the first poll occurs are ignored.
- Select the Delete files after successful processing option, if you want. If Delete files after successful processing is selected, files whose content is matched and validated successfully are deleted once processing of the file completes. Where multiple messages are consumed from a file, all messages must be successfully validated for deletion to occur. When consuming a file within a test, if the test fails, deletion does not occur.
- Change the values in the Timeout and Tolerance fields, if you want. Note: The values in these fields control the amount of time allowed in attempts to read the file.
- Under Timeout, enter the amount of time (in milliseconds) after which the test action fails if HCL OneTest™ API is unable to read from the file.
- Under Tolerance, set the amount of time (in milliseconds) that HCL OneTest™ API allows after the timeout, to continue to check for the file. If the file becomes available after the timeout and before timeout + tolerance, the test action failure will indicate that the file was late.
Note: You can validate an empty file (that is, one that contains zero bytes) by selecting the Byte Array formatter and leaving the data (ByteArray) field empty.
- Click the Browse option to select the required text file with any associated tags and complete the File Name Pattern Override field.