Contacts quick reference
This quick reference includes a screen image explaining
the basics in Contacts, as well as tables listing other commonly-used
tasks and shortcuts.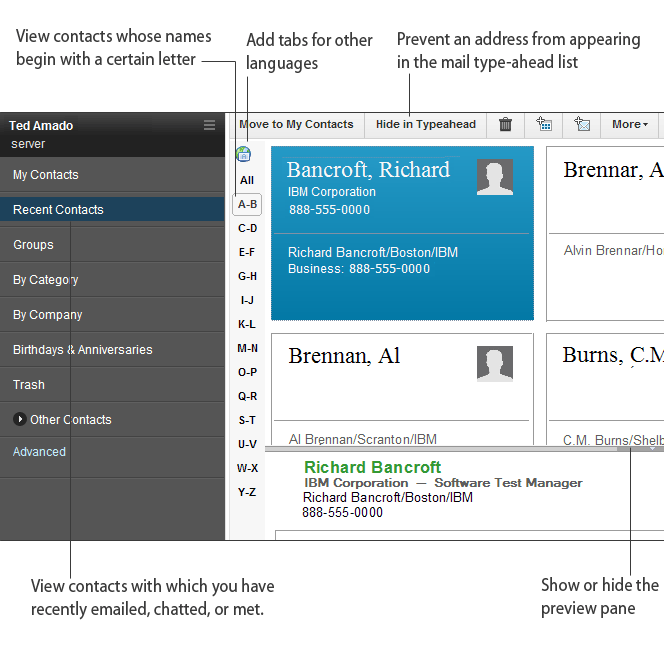
| Task | Action |
|---|---|
Open Contacts |
Click (Notes
Basic client users: To open Contacts, click this icon in the Bookmark
bar: |
Search for a name in the My Contacts view |
Type the first few letters of a contact or group name. |
| Task | Action |
|---|---|
Add a contact |
|
Move a contact from Recent Contacts to My Contacts |
|
Add a picture for a contact |
While adding or editing a contact, click Note: The recommended size in pixels is 85w x 74h. Any image
you import is automatically resized to these specifications. |
Choose the primary email, address, or phone number for a contact |
The primary email, address, or phone number is the one that appears when you print contacts or view your Contacts as business cards.
|
Add more phone numbers for a contact |
While adding or editing a contact, click the Phone Numbers link. To change a phone number label, select a new one from the list, or highlight the existing label and then type a new one. |
Add a birthday or anniversary |
While adding or editing a contact, click the Other Information link. |
Add custom fields to a contact |
While adding or editing a contact, click the Other Information link. Edit any of the custom fields at the bottom of the dialog box. |
| Task | Action |
|---|---|
Create a group from existing contacts |
Open Contacts, and then select the names you want in the group. Click . |
Sort group members alphabetically |
|
| Task | Action |
|---|---|
Change the address format for business cards, previewing, and printing |
|
Set how long to keep items in the Trash before deleting them permanently |
|
Select how you want names display in your Contacts (First Name, Last Name or Last Name, First Name) |
|
Set the format for contact names with three parts, such as George De Marco |
If you add a contact whose name has three
parts, such as George De Marco, a Name Helper displays so that you
can specify To suppress the Name Helper and always accept the default, click (Notes Basic client users: Open Contacts, and then click ; Macintosh OS X users: Click ), and then click Contacts. Select Always accept the default name assignment when adding contacts. If the default is incorrect for a contact, open the contact, and click the Contact Name link to correct it. |
| Task | For Windows | For Macintosh |
|---|---|---|
| Open Contacts Note: To enable this shortcut,
click . |
Ctrl+3 | Ctrl+3 |
| Open selected contact | Enter | Enter |
| Close selected contact or view | Esc | Esc |
| Get help for the current feature | F1 | Help or Command + ? |
| Enlarge selected text to the next point size | F2 | N/A |
| Reduce selected text to the next point size | Shift + F2 | N/A |
| Undo last action | Ctrl + Z | Command + Z |
| See a list of available shortcuts | Ctrl+ Shift + L | Ctrl+ Shift + L |