Setting up a Relying Party Trust for the ID vault server
Set up a Relying Part Trust in Active Directory Federated Services (ADFS) for the Domino ID vault server. These procedures describe steps for ADFS 3.0 and ADFS 4.0.
About this task
Procedure
- From ADFS, select .
- Navigate to the Relying Party Trusts folder.
- Select .
- Click Start to run the Add Relying Party Trust wizard.
-
In the Select Data Source window select Import data about the relying party from a
file, select the ServiceProvider.xml file that you exported from the
corresponding ID vault server IdP configuration document. Then, click Next.
Note: When you import from the ServiceProvider.xml file, values for Steps 6 - 10 are populated automatically. If you select Enter data about the relying party manually, you enter these values yourself.
- In the Select Display Name window, enter a Display name to represent the service provider, for example, Domino Renovations Vault. Click Next.
- In the Choose Profile window, select AD FS profile and click Next.
-
In the Configure Certificate window, click Next.
-
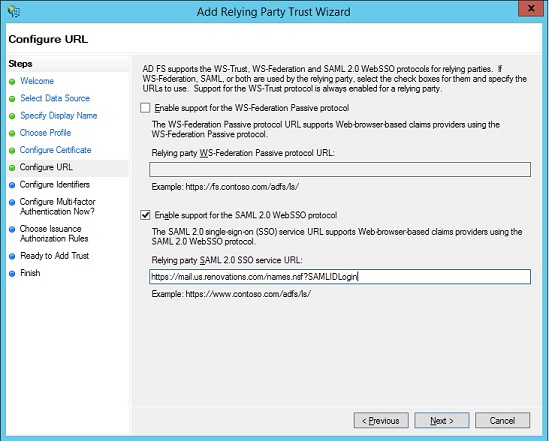
In the Configure URL window, select Enable support for the SAML 2.0 WebSSO
protocol. For Relying party SAML 2.0 SSO service URL, enter the
following URL:
https://<host>/names.nsf?SAMLIDLoginwhere <host> is either a Web server or the ID vault server, depending on whether you use Web federated login:The following example shows a host name specified for a Web server when you use Web federated login:Table 1. Specifying the Relying party SAML 2.0 SSO service URL host name in the ID vault server Relying Party Trust If you use Web federated login If you use only Notes or Nomad federated login Specify the DNS host name of a web server that will participate in federated login. For example:https://mail.us.renovations.com/names.nsf?SAMLIDLogin- Notice that the ending string of the URL is
/names.nsf?SAMLIDLogin. This string is different than the ending string of the URL for a Web server Trust document, which is/names.nsf?SAMLLogin. - Specify a web server host name rather than the ID vault server host name. Doing so allows iNotes users to obtain credentials from the ID vault server for federated login.
- The host name must match the host name that is included in the Host names or addresses mapped to this site field in the web server IdP configuration document you create. Do not use the host name specified in the ID vault server IdP configuration document.
- You can specify only one web server host per Trust document.
- If there are multiple Web server hosts behind a load balancer, specify the load balancer host name here. If there is no load balancer, repeat this procedure and create a separate Trust document for each web server.
Specify the DNS host name of the Domino ID vault server that will participate in federated login. For example:https://vault.domino1.us.renovations.com/names.nsf?SAMLIDLogin- The host name must match the host name that is included in the Host names or addresses mapped to this site field in the ID vault server IdP configuration document you created.
- Notice that the ending string of the URL is
-
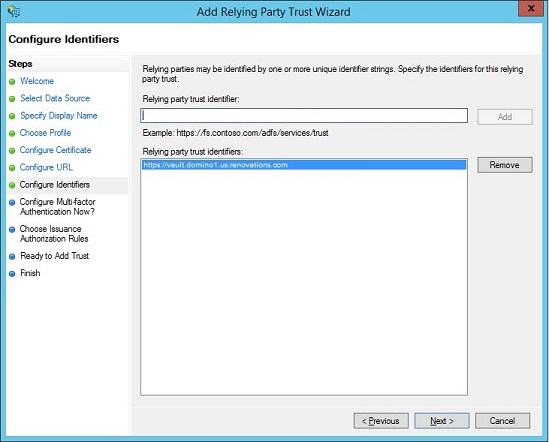
In the Configure Identifiers window, in the Relying party trust
identifier field, enter a URL to identify the ID vault server, then click
Add and Next.
This URL must match the one that you specify in the Service provider ID field of the IdP configuration document for the ID vault server. For example: https://vault.domino1.us.renovations.comNote: This URL is used only as an identifier and not for HTTP connections.
- Click Next to skip the Configure Multi-factor Authentication Now? window.
- In the Choose Issuance Authorization Rules window, select Permit all users to access this relying party and click Next.
- In the Ready to Add Trust window, click Next.
- In the Finish window, select Open the Edit Claim Rules dialog for this replying party trust when the wizard closes and click Close.
- If the Edit Claim Rules dialog does not open when the wizard closes, right-click the name of the Relying Party Trust that you created, and select Edit Claim Rules...
- In the Edit Claim Rules dialog, click Add Rule.
- In the Select Rule Template dialog, for Choose Rule Type, select Send LDAP Attributes as Claims, and click Next.
-
Complete the Configure Rule dialog box:
- For Claim rule name, enter EmailAddressToNameID.
- For Attribute store, select Active Directory.
- For LDAP Attribute, select E-Mail-Addresses.
- For Outgoing Claim Type, select Name ID.
- Click Finish.
- In the Edit Claim Rules dialog, click Apply and OK.
-
In the folder:
-
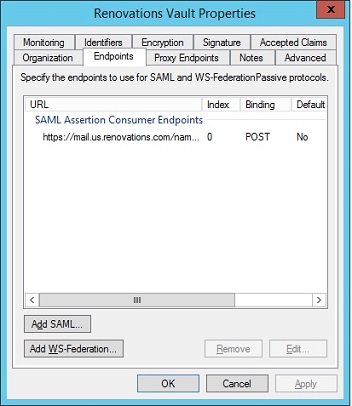
For SAML Assertion Consumer Endpoints, verify that there is a POST
binding URL for Domino. In addition, if there is an Artifact binding URL, remove it because Domino
only uses POST binding.
-
For SAML Assertion Consumer Endpoints, verify that there is a POST
binding URL for Domino. In addition, if there is an Artifact binding URL, remove it because Domino
only uses POST binding.