Using a view to generate XML
About this task
Views enable you to control which documents are rendered in XML and to track information and convert it into XML for distribution across an intranet or the World Wide Web. You can find the view described in this section in the ROI Books application on the web site at http://www.lotus.com/xml.
Mapping XML tags to a view
Procedure
Example
About this task
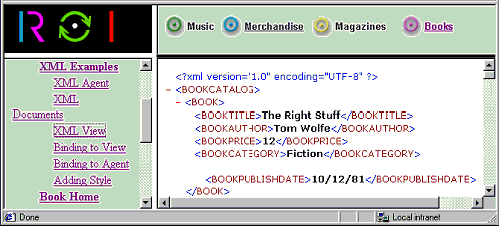
The ROI Books application assigns each element and field in a document to a column in the XMLView using a column formula. The column formula for the first child element also contains the open parent tag, and column formula for the last child element contains the close parent tag. For example, the column formula for the first column is:
"<BOOK><BOOKTITLE>"+bookTitle+"</BOOKTITLE>"The parent element is <BOOK>, the child element is <BOOKTITLE>, and bookTitle is the name of the field containing the content of the <BOOKTITLE> tag. There are more child elements within <BOOK> that are included in this view, so the <BOOK> element is not closed until the last child element is added. In the ROI Books application, the last child element is assigned to the last column of the view. The formula for the last column is:
"<BOOKPUBLISHDATE>"+bookDatePublished+"</BOOKPUBLISHDATE></BOOK>"The XML View is embedded into a page that contains the XML declaration and the root element <BOOKCATALOG>.
To map XML to a view
Procedure
- Create a view and open it.
- Select Edit - Properties to open the View Properties box.
- Click the Advanced tab
- In For Web Access, select "Treat view contents as HTML." Domino® generates HTML for the contents of a view if this property is not selected. In addition, the contents of a view that is embedded into a page are not visible if this property is not selected.
- Click "View Selection" on the Objects tab and add a selection
formula to define which documents will be included in the view. For
example, an application for an online bookstore contains a view for
approved orders. Documents are selected for the view using the following
formula:
SELECT status="Approved" - Click "Form Formula" on the Objects tab and enter a formula that selects your template form.
- Add columns to the view.
- Click the first column of the view.
- Enter a column formula in the Script area using the following syntax. "<PARENT><CHILD>"+fieldname+"<\CHILD>" If you have more than one element for any column, add a semicolon (;) at the end of the first column formula and add the column formula for the next element that follows it. "<PARENT><CHILD>"+fieldname+"<\CHILD>"; "<CHILD>"+fieldname+"<\CHILD>"; "<CHILD>"+fieldname+"<\CHILD>"
Results
- Click the second column and type a column formula into the Script area using the syntax that follows. "<CHILD>"+fieldname+"<\CHILD>"
- Repeat Step 10 for each XML element except the last one.
- For the last child element, the use the syntax that follows. "<LASTCHILD>"+fieldname+"<\LASTCHILD></PARENT>"
Embedding a view in a page
Procedure
- Open or create a page.
- Select Design - Page Properties.
- Click the Page Info tab.
- In Web Access, select "Treat page contents as HTML," and close the Page properties box.
- Type an XML declaration before the place where you want the embedded view to display.
- Place the cursor where you want the embedded view to display.
- Select Create - Embedded Element - View.
- Optional: If you don't want to display the same view in all circumstances, click "Choose a View based on a formula." When you click OK to close the dialog box, write a formula in the Programmer's pane to display the appropriate view.
- Optional: Click the embedded view and select Element - View Properties to change the alignment, or style, or to hide the element under certain conditions.
- Type a close root tag following the view.
Results
To delete an embedded view, click the embedded view in the Work pane and select Edit - Clear.