Creating custom Java™ code
You can create custom code that uses references in the test as input and returns modified values to the test.
About this task
Custom code input values can be located in references or field references. You can also pass a text string as an argument to custom code. References that are used as input to custom code must be included in the same test as the custom code. In the test, the reference must precede the code that it affects. Verify that the test contains the references that are required for customized inputs to your code. For details about creating references and field references, see Creating a Reference or a Field Reference.
If your custom code uses external JAR files, you might need to change the Java™ build path. In some cases, you can avoid changing the build path manually by running the test before adding your custom code to it. The first time a test runs, classes and libraries that are required for compilation are added to the build path. For example, you can import Test and Performance Tools Platform (TPTP) classes that are required to create custom events in the test log if the test, to which you have added your custom code, has run previously. However, if the test has never been run, import errors occur because the classes are not named in the build path for the project until the test has run.
If your code uses external resources, for example, an SQL database or a product that manages customer relationships, you must configure the custom code to work on every computer on which your test runs.
Custom code is saved in the src folder of the project that contains the test that calls the code. By default, custom code is located in a package named test in the src folder.
You can reuse a custom code package for tests that are located in
multiple projects. The projects must be in one workspace. To reuse custom code
across projects, use the project name before the custom code package. For example,
 .
.
The following example shows the standard Navigator view of two custom code classes. (The Test Navigator does not display Java™ source files.)
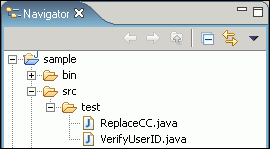
When you add the ReplaceCC.java and VerifyYUserID.java custom code classes to the test and return a value to the test, Substitute lists these two classes.
The test package also contains the generated Java™ code for tests in the project.
You can put custom code in a different package (for example, custom). You must separate custom code from generated code, especially if you use a source-control system.
Procedure
- Open the test, and then select either a Launch application or In application node.
-
Click Insert, and then select Custom
Code.
The Insert option adds the custom code above the selected node.Note: After you insert custom code, the Problems view displays an error stating that the new custom code element has no Java™ file. This error message remains until you click View Code or Generate Code, to remind you that the custom code test element is not yet associated with any Java™ code.
-
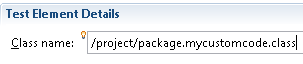
Inspect the Class name field and complete one of the
following steps:
- If the code to call already exists, change the class name to match its name. You can click View Code to open the code in the Java™ editor.
- If the code does not exist, change the class name to describe the purpose of the code, and then click Generate Code to generate a template class for logging results and to open the code in the Java™ editor. If a class with this name exists, you are warned that it will be overwritten.
-
Click Add in the Arguments
field.
The Custom Code window lists all values in the test that can be used as inputs to your code (references or field references in the test that precede the code).
- Select all inputs that your code requires in the Custom Code window.
- Click OK.
The window closes and the selected references are added to the Arguments field.
- Click Text, and then type the text string to add text strings as inputs to your custom code.
- Locate a value that your code returns to the test after you add custom code in the test.
- Highlight the value.
- Right-click the highlighted value, click Substitute,
and select the class name of your custom code.
The custom code classes that you have added are listed. After you have made your selection, the value to be returned to the test is highlighted in orange, and the Used by table is updated with this information.