Form Selection
The feature allows multiple forms to be used when working with a record.
The Form Selection feature allows an administrator to create multiple forms for any record type. You can set your own preferred default form for submitting or viewing a record and can switch to another form when working with a record.
For more details about how to work with forms or modify records, see the topics Working with Forms and Using List View or Tabbed View to modify a record.
The feature is managed by a web server site configuration setting that specifies which groups can use the feature. The feature will only be available if you are a member of one of those groups. Ask your administrator or see the Applications Options Page topic.
This feature allows the administrator to provide forms that can complete specific actions. For example, a simplified submit form can have all the required fields on a single tab, or a triage form can use a single tab for all the fields needed to evaluate incoming defects.
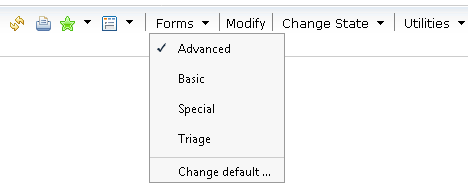
The feature must be enabled by the administrator. If enabled, you see a Forms menu item in the header for a tab, or floating window, that contains the record. The Forms menu allows changing to a different form as well as choosing one as your default. You can change which form is used when viewing, submitting, or modifying a record.
When List View is selected, the fields and tab sections match the currently selected form. Changing the form when the record is shown in List View mode causes the List View to change and match the newly selected form. For more information, see the topic Using List View or Tabbed View to view a record.
This topic uses examples and screen captures from a schema with multiple forms. The schema provides a Defect record type with four forms, Advanced, Basic , Special and Triage. The Basic form is set as the default for submitting a new Defect, and the Advanced form is set as the default when viewing or modifying a Defect (also known as the record form). Labels associated with mandatory fields and the tabs on which they appear are indicated by red text.
If the feature is enabled by administrator, when you view a record, you will see the Forms drop down list with the Advanced, Basic , Special and Triage options for the forms:
The Forms menu shows the forms available for the current record type that the schema provides. The check mark indicates that the Advanced form is currently being used to display the record.
If you want to change the Forms default selection, click Forms and select Change default. The Select Default Record Form dialog appears. The settings show the default or your previous settings.
The top of the dialog has a Record Type selector. It will initially match the type of the record that was being viewed when the dialog was opened. You can change the selection to see or change the settings for any other record type.
The bottom of the dialog box has OK and Cancel buttons. These buttons save or abandon all changes made while the dialog box is open, including changes made to the currently selected record type and any other record types selected by the Record Type selector.
The changes made in this dialog will not affect which form is currently being used to view the current record, or any other record already open in your session. The changes will only take effect the next time a record is opened.
The Use the system default forms check box will be checked if the selected forms are the same as system default. Selecting a different form will automatically deselect this check box. To restore your defaults to match the system, check the box.
The Use the same form for all operations on this record type check box will initially be checked only when the same form is the default for both submit and viewing. When checked, the dialog box will have one list of forms. You can choose a different form to use for both submit and viewing records. If you prefer to use one form for submit and another for viewing, uncheck the box to reveal separate lists and select the forms you want for those different situations. You can easily go back to using the same form for both situations by checking the box.
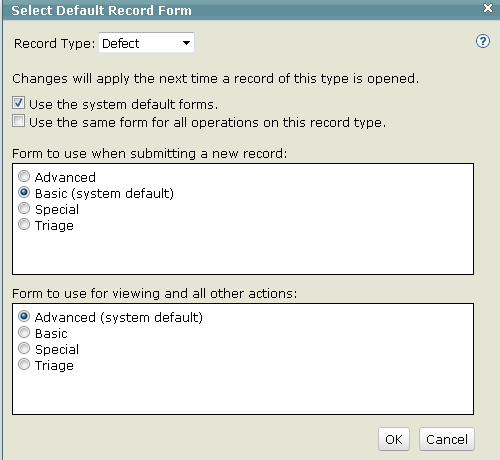
If you want the Advanced form to be the default for submitting a new record, you can select Advanced in the Form to use when submitting a new record. In the Form to use for viewing all other actions section, you can choose the same form or a different form.
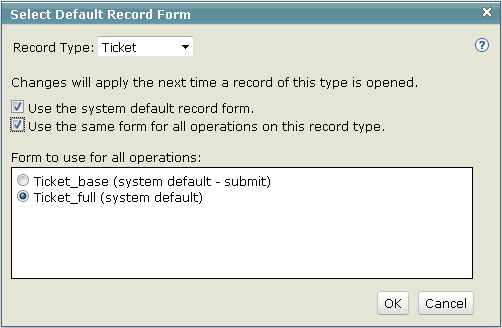
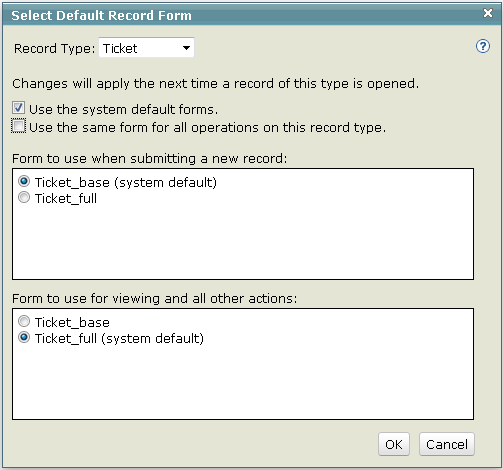
In the next example, the Ticket record type has two forms, one for submit named Ticket_base and one for all other operations named Ticket_full. When first opened, the Select Default Record Form dialog will show two lists. Each list shows the two forms, and identifies one as the system default.
If you check Use the same form for all operations on this record type box, the dialog changes to show only one list. The form that was selected as the default for viewing will be selected as the default for all operations.