Create a Patch Policy
In this page, steps for creating a patch policy, selecting patches to include, setting deployment options, and designating targets are provided in detail.
About this task
Procedure
-
On the Policies page, click Add
Policy.
The Add Policy page is displayed.Note: A Non-Master operator needs Create/Edit Policy and Delete Policy permissions to add, edit or delete policy. For more information on permissions, see The WebUI Permissions Service. Non-Master operators cannot edit definition of the policy stored in the Master Action Site despite having the permission to Create/Edit Policy. Currently, non-master operators are not allowed to access the Master Action Site and they can access only their custom site.
-
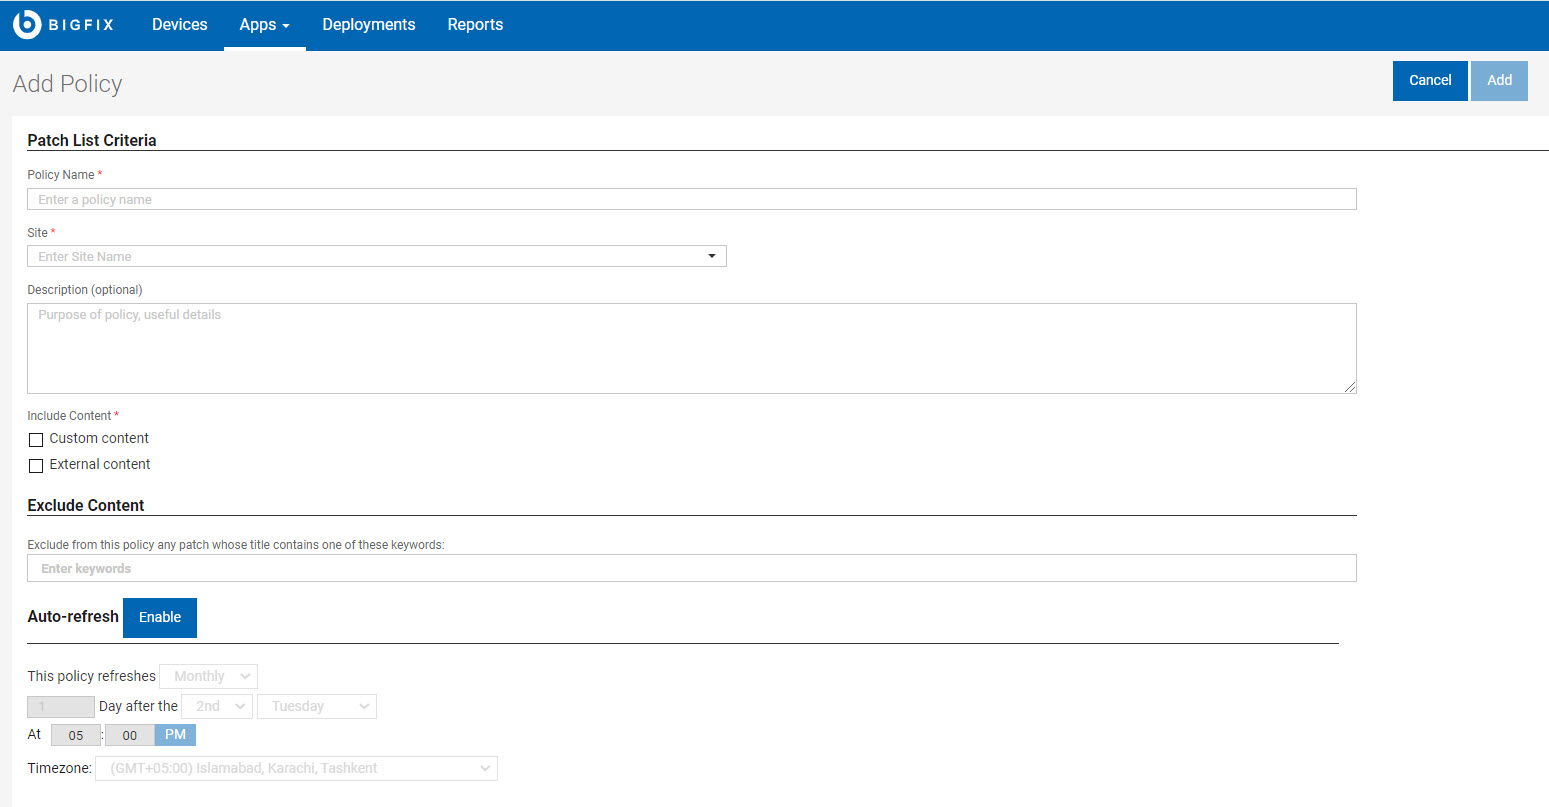
Provide the following information under Patch List Criteria:
- Policy Name
- Enter the new policy name.
- Site
- Select the Master Action Site from the drop-down to store the policy and its schedules.
- Description
- Enter the description.
-
You can include two types of content: Custom content and/or External
content
 Custom content
- Check this option to include fixlets from a custom site.
-
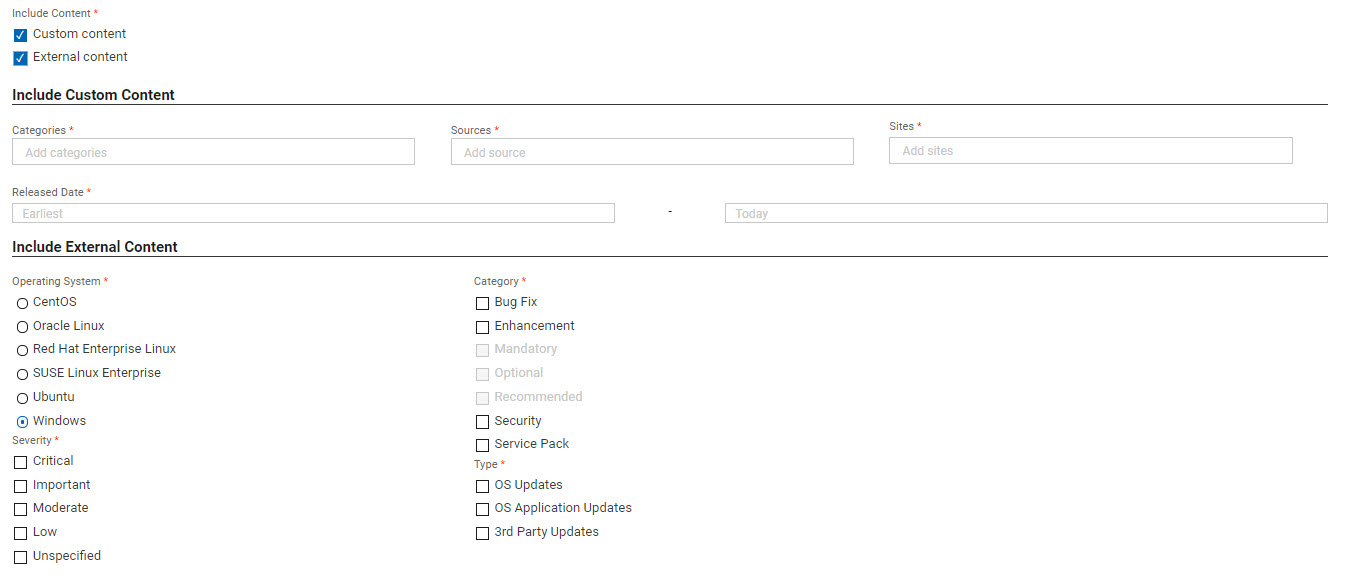
Under Include Custom Content, select the Categories,
Sources, Sites, and Release Dates from the
drop-down that the new policy must include.
Note: Custom fixlets must include the above fields in order to be included in the policy.
External content- Check this option to include fixlets from an external site.
- Under Include External Content, select one or more items from each column.
- Operating System (choose one): CentOS, Oracle Linux, Red Hat Enterprise Linux, SUSE Linux Enterprise, Ubuntu, Windows.
- Category: Bug Fix, Enhancement, Security, Service Pack.
- Severity: Critical, Important, Moderate, Low, Unspecified.
- Type: OS Updates, OS Application Updates, 3rd Party Updates.
Note: While creating the patch policy, ensure the following:- Fixlets must have a default action. If not, the Fixlets will not be included in the patch policy.
- Patch policies will only detect Fixlets that has a default action.
- Tasks will not be detected.
- Specify any patch exclusions. Type a keyword or phrase from the patch title in the Exclude Content field, and press Enter to add more. The Exclude Content field is not case-sensitive, so capitalization can be ignored.
- Click Add on the top right corner, a new page is created with list of patches that are included and excluded as highlighted below.
- Specify any patch exclusions. Type a keyword or phrase from the patch title in the Exclude Content field, and press Enter to add more. The Exclude Content field is not case-sensitive, so capitalization can be ignored.
-
Specify Auto-refresh behavior. Use the optional Auto-refresh feature to
automatically include new patch content in your policy. To control update timing
and frequency, set a refresh interval. Auto-refresh is disabled by default.
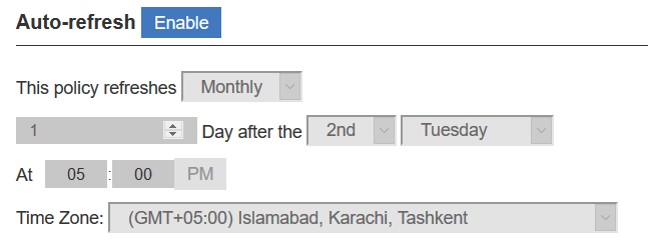
- Frequency (daily, weekly, monthly), on a specific day (of week/month) at (hour).
- Day After: use the optional Day After controls to schedule Auto-refresh updates relative to a monthly event, such as patch Tuesday. The second Tuesday of the month often falls in the second week—but not always. (For example, in August of 2018, Patch Tuesday fell on the 14th.) Use the Day After options to coordinate refreshes with events whose dates change month to month.
- Time Zone: defaults to time zone of logged in user. The default time zone is the one the operator is in.
-
Click Add to save policy settings and display the policy
document. The Schedules and Patches tabs appear at the upper left, beneath the policy name. A policy summary appears on the right. Once established, policy schedules will display on the left. The Edit Policy and Delete Policy controls appear at the lower right.
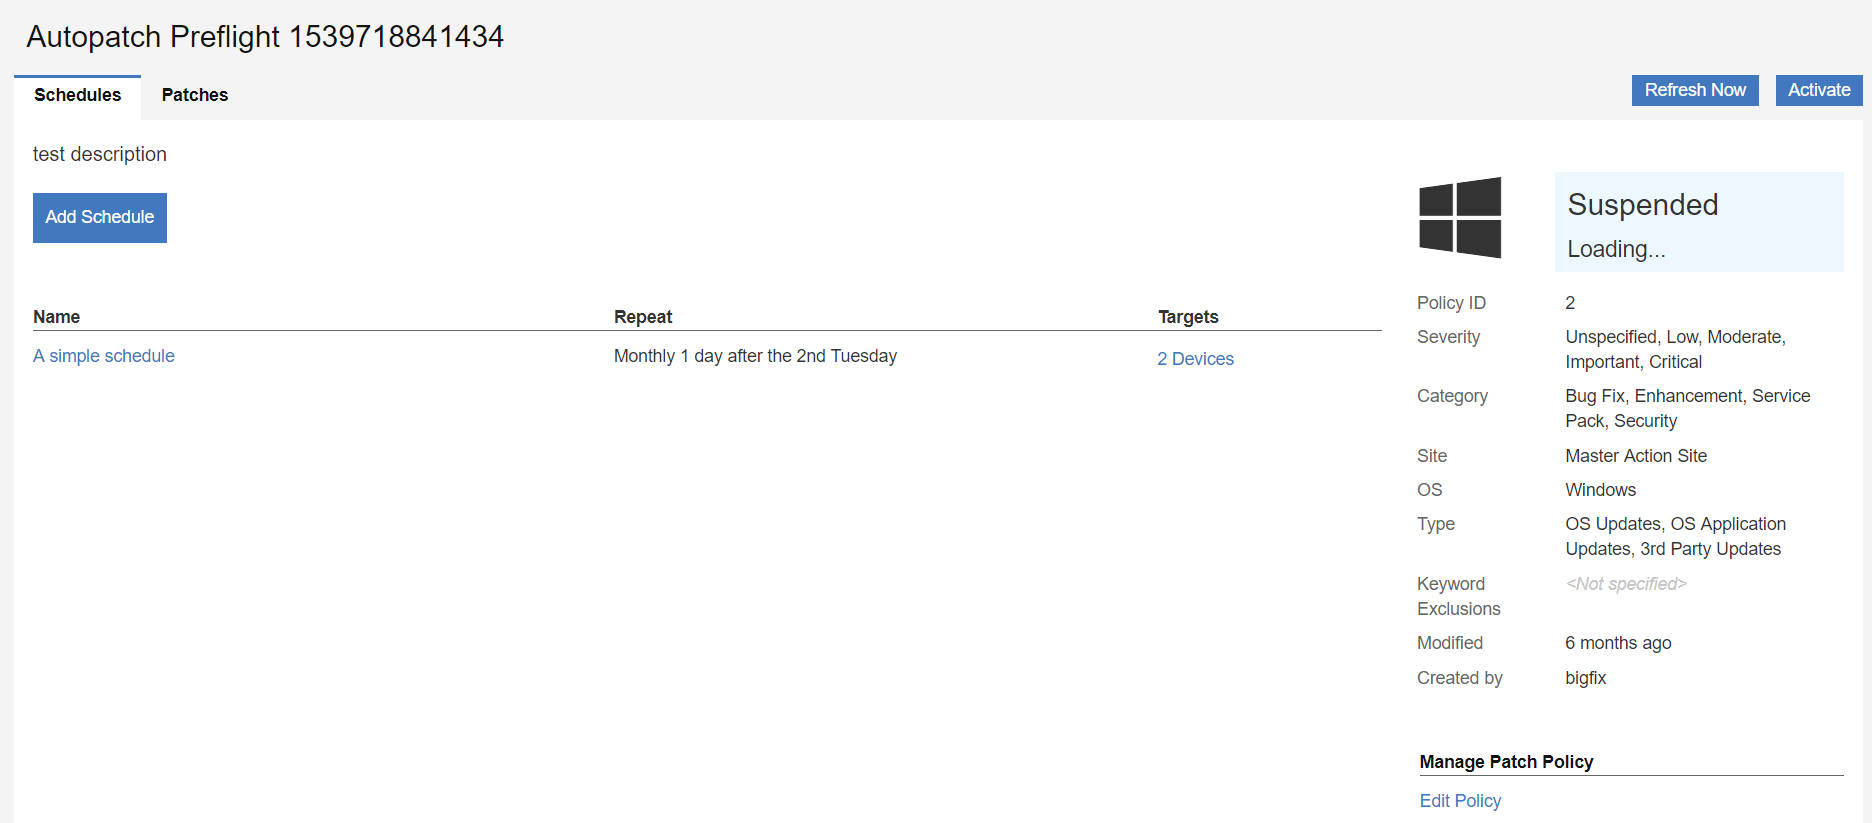
-
Click the Add Schedule button to set policy deployment
timing, behavior, and targets. A policy can have multiple schedules, each with
its own deployment options and targets. A policy without a schedule does not
deploy.
Scheduling adds predictability to patching and can help minimize errors. It also ensures that your environment meets company security policies in time for compliance audits. Some vendors follow a regular patch release schedule, which can tailor your policy schedule to meet. You may want to roll out a policy in a test environment prior to deploying to production. Consider defining separate patch rollouts for Test, QA, and production stages, each with their own timing and duration.Note: Non-Master operators need Create/Edit Schedule and Delete Schedule permissions to add or edit or delete a schedule. For more information on permissions, see The WebUI Permissions Service. Non-Master operators also need write access to the site where the policy is stored to add or edit or delete a schedule.
- Enter a name for the schedule and set the deployment
interval.
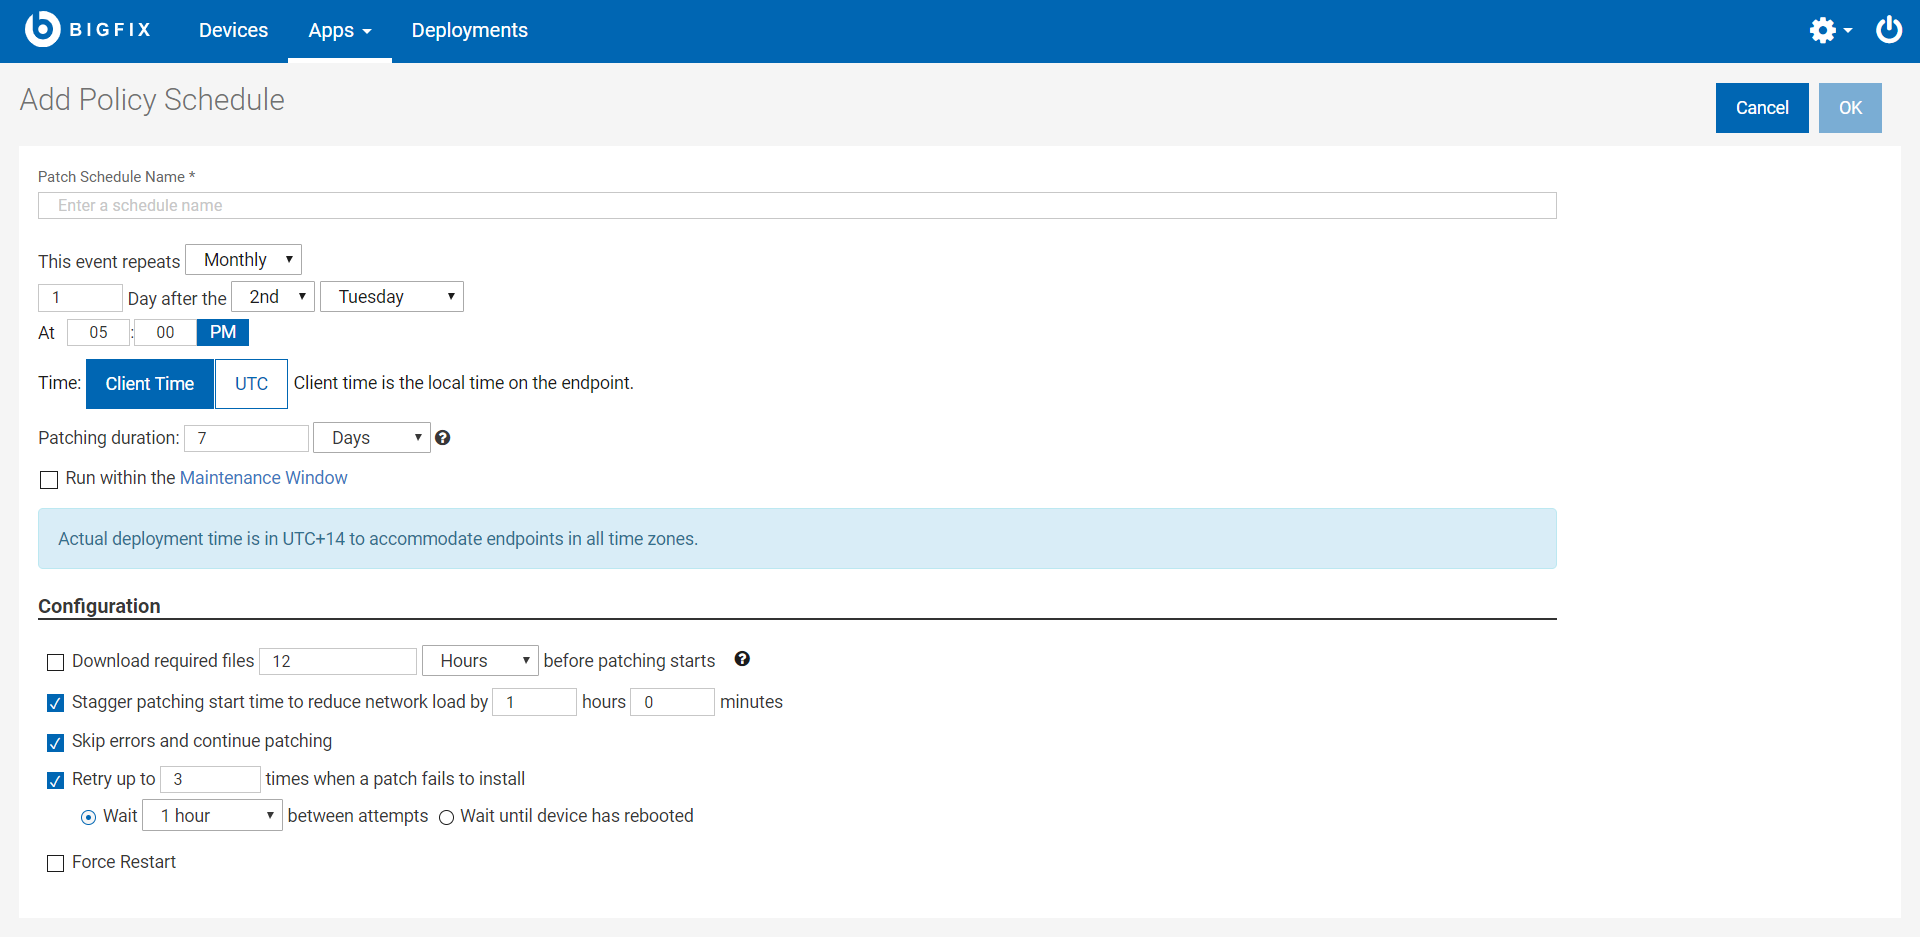
- This event repeats (daily, weekly, monthly), on (day of week/month).
- Day after - Use the optional Day after controls to schedule patching relative to a monthly event, such as Patch Tuesday. The second Tuesday of the month often falls in the second week—but not always. (For example, in August of 2018, Patch Tuesday fell on the 14th.) Use the Day after options to coordinate patching with events whose dates change month to month.
- At (Start time).
- Time Zone. Use Client time to initiate a process relative to its
time zone, for example, to initiate patching in the overnight
maintenance window where each endpoint resides. Use UTC time
when you want all endpoints to act simultaneously across all
time zones.
- Client Time - the local time on each endpoint; the time on the device where the BigFix agent is installed.
- Universal Time - Coordinated Universal Time (UTC) is the global standard used to regulate clocks and time worldwide.
Note: If you specify Client Time, the policy Start time will begin at the specified time in UTC+14 time zone. For more information. See Deployment Time. - Patching Duration (minutes, hours, or days, up to 30 days). The amount of time the policy will attempt to install patches on a target device that is not responding.
- Run within the Maintenance Window - This
option allows you to run patch policies during maintenance
activities. You can use the Maintenance Windows
Dashboard to schedule maintenance activities run by
BigFix. Note: To use this feature, a global In Maintenance Window property must exist.To create the global In Maintenance Window property:
- From the BigFix console, goto Tools > Manage Properties.
- Select In Maintenance Window property from the BES support site, click Make Custom Copy, and then click OK.
- Enter a name for the schedule and set the deployment
interval.
-
Set deployment and post-deployment behavior.
- Pre-caching: To download required files before patching starts, set the in minutes, hours, or days up to 5 days.
- Stagger patching start time, for example, to reduce network load. Set an unlimited number of minutes or hours.
- Bypass patch errors and continue patching. Patch policies are Multiple Action Groups (MAGs). MAGs run sequentially and stop on the first action that fails. Use the Bypass patch errors option to ignore failures and proceed to the next action. Use this option when the actions in a MAG do not depend on the actions that precede them. For more information about policies and Multiple Action Group (MAG) processing, see Monitoring Deployed Policies.
- Retry up to n times (unlimited). If a patch fails to install on a
device, for example, due to lack of space on the hard drive, set a retry
value and the wait period between attempts.
- Wait n (minutes, hours, up to 30 days) between attempts to install.
- Wait until device has rebooted to install.
- Force a Restart - Force a restart on completion. Notify device owners when a restart is required and provide options for restarting at a convenient time. (1, 7, 15 days). Use the default message or type in your own.
- Click OK to save the schedule and return to the policy document.
-
The new schedule appears at the top of the list. Click Add
Targets.
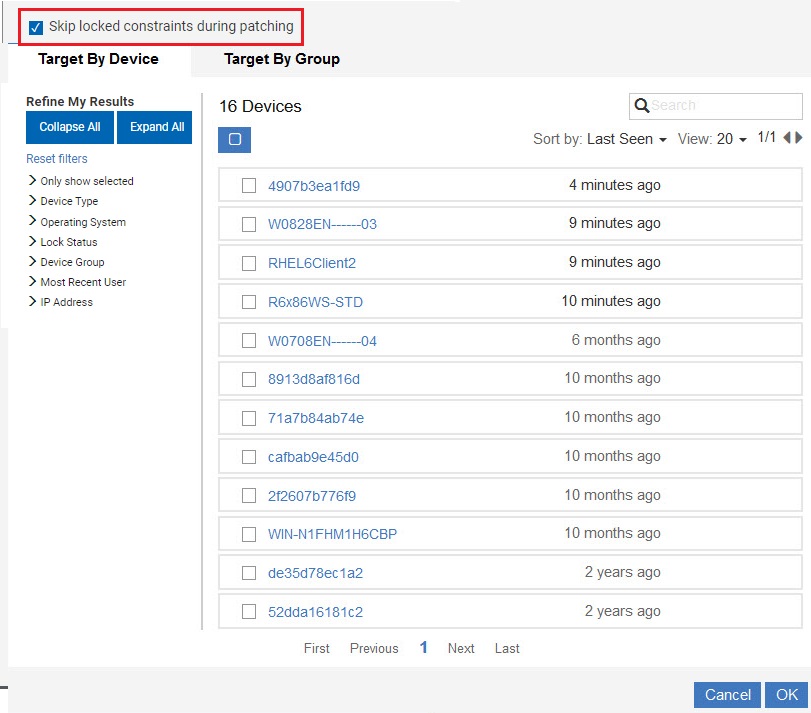 Skip locked constraints during patching: Use this feature to deploy patches to locked devices without having to unlock the device. This option is only available to an operator with console lock or unlock permissions, and only applies to targets added by that operator. For information on lock permission, see Can Lock - Adding Local Operators.Note: Non-Master operators need Add/Remove Your Own Targets permission to add or remove the self created targets. Non-master operators need Remove Other Operator's Targets permission to delete the targets that are created by other operators. Non-Master operators can target only the permitted number of devices and cannot exceed the limit. In case of violation, WebUI app will display an error message and the non-master operators cannot proceed further. For more information on permissions, see The WebUI Permissions Service. Non-Master operators need read access to the site where the policy is stored to add/remove the targets.
 - Select devices or computer groups from the Target By Device or Target By Group tabs. Note that you cannot target both devices and groups in a single schedule. A schedule without targets does not deploy. Use the Sort, Search, View, and filter controls to find targets quickly. Click anywhere in a card to select or deselect it. Click a device or group name to open its document. Use your browser’s Back button to return to the Patch Policy app.
- Click OK to save targets and return to the Policy document.
-
To set a manual exclusion, click the Patches tab.
- Check the Exclude box next to patches you want to exclude. The Exclude button tallies your selections.
- Click the Exclude button.
-
When you are ready, click Activate to activate the
policy and commence patching. Activating a policy activates each of its
schedules. Suspend an active policy at any time to halt patch deployment.
To monitor policy-based patching activity, use the WebUI’s Deployment viewsNote:
If you have specified Client Time in your policy schedule, the policy start time will be the specified client time in UTC+14 time zone after activating the policy. This is to ensure that clients in all time zones will be receiving the policy at the specified time.
In WebUI, the start time will be displayed in browser time, after the policy is activated.
- Client time = The time on the endpoint receiving the policy.
- Browser time = The time on the machine on which the browser resides.
The following calculation can be used to convert from UTC+14 time to your browser’s time:- Start_time (in browser time) = <specified_client_time> - 14 hrs + <utc_hour_offset_for_browser_timezone> hrs
ExampleYou have specified a Client Time of 5 AM, because you want the policy to be executed at 5 AM in each endpoint’s timezone, that is 5 AM PST, 5 AM EST, 5 AM IST, etc. This means the policy action will be issued at 5 AM in the UTC+14 time zone but the policy will not execute on a client endpoint until it is 5 AM in the client’s local time.
Consider your browser is in Pacific Daylight Time (PDT). PDT is UTC-7, therefore the UTC offset here is -7.
Start time in PDT = 5 AM – 14 hours + (-7 hours) = 5 AM – 21 hours = 8 AM PDT.
Now let us consider that your browser is in Indian Standard Time (IST). IST is UTC+5:30 so the UTC offset here is +5:30.
Start time in IST = 5 AM – 14 hours + (5:30 hours) = 5 AM – 8:30 hours = 20:30 IST or 8:30 PM IST.