Resuming a stopped or failed interactive installation
You can rerun the interactive installation during the pre-installation and installation stages. You can also use a built-in function to diagnose problems during the installation of the BigFix Inventory server.
About this task
- You can remove the installation directory before you restart the installation
- You can use a built-in function to diagnose and fix the problem
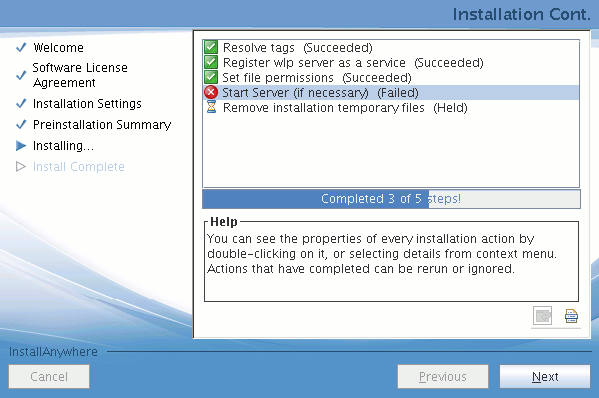
Some configuration steps in the installation depend on other steps. If one of them fails, the execution of the dependent step is also held. If an error occurs, the installation wizard continues running steps that do not depend on the failed one. You can see the list of prerequisites for any step in the step properties dialog. To open the dialog, double-click the step, or right-click it and select Details.
You can continue the installation and fix the problem at the end of the installation. You can also end the installation and resolve the problem later, at a convenient time. It is not necessary to specify any special options. It is enough to run the installation wizard again. It detects that the previous configuration attempt failed or was interrupted and starts automatically in resume mode.
If you exited the installation wizard, run it again. It automatically starts the configuration.
Procedure
- If you encounter a problem, double-click the line that
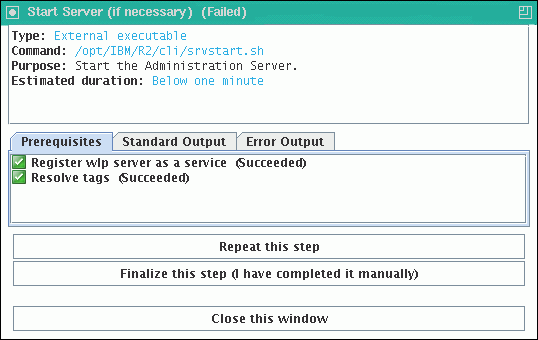
contains the step name, or right-click it and select Details. The line is indicated by a red icon.
-
Review the most important information that is displayed in the top. If a dedicate log file
exists, its location is shown.
-
Review the information that is shown on the Standard Output tab or, if
applicable, on the Dedicated Log tab to determine the cause of the
problem.
Important: To reduce the performance load on the computer, the function that captures the dedicated log file runs with the lowest possible priority. Thus, the Dedicated Log tab does not always present the most recent and detailed information. What is more, the end of the log file might not be shown. If a failure occurs, check either the dedicated log whose location can be found in the step description, or the msg_server.log file.
- Fix the problem.
- On the installation panel, right-click the line that shows
the problem, then click .
The installer completes the step and the remaining dependent steps. If you run the failed step outside the installation wizard, mark the step as completed successfully.Note: If you cannot diagnose the problem and rerun the step manually, uninstall the product and try to install it again.
- Click Next. The Postinstallation Summary opens with information about installed components.