Performing initial configuration on Linux
During the initial configuration, you create a BigFix Inventory database and the application administrator. You also set up a connection to the BigFix server and database. Optionally, you can configure a connection to the Web Reports database to give the Web Reports users access to BigFix Inventory.
Before you begin
- Ensure that the DB2 user has the following permissions. These permissions apply only if the
databases were installed with default settings, and all customizations and hardening configurations
were consulted with BigFix support.
- For the BigFix database (BFENT): DBAUTH
- For the Web Reports database (BESREPOR): DATAACCESS
- To reuse DB2 that you installed for BigFix
with BigFix Inventory, increase the number of active
databases to at least 3. To increase the number, log in as the DB2 instance owner, and run the
following command. Then, restart the database server.
db2 update dbm cfg using NUMDB number_of_active_databases
Procedure
-
Create the BigFix Inventory database.
- If the DB2 server is installed on the same computer as the BigFix Inventory server, perform the following steps.
- Select The application and the database are on the same computer. The host name, port number, and the default name of the database are filled in automatically. If you want to specify a different name of the database, you can choose any name that meets the DB2 naming requirements.
- Provide credentials of the operating systems user that will be used for connecting to the
database. The user can be an instance owner.Tip: Create a dedicated user for connecting to DB2.
- To create the database, click Create.
- If the DB2 server is installed on a different computer than the BigFix Inventory server, perform the following steps.
- Clear The application and the database are on the same computer check box.
- Provide the host name and port number of the computer where the DB2 server is installed, and specify the name for the application database. You can use the default name or choose any name that meets the DB2 naming requirements.
- Provide credentials of the operating systems user that will be used for connecting to the
database. The user can be an instance owner.Tip: Create a dedicated user for connecting to DB2.
- To download a script that is used for creating the database, click Download Script.
- Move the script to the computer where the DB2 server is installed and run it. The script creates
a database that can be accessed by the user that you specified in substep c.Important: The user who runs the script must have the
SYSADMauthority. You can use the DB2 instance owner. - When the database is created, return to the computer on which you are configuring BigFix Inventory, and click Create.
- If the DB2 server is installed on the same computer as the BigFix Inventory server, perform the following steps.
-
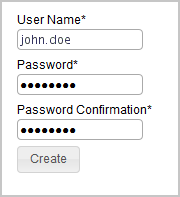
Create the administrator of BigFix Inventory.
Tip: Avoid using admin, administrator, root or a similar name for the administrative account. Such an account might be prone to hacker attacks and locked out if an attacker exceeds the specified number of failed login attempts. For more information, about the account lockout, see: Configuring user account lockout.
- Optional:
To automatically enable scans that collect data from
the computers in your infrastructure, select Enable default scan schedule for this data
source.
If you enable the default scan schedule, actions that are needed to collect data from the computers in your infrastructure are automatically started on the BigFix server. This option is advised for environments with up to a few thousand computers. For larger environments, finish the installation, divide the computers into groups, and then manually set up scan schedule for each group to avoid performance issues. For more information about the default and manual scan schedule, see: Setting up scans to discover software and hardware inventory.
-
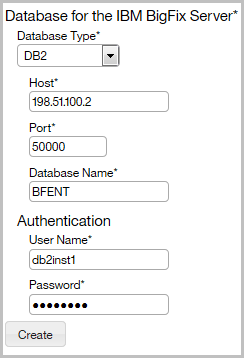
Configure the connection to the BigFix
database. The database stores information about the computers and data that was discovered on these
computers. Specify the host, port, database name, and credentials of the user that can access the
BigFix database.
-
Configure the connection to the BigFix
server. The host name or IP address, and the API port number are automatically retrieved from the
database. Specify only the administrative user that you created during the installation of BigFix.
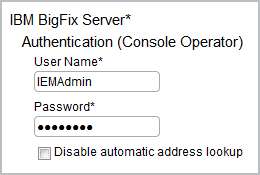
Note: If you do not want to provide the Master Operator, you can create a dedicated BigFix user that fulfills the following requirements:- Is assigned the BigFix Inventory v9 site
- Is assigned computers that you are going to monitor, and the computer where the BigFix server is installed
- Has the following permissions: Can use REST API, Can use Console, Custom Content, Can Create Actions
- Optional: If the BigFix and BigFix Inventory servers are in separated networks, the automatic address lookup might return incorrect address. To disable the lookup, select Disable automatic address lookup, and specify the address manually. Then, configure additional environment variables on the BigFix Inventory server. For more information, see: Configuring servers in separate networks.
- Optional:
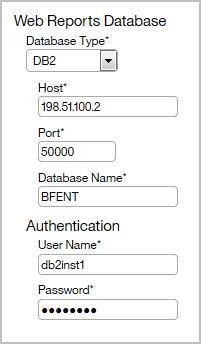
Configure the connection to the Web Reports database. Specify the database type, host name,
database name, and credentials of the Web Reports database user.
-
To create connections to the databases, click Create.
When the connections are created and configured, a new page opens and a message about the data import is displayed.
- Optional: If your environment consists of more than 50 000 endpoints, complete steps to enhance the application performance before you run the import.
-
To run the initial import, click Import Now.
The import might take a few hours, depending on your hardware capacity.
What to do next
If you did not enable the default scan schedule, manually configure scans to collect data that is later on displayed on the reports.