Custom template tutorial
This section describes how to make a simple custom template.
About this task
In this section we will create a simple custom template for generating a table of remediation tasks for all issues discovered during the scan. The template output will have the structure shown below, though obviously the actual data will depend on the scan you use when generating the report.
| Index | Name | Count | Priority |
|---|---|---|---|
| 1/2 | RemediationTaskA | 4 | High |
| 2/2 | RemediationTaskB | 2 | High |
| 1/3 | RemediationTaskC | 5 | Medium |
| 2/3 | RemediationTaskD | 2 | Medium |
| 3/3 | RemediationTaskE | 7 | Medium |
| 2/2 | RemediationTaskF | 3 | Low |
High priority tasks will be listed first, followed by Medium and then Low. For each task the table will indicate the task Index (e.g. 1/n), Name, Count (number of issues that the task applies to), and its priority.
Procedure
- Open the list of valid merge fields by clicking Tools > Report > Template based > View Field Reference. You will need this as a reference from which to copy field names.
- Open an MS Word document, type in the heading "Remediation Tasks", and save it.
- Create the table header: Create a table with 4 columns and 1 row and type in the headers "Index", "Name", "Count", and "Priority".
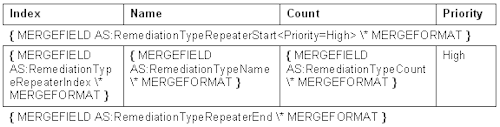
- Add the fields that will generate the High priority
entries in the table:
The High priority section of the table is now complete. It will produce multiple rows of data: one for each High priority remediation task in your scan results. Your document should now look like this:
- Repeat Step 4 for Medium and Low priority tasks (in the
Priority column, type "Medium" and "Low" respectively). Make sure
that each table row (High, Medium and Low) has a Start merge field
before it and an End merge field after it, as shown in the image below.
Note: The field content of the three rows is the same, so you can copy-and-paste the "High" priority row in between the Start and End tags for Medium and Low priority tasks, simply changing the text in the "Priority" column.Note: Since the Name column will contain text strings, while the Index, Count and Priority columns will contain only numbers or a short word, you may want to adjust the column widths with this in mind.

- Add explanatory text and apply any formatting to the rest of the document as required.
- Save the file.
- To create a report using this template, see Importing a custom template