Configuring Microsoft ADFS for SAML-SSO in AppScan Enterprise
You can configure the Active Directory Federation Service (ADFS) for user authentication through SAML-SSO login method. ADFS allows users across organizational boundaries to access applications on Windows Server Operating Systems using a single set of login credentials. ADFS uses a claims-based access control authorization model to maintain application security and implement federated identity.
Before you begin
- You must have an Active Directory domain administrator account.
- You must have a publicly trusted certificate for SSL server authentication for configuring ADFS.
- You must have completed the following tasks:
- Installed the AppScan Enterprise 10.0.8 on your system using Active Directory. See Installing.
- Configured the SAML properties file with the Sign-On URL and SP Entity ID. See Enabling SAML Service Provider.
Procedure
-
Go to Service Manager > Tools > ADFS management, select
Add Relying Party Trust, and complete the following steps:
- Select Claims Aware, and click Next.
- In Select Data Source, select Enter data about the replying partner manually, and click Next.
- In Specify Display Name, type Display Name as in ASE (any name), and click Next.
- In Configure Certificate, click Next.
- In Configure URL:
- Select Enable support for the SAML 2.0 WebSSO protocol
- In the Relying party SAML 2.0 SSO service URL field, enter:
https://<host_name>:<port_number>/<ase_instance_name>/api/saml - Click Next.
- In Configure Identifier:
- Enter the Relying party trust identifier
as:
https://<host_name>:<port_number>/<ase_instance_name>/metadata.jsp - Select Add.
- Click Next.
- Enter the Relying party trust identifier
as:
- In Choose Access Control Policy, select Permit Everyone, and click Next.
- In Ready to Add trust, go to the Advanced tab and verify that Secure hash algorithm is "SHA-256".
- Click Finish.
-
Claims configuration:
- Select the Relying party display name (for example ASE), and click on Edit Claim Issuance Policy.
- In Edit Claim Insurance Policy, select Add Rule.
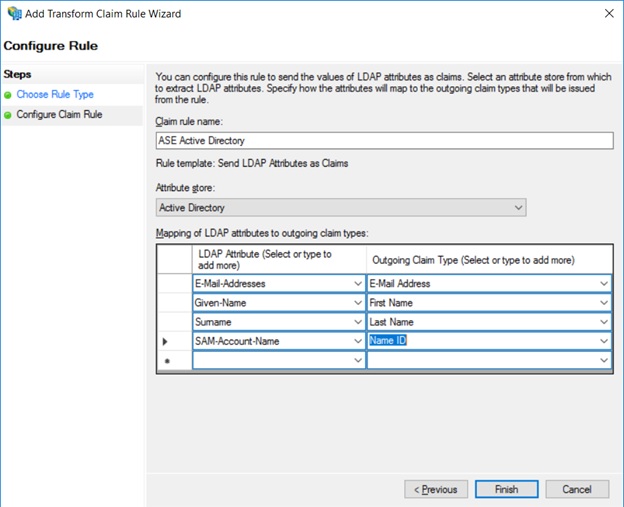
- In the Choose Rule Type screen, for Claim Rule Template, select Send LDAP Attribute as Claims, and then click Next.
- In Configure Claim Rule, provide the Claim rule name (example: "ASE Active Directory").
- In Attribute Store, select Active Directory.
- Map the SAM-Account-Name attributes to Name
ID, as shown below.
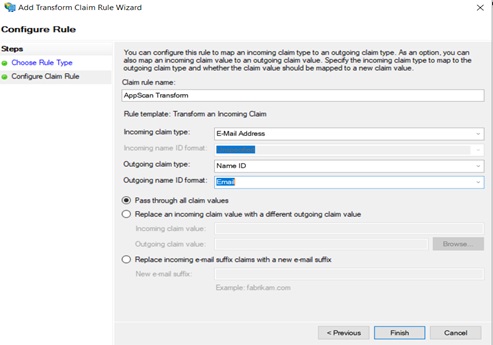
- Select Edit Claim Insurance Policy again, and in Choose
Rule Type, select Transfer an Incoming Chain.

- In Configure Claim Rule, type in a name for the rule, and the
following details:
- Incoming claim type: Email address
- Outgoing claim type: Name ID
- Outgoing Name ID format: Email
- Select Pass through all claim values, and click
Finish.