Configuring a security scan using scan properties in AppScan Enterprise

Security scans should be performed in a preproduction environment, such as on a staging or Quality Assurance server. Doing so helps you contain the risks associated with performing security scans. Your preproduction environment should mirror the production environment as much as possible; the application should have the same executable files in both environments so that you know you are thoroughly testing your exposed applications. Security scans should also be integrated into your Software Development Life cycle (SDLC) process so that you can catch security issues before they make their way into your production environment.
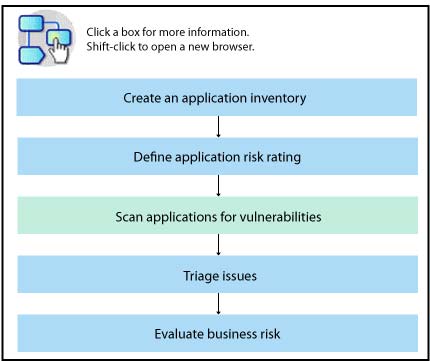
ASE Workflow ScanClick this area to get information about creating an application inventoryDetermining riskClick this area to get information about triaging issuesClick this area to get information about evaluating business risk

Before you begin

  1. Ensure the application is in a development or testing environment.
  2. Establish a time window with the owners of the application (developers or QA) for scanning the application. The application must be up and running and stable for the time period you will be scanning it with AppScan® Enterprise Server. There should not be any changes being made to the application during scanning.
  3. Decide upfront whether you want to perform a Manual Explore or an automatic crawl:
    • A Manual Explore means you will be indicating the exact URLs for the scan to test in the configuration (the scan will not automatically crawl to discover new URLs). Use this method for web applications that require a lot of user interaction to navigate the application or if you would like to just test a specific area of your application.
    • An automatic crawl means you will be configuring the scan to automatically discover more URLs to test in your web application. Use this method for an application that has a lot of static links and does not require a lot of user interaction.

Procedure

  1. On the What to Scan page, enter the starting URL of the application and click Add. Note the 'Status' column when you add the starting URL. If there is a green check mark, AppScan Enterprise Server is able to access the web application. If you see a Warning instead, this might be a sign that you need to enter in proxy settings or additional authentication for AppScan Enterprise Server to access the web application. Click Retest.
  2. If the web application needs specific proxy setting or additional authentication, go to the Connections page in the job properties, select Proxy > Use custom proxy settings, and enter the proxy settings.
  3. If the web application requires additional Platform Authentication, select Scan pages requiring authentication in the Platform Authentication section, and enter the user name and password or select the service account option instead.
  4. If your web application contains an HTML login, go to the Login Management page to record the login. Click Recorded > Record Login.
    1. The web application will launch in a recording browser. Simulate your login and close the browser window.
    2. After recording the login and closing the popup window, the URLs that you encountered during the login will be listed on the Login Sequence URLs page. Click Save to save the sequence. The URLs should be listed in the Login Management page.
    3. Select a URL from the list and click View HTTP request (View HTTP Request) icon.
      Note: This will show you the full HTTP request that was recorded for that URL. Look for the cookies that were sent in the HTTP Request. These are identified in the line 'Cookie'. For the security tests to be successful during the scan, all session cookies that the web application uses must be identified. By looking at this line in the recorded login HTTP request, you can get an idea of what the web application's session cookie names are. Not all the cookies in this line will necessarily be session cookies. Sometimes you might need to consult with the developers of the web application. Session cookies typically contain 'session' or 'id' but on some occasions they do not. By default, AppScan Enterprise will automatically identify many session cookie names.
  5. If you have identified any session cookie names that were missed by AppScan Enterprise, you must configure the session cookie names in the scan. There are two ways to add a cookie that was missed by AppScan Enterprise. Go to the Parameters and Cookies page:
    1. Select the cookies or parameters you want to track and click the "Track" button on the Edit Parameters and Cookies page.
    2. Click Add ( icon). Select 'Cookie' as the Type. You can enter a full name or a regular expression as the name. Select Session ID: Track this parameter during scan. AppScan Enterprise Server will track this session cookie and update the value when needed during the scan. Click Done.
  6. If you have any additional forms you need to fill out to configure the scan, go to the What to Scan page. In the Manual Explore section, click Add Existing Item (Add existing items) to launch Manual Explore. You can also use Manual Explore to manually select URLs if you want to restrict your scan to a Manual Explore. The web application will launch in a separate browser window. Simulate any manual navigation or form fill in this window; then close the window and save your form results.
    Note: You can use Manual Explore to:
    • Record any additional functionality that the AppScan Enterprise Server automatic crawler will not get through; for example, form fill or user interaction
    • Restrict your scan to just scan these URLs and functionality you have recorded and not have AppScan Enterprise Server perform an automatic crawl
  7. On the What to Scan page, scroll down to the Additional Servers and Domains list. Review this list and if there are any domains that you do not want the automatic crawler to explore during the scan, remove them.
    Note: If there are domains that are not included in the Server Group associated with your test policy, those domains are not tested. Click Show Test Policy Details on the Security page to see the server groups and the URLs or IP addresses that are applicable to the chosen test policy. There is no indication that unauthorized URLs are not tested, except that those domains do not have results in any reports that are based on this job. Ensure that your starting URLs are included in the server groups associated with the test policy you choose.
  8. On the Security page, enter your security test options:
    • Keep the JavaScript Analyzer check box selected if you want to perform static JavaScript™ analysis to detect a range of client-side issues, primarily DOM-Based Cross Site Scripting. See How JavaScript source code analysis works.
    • If you are scanning a web application that will lock a user out after multiple failed login attempts, clear the Include tests on login and logout pages check boxes. This will prevent AppScan Enterprise Server from getting locked out during the scan.
    • Select a Security Test Policy.
      Note: You can only choose tests based on the test policy or policies that have been assigned to you by the Product Administrator. If you did not create this job, then it can only perform tests that are associated with the Job Administrator who created it. However, you can change the test policies available to you and the tests it can perform by taking ownership of the job (Job Properties page of the job).
  9. Go to the Explore Options page:
    1. If you want the scan to perform an automatic scan and find additional URLs, select Apply no page limits.
    2. If you want the scan to only explore and test your recorded login and manual explore, select Specified URLs limit.
    3. If you are performing an automatic crawl, and your web application uses JavaScript to dynamically build URLs, select Execute JavaScript to discover URLs and dynamic content.
  10. Click Save to save your options and exit the job properties.